Sony CDX-M800 Operating Instructions - Page 12
Labeling a CD, — Disc Memo (For a CD unit with the CUSTOM FILE function)
 |
View all Sony CDX-M800 manuals
Add to My Manuals
Save this manual to your list of manuals |
Page 12 highlights
Labeling a CD - Disc Memo (For a CD unit with the CUSTOM FILE function) You can label each disc with a custom name (Disc Memo). You can enter up to 8 characters for a disc. If you label a CD, you can locate the disc by name (page 13). 1 Start playing the disc you want to label in a CD unit with the CUSTOM FILE function. 2 Press (MENU), then press M or m repeatedly until "Name Edit" appears. 3 Press (ENTER). The unit will repeat the disc during the labeling procedure. 4 Enter the characters. 1 Press M*1 repeatedly to select the desired character. A t B t C ... t 0 t 1 t 2 ... t + * t - t ... t *2 t A *1 For reverse order, press m. *2 (blank space) 2 Press , after locating the desired character. If you press
-
 1
1 -
2
-
3
-
4
-
5
-
6
-
 7
7 -
 8
8 -
 9
9 -
 10
10 -
 11
11 -
 12
12 -
 13
13 -
 14
14 -
 15
15 -
 16
16 -
 17
17 -
18
-
19
-
20
-
21
-
22
-
23
-
24
-
25
-
26
-
27
-
28
-
29
-
30
-
31
-
32
-
33
-
34
-
35
-
36
-
37
-
38
-
39
-
40
-
41
-
42
-
43
-
44
-
45
-
46
-
47
-
48
-
49
-
50
-
51
-
52
-
53
-
54
-
55
-
56
-
57
-
58
-
59
-
60
-
61
-
62
-
63
-
64
-
65
-
66
-
67
-
68
-
69
-
70
-
71
-
72
-
73
-
74
-
75
-
76
-
77
-
78
-
79
-
80
-
81
-
82
-
83
-
84
 |
 |

12
Labeling a CD
— Disc Memo (For a CD unit with the
CUSTOM FILE function)
You can label each disc with a custom name
(Disc Memo). You can enter up to 8 characters
for a disc. If you label a CD, you can locate the
disc by name (page 13).
1
Start playing the disc you want to label
in a CD unit with the CUSTOM FILE
function.
2
Press
(MENU)
, then press
M
or
m
repeatedly until “Name Edit” appears.
3
Press
(ENTER)
.
The unit will repeat the disc during the
labeling procedure.
4
Enter the characters.
1
Press
M
*
1
repeatedly to select the
desired character.
A
t
B
t
C
...
t
0
t
1
t
2
...
t
+
t
–
t
*
...
t
*
2
t
A
*1
For reverse order, press
m
.
*2
(blank space)
2
Press
,
after locating the desired
character.
If you press
<
, you can move back to the
left.
3
Repeat steps
1
and
2
to enter the
entire name.
5
To return to normal play mode, press
(ENTER)
.
Tips
•
Simply overwrite or enter “
” to correct or erase a
name.
•
There is another way to start labeling a CD: Press
(LIST)
for 2 seconds instead of performing steps 2
and 3. You can also complete the operation by
pressing
(LIST)
for 2 seconds instead of step 5.
•
You can label CDs on a unit without the CUSTOM
FILE function if that unit is connected along with a
CD unit that has the function. The Disc Memo will be
stored in the memory of the CD unit with the
CUSTOM FILE function.
Note
Repeat/shuffle play is suspended until the Name Edit
is complete.
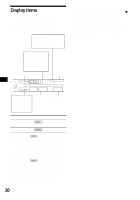
Viewing the Disc Memo
As a display item, the Disc Memo always takes
priority over any original CD TEXT information.
Tip
To find out about other items that can be displayed,
see page 10.
Erasing the Disc Memo
1
Press
(SOURCE)
repeatedly to select
“CD.”
2
Press
(MODE)
repeatedly to select the
CD unit storing the Disc Memo.
3
Press
(MENU)
, then press
M
or
m
repeatedly until “Name Delete”
appears.
4
Press
(ENTER)
.
The stored names will appear.
5
Press
M
or
m
repeatedly to select the
disc name you want to erase.
6
Press
(ENTER)
for 2 seconds.
The name is erased.
Repeat steps 5 and 6 if you want to erase
other names.
7
Press
(MENU)
twice.
The unit returns to normal play mode.
Notes
•
When the Disc Memo for a CD TEXT disc is erased,
the original CD TEXT information is displayed.
•
If you cannot find the Disc Memo you want to erase,
try selecting a different CD unit in step 2.
•
If you have already erased all of the Disc Memo, the
unit returns to normal play mode in step 4.
To
Press
View
(DSPL)
during CD/CD
TEXT disc playback