Sony CDX-M800 Operating Instructions - Page 20
Selecting the display mode and display image
 |
View all Sony CDX-M800 manuals
Add to My Manuals
Save this manual to your list of manuals |
Page 20 highlights
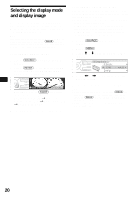
Selecting the display mode and display image You can select from 3 different display modes. You can also select various display images in Wallpaper mode (1-2), Spectrum analyzer mode (1-5) and Movie mode (1-3). Note The default setting of Auto Image mode is "A.IMG-All." After a few seconds of releasing (IMAGE), the unit returns to Auto Image mode. If you want to display a display image, set to "A.IMG-off" (page 20). Selecting the display image 1 Press (SOURCE) to select a desired source. 2 Press (IMAGE) on the unit repeatedly to select the desired display image. Example: Wallpaper mode Each time you press (IMAGE), the display image changes as follows: Wallpaper mode 1-2 t Spectrum analyzer mode 1-5 t Movie mode 1-3 t normal play mode To cancel this mode, select normal play mode. Selecting the Auto Image mode Auto Image mode automatically steps (every 10 seconds) through the display images of one or all display modes as follows: • A.IMG-All - to shuffle repeatedly the display images in all display modes. • A.IMG-Sa - to step repeatedly through the display images of Spectrum analyzer mode. • A.IMG-Movie - to step repeatedly through the display images of Movie mode. 1 Press (SOURCE) to select a desired source. 2 Press (MENU). 3 Press M or m repeatedly until "A.IMG" appears. 4 Press < or , repeatedly to select the desired setting. To cancel Auto Image mode, select "A.IMG-off." Tips • During Auto Image mode, if you press (IMAGE), the display image will change. After a few seconds of releasing (IMAGE), this unit returns to the former Auto Image setting. • If you set Info mode to off, no display items will appear (page 17). 20
-
 1
1 -
2
-
3
-
4
-
5
-
6
-
7
-
8
-
9
-
10
-
11
-
12
-
13
-
14
-
 15
15 -
 16
16 -
 17
17 -
 18
18 -
 19
19 -
 20
20 -
 21
21 -
 22
22 -
 23
23 -
 24
24 -
 25
25 -
26
-
27
-
28
-
29
-
30
-
31
-
32
-
33
-
34
-
35
-
36
-
37
-
38
-
39
-
40
-
41
-
42
-
43
-
44
-
45
-
46
-
47
-
48
-
49
-
50
-
51
-
52
-
53
-
54
-
55
-
56
-
57
-
58
-
59
-
60
-
61
-
62
-
63
-
64
-
65
-
66
-
67
-
68
-
69
-
70
-
71
-
72
-
73
-
74
-
75
-
76
-
77
-
78
-
79
-
80
-
81
-
82
-
83
-
84
 |
 |
