Sony DAV-DZ170 Operating Instructions - Page 28
Setting the type of video output to match your TV, Press DVD/CD.
 |
UPC - 027242781672
View all Sony DAV-DZ170 manuals
Add to My Manuals
Save this manual to your list of manuals |
Page 28 highlights
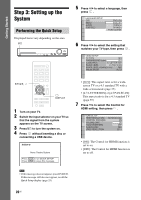
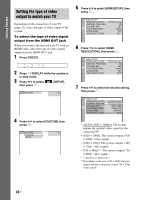
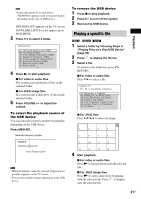
Getting Started Setting the type of video output to match your TV Depending on the connection of your TV (page 22), select the type of video output of the system. To select the type of video signal output from the HDMI OUT jack When you connect the unit and your TV with an HDMI cable, select the type of video signals output from the HDMI OUT jack. 1 Press DVD/CD. 2 Press DISPLAY while the system is in stop mode. 3 Press X/x to select [SETUP], then press . CUSTOM 4 Press X/x to select [CUSTOM], then press . CUSTOM CUSTOM QUICK 5 Press X/x to select [HDMI SETUP], then press . HDMI SETUP HDMI RESOLUTION: CONTROL FOR HDMI: VOLUME LIMIT: YCBCR/RGB(HDMI): AUDIO(HDMI): JPEG RESOLUTION: AUTO(1920x1080p) ON OFF YCBCR OFF SD 6 Press X/x to select [HDMI RESOLUTION], then press . HDMI SETUP HDMI RESOLUTION: CONTROL FOR HDMI: VOLUME LIMIT: YCBCR/RGB(HDMI): AUDIO(HDMI): JPEG RESOLUTION: AUTO(1920x1080p) ON OFF YCBCR OFF SD 7 Press X/x to select the desired setting, then press . HDMI SETUP HDMI RESOLUTION: CONTROL FOR HDMI: VOLUME LIMIT: YCBCR/RGB(HDMI): AUDIO(HDMI): JPEG RESOLUTION: AUTO(1920x1080p) AUTO(1920x1O08F0pF) 1920LxE1V0E8L02i 1280YxC72BC0pR 720x4O80FpF SD • [AUTO (1920 × 1080p)]: The system outputs the optimal video signal for the connected TV. • [1920 × 1080i]: The system outputs 1920 × 1080i* video signals. • [1280 × 720p]: The system outputs 1280 × 720p* video signals. • [720 × 480p]**: The system outputs 720 × 480p* video signals. * i: interlace, p: progressive ** Depending on the area, [720 × 480/576p] may appear and the system may output 720 × 576p video signals. 28US
-
 1
1 -
2
-
3
-
4
-
5
-
6
-
7
-
8
-
9
-
10
-
11
-
12
-
13
-
14
-
15
-
16
-
17
-
18
-
19
-
20
-
21
-
22
-
 23
23 -
 24
24 -
 25
25 -
 26
26 -
 27
27 -
 28
28 -
 29
29 -
 30
30 -
 31
31 -
 32
32 -
 33
33 -
34
-
35
-
36
-
37
-
38
-
39
-
40
-
41
-
42
-
43
-
44
-
45
-
46
-
47
-
48
-
49
-
50
-
51
-
52
-
53
-
54
-
55
-
56
-
57
-
58
-
59
-
60
-
61
-
62
-
63
-
64
-
65
-
66
-
67
-
68
-
69
-
70
-
71
-
72
-
73
-
74
-
75
-
76
 |
 |
