Sony DAV-DZ290K User Manual - Page 26
Setting the type of video output to match your TV, Press FUNCTION repeatedly until - manual
 |
View all Sony DAV-DZ290K manuals
Add to My Manuals
Save this manual to your list of manuals |
Page 26 highlights
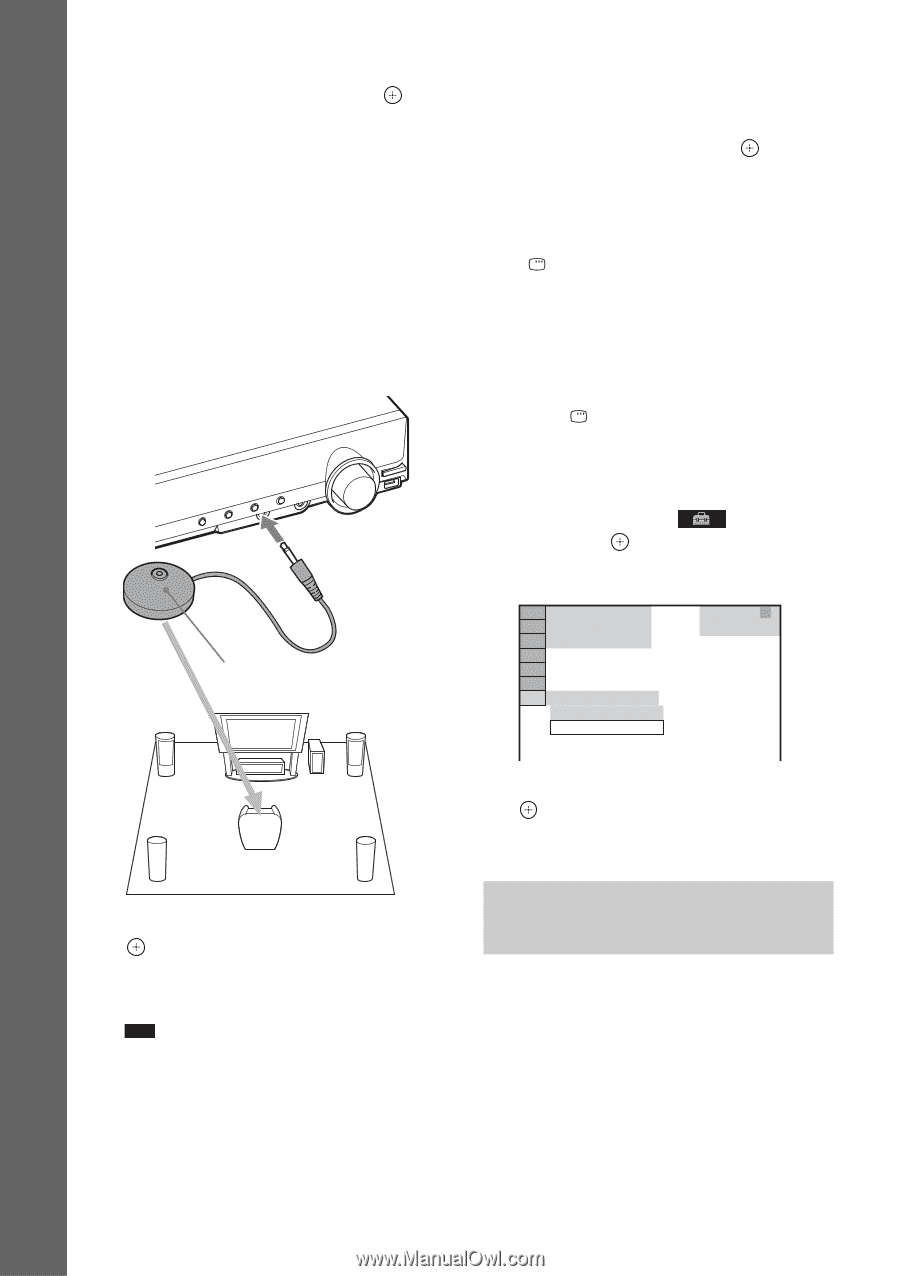
Getting Started 8 Press C/c to select the speaker formation image as the speakers are actually positioned, then press . For details, see "Getting Optimal Surround Sound for a Room" (page 77). 9 Connect the calibration mic (supplied) to the A.CAL MIC jack on the front panel. Set up the calibration mic at ear level using a tripod, etc. (not supplied). The front of each speaker should face the calibration mic, and there should be no obstruction between the speakers and the calibration mic. Calibration mic from the status of the speaker installation, perform the speaker settings manually by following "Settings for the speakers" (page 56). 11 Unplug the calibration mic, press C/c to select [YES], then press . Quick Setup is finished. All connections and setup operations are complete. To quit the Quick Setup Press DISPLAY in any Step. To recall the Quick Setup display 1 Press FUNCTION repeatedly until "DVD" appears in the front panel display. 2 Press DISPLAY while the system is in stop mode. The Control Menu display appears on the TV screen. 3 Press X/x to select [SETUP], then press . The options for [SETUP] appear. 94( 99) 1( 1) T 0: 01: 08 DVD VIDEO CUSTOM CUSTOM QUICK 4 Press X/x to select [QUICK], then press . The Quick Setup display appears. 10 Press C/c to select [YES], then press . [AUTO CALIBRATION] starts. Be quiet during the measurement. Note • Loud test sounds are output when [AUTO CALIBRATION] starts. You cannot turn the volume down. Give consideration to children and neighbors. • The environment of the room in which the system is installed may affect measurements. When the measurements differ considerably 26GB Setting the type of video output to match your TV Depending on the connection of the TV (page 18), select the type of video output of the system. To select the type of video signal output from the HDMI OUT jack When you connect the unit and the TV with an HDMI cable, select the type of video signals output from the HDMI OUT jack.
-
 1
1 -
2
-
3
-
4
-
5
-
6
-
7
-
8
-
9
-
10
-
11
-
12
-
13
-
14
-
15
-
16
-
17
-
18
-
19
-
20
-
 21
21 -
 22
22 -
 23
23 -
 24
24 -
 25
25 -
 26
26 -
 27
27 -
 28
28 -
 29
29 -
 30
30 -
 31
31 -
32
-
33
-
34
-
35
-
36
-
37
-
38
-
39
-
40
-
41
-
42
-
43
-
44
-
45
-
46
-
47
-
48
-
49
-
50
-
51
-
52
-
53
-
54
-
55
-
56
-
57
-
58
-
59
-
60
-
61
-
62
-
63
-
64
-
65
-
66
-
67
-
68
-
69
-
70
-
71
-
72
-
73
-
74
-
75
-
76
-
77
-
78
-
79
-
80
-
81
-
82
-
83
-
84
-
85
-
86
-
87
-
88
-
89
-
90
-
91
-
92
-
93
-
94
-
95
-
96
-
97
-
98
-
99
-
100
-
101
-
102
-
103
-
104
-
105
-
106
-
107
-
108
-
109
-
110
-
111
-
112
-
113
-
114
-
115
-
116
-
117
-
118
-
119
-
120
 |
 |