Sony DCR-HC46 Operating Guide - Page 67
Dv Out Dcr-hc96, Video Input Dcr-hc96, Tv Type Dcr-hc46/hc96, Usb Camera, Disp Guide
 |
UPC - 027242688742
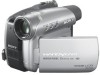
View all Sony DCR-HC46 manuals
Add to My Manuals
Save this manual to your list of manuals |
Page 67 highlights
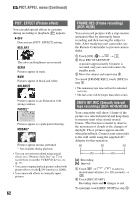
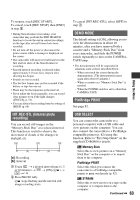
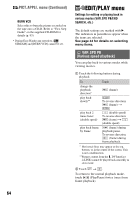
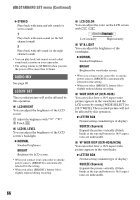
A/V t DV OUT (DCR-HC96) When you set [A/V t DV OUT] ( ) to [ON], you can convert analog signals to digital by connecting a digital device and an analog device to your camcorder. See page 97 for details. VIDEO INPUT (DCR-HC96) Selects the video plug to connect when you input the picture from the other device via A/V connecting cable. B VIDEO Connects via video plug of the A/V connecting cable. S VIDEO Connects via S VIDEO plug of the A/V connecting cable with S VIDEO cable. TV TYPE (DCR-HC46/HC96) See page 43. USB CAMERA When you set [ STREAM] and connect your camcorder to your computer via the USB cable, you can view the picture your camcorder is currently seeing on your computer like a live camera. You can also import the picture to your computer. Refer to the "First Step Guide" on the supplied CD-ROM for details (p. 93). DISP GUIDE See page 21. GUIDEFRAME (DCR-HC96) You can display the frame and check that the subject is horizontal or vertical by setting [GUIDEFRAME] to [ON]. The frame is not recorded. Press DISP/BATT INFO to make the frame disappear. • Pointing the subject at the cross point of the guide frame makes a balanced composition. DATA CODE During playback, displays information (data code) recorded automatically at the time of recording. B OFF Data code is not displayed. DATE/TIME Displays the date and time. CAMERA DATA (below) Displays camera setting data. 6 0 min 1 0 : 0 0 : 0 0 : 0 0 2 6 5 AUTO 100 AWB F1. 8 9 dB 3 4 A SteadyShot off B Exposure C White balance D Gain E Shutter speed F Aperture value • Camera setting data does not appear when movies on a "Memory Stick Duo" are played back. • The exposure adjustment value (0EV), a shutter speed, and the aperture value appear when still images on a "Memory Stick Duo" are played back. • In the [DATE/TIME] data display, the date and time are displayed in the same area. If you record a picture without setting the clock and [--:--:--] will appear. Continued , 67 Using the Menu
-
 1
1 -
2
-
3
-
4
-
5
-
6
-
7
-
8
-
9
-
10
-
11
-
12
-
13
-
14
-
15
-
16
-
17
-
18
-
19
-
20
-
21
-
22
-
23
-
24
-
25
-
26
-
27
-
28
-
29
-
30
-
31
-
32
-
33
-
34
-
35
-
36
-
37
-
38
-
39
-
40
-
41
-
42
-
43
-
44
-
45
-
46
-
47
-
48
-
49
-
50
-
51
-
52
-
53
-
54
-
55
-
56
-
57
-
58
-
59
-
60
-
61
-
 62
62 -
 63
63 -
 64
64 -
 65
65 -
 66
66 -
 67
67 -
 68
68 -
 69
69 -
 70
70 -
 71
71 -
 72
72 -
73
-
74
-
75
-
76
-
77
-
78
-
79
-
80
-
81
-
82
-
83
-
84
-
85
-
86
-
87
-
88
-
89
-
90
-
91
-
92
-
93
-
94
-
95
-
96
-
97
-
98
-
99
-
100
-
101
-
102
-
103
-
104
-
105
-
106
-
107
-
108
-
109
-
110
-
111
-
112
-
113
-
114
-
115
-
116
-
117
-
118
-
119
-
120
-
121
-
122
-
123
-
124
-
125
-
126
-
127
-
128
-
129
-
130
-
131
-
132
-
133
-
134
-
135
-
136
-
137
-
138
-
139
-
140
 |
 |
