Sony DCR-SX83 Operating Guide - Page 33
Click [Install]., agreement carefully. If you agree - software
 |
UPC - 027242788848
View all Sony DCR-SX83 manuals
Add to My Manuals
Save this manual to your list of manuals |
Page 33 highlights
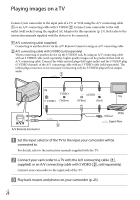
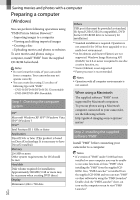
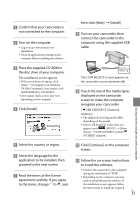
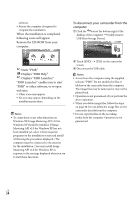
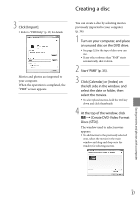
Confirm that your camcorder is not connected to the computer. Turn on the computer. Log on as an Administrator for installation. Close all applications running on the computer before installing the software. Place the supplied CD-ROM in the disc drive of your computer. The installation screen appears. If the screen does not appear, click [Start] [Computer] (in Windows XP, [My Computer]), then double-click [SONYPMB (E:)] (CD-ROM)*. * Drive names (such as (E:)) may vary depending on the computer. Click [Install]. Select the country or region. Select the language for the application to be installed, then proceed to the next screen. Read the terms of the license agreement carefully. If you agree to the terms, change to , and then click [Next] [Install]. Turn on your camcorder, then connect the camcorder to the computer using the supplied USB cable. The [USB SELECT] screen appears on the camcorder screen automatically. Touch the one of the media types displayed on the camcorder screen to make the computer recognize your camcorder. [ USB CONNECT] (Internal memory) The displayed recording media differ depending on the model. If the [USB SELECT] screen does not appear, touch (MENU) [Show others] [USB CONNECT] (under [OTHERS] category). Click [Continue] on the computer screen. Follow the on-screen instructions to install the software. Connect the camcorder to the computer during the installation of "PMB." Depending on the computer, you may need to install third party software. If the installation screen appears, follow the instructions to install the required US 33 Saving movies and photos with a computer
-
 1
1 -
2
-
3
-
4
-
5
-
6
-
7
-
8
-
9
-
10
-
11
-
12
-
13
-
14
-
15
-
16
-
17
-
18
-
19
-
20
-
21
-
22
-
23
-
24
-
25
-
26
-
27
-
 28
28 -
 29
29 -
 30
30 -
 31
31 -
 32
32 -
 33
33 -
 34
34 -
 35
35 -
 36
36 -
 37
37 -
 38
38 -
39
-
40
-
41
-
42
-
43
-
44
-
45
-
46
-
47
-
48
-
49
-
50
-
51
-
52
-
53
-
54
-
55
-
56
-
57
-
58
-
59
-
60
-
61
-
62
-
63
-
64
-
65
-
66
-
67
-
68
-
69
-
70
-
71
-
72
-
73
-
74
-
75
-
76
-
77
-
78
-
79
-
80
-
81
-
82
-
83
-
84
-
85
-
86
-
87
-
88
-
89
-
90
-
91
-
92
-
93
-
94
-
95
-
96
-
97
-
98
-
99
-
100
-
101
-
102
-
103
-
104
-
105
-
106
-
107
-
108
-
109
-
110
-
111
-
112
-
113
-
114
-
115
-
116
-
117
-
118
-
119
-
120
-
121
-
122
-
123
-
124
 |
 |
