Sony DPP-EX50 Operating Instructions - Page 100
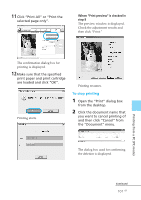
Click OK., The print dialog box is displayed.
 |
UPC - 027242639546
View all Sony DPP-EX50 manuals
Add to My Manuals
Save this manual to your list of manuals |
Page 100 highlights
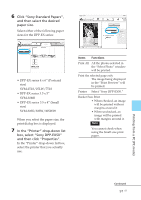
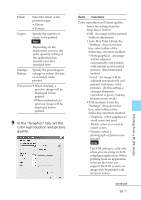
Exif Print Check it to adjust and print an image shot with a Exif Print (Exif 2.2)-compliant digital camera. The printer driver uses the color conversion and Exif shooting data to adjust the image. This option is effective only with PictureGear Studio. Red-eye reduction Check it to automatically reduce the red-eye phenomenon of the subject shot by using a flash light. Notes •When you check this option, make sure to select "Preview" to display the preview image before printing and check that the red-eye reduction has been correctly processed to the image. •Red-eye phenomenon will be detected automatically, and it may not be corrected. •Red-eye reduction is enabled only when you have installed the software from "Setup.exe" in the supplied CD-ROM. For the details see the Readme.txt. Print settings Adjusts the color elements and sharpness. R:Adjusts the red and blue elements. The higher you set the level, the ore reddish the picture becomes as if it receives red light. The lower you set the level, the darker the picture becomes as if light blue is added. G:Adjusts the green and purple elements. The higher you set the level, the more greenish the picture becomes as if it receives green light. The lower you set the level, the darker the picture becomes as if red purple is added. B:Adjusts the blue and yellow elements. The higher you set the level, the more bluish the picture becomes as if it receives blue light. The lower you set the level, the darker the picture becomes as if yellow is added. Sharp (sharpness): The higher you set the sharpness level, the more distinct the outlines become 10 Click "OK". The print dialog box is displayed. 100 GB
-
 1
1 -
2
-
3
-
4
-
5
-
6
-
7
-
8
-
9
-
10
-
11
-
12
-
13
-
14
-
15
-
16
-
17
-
18
-
19
-
20
-
21
-
22
-
23
-
24
-
25
-
26
-
27
-
28
-
29
-
30
-
31
-
32
-
33
-
34
-
35
-
36
-
37
-
38
-
39
-
40
-
41
-
42
-
43
-
44
-
45
-
46
-
47
-
48
-
49
-
50
-
51
-
52
-
53
-
54
-
55
-
56
-
57
-
58
-
59
-
60
-
61
-
62
-
63
-
64
-
65
-
66
-
67
-
68
-
69
-
70
-
71
-
72
-
73
-
74
-
75
-
76
-
77
-
78
-
79
-
80
-
81
-
82
-
83
-
84
-
85
-
86
-
87
-
88
-
89
-
90
-
91
-
92
-
93
-
94
-
 95
95 -
 96
96 -
 97
97 -
 98
98 -
 99
99 -
 100
100 -
 101
101 -
 102
102 -
 103
103 -
 104
104 -
 105
105 -
106
-
107
-
108
-
109
-
110
-
111
-
112
-
113
-
114
-
115
-
116
-
117
-
118
-
119
-
120
-
121
-
122
-
123
-
124
-
125
-
126
-
127
-
128
-
129
-
130
-
131
-
132
-
133
-
134
-
135
-
136
-
137
-
138
-
139
-
140
-
141
-
142
-
143
-
144
 |
 |
