Sony DPP-EX50 Operating Instructions - Page 59
Printing an edited image, Displaying other menu while, editing an image
 |
UPC - 027242639546
View all Sony DPP-EX50 manuals
Add to My Manuals
Save this manual to your list of manuals |
Page 59 highlights
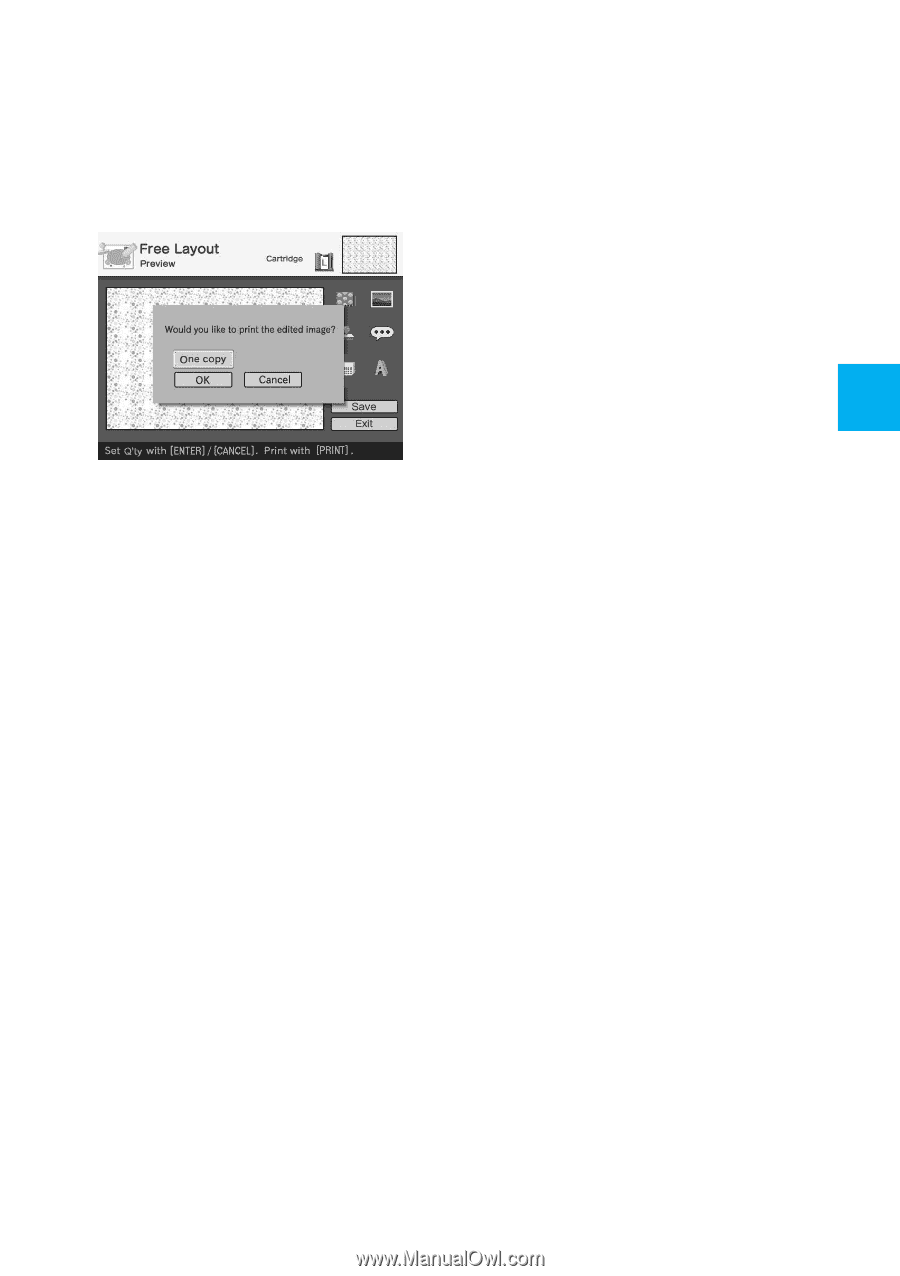
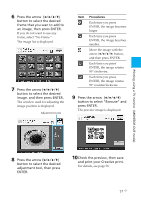
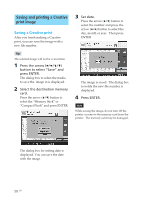
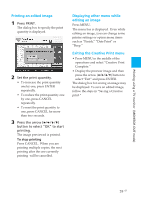
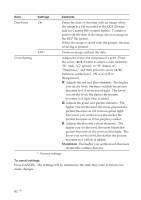
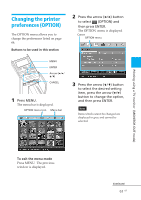
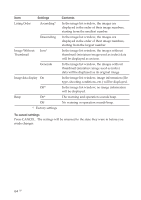
Printing using a TV monitor (MONITOR OUT mode) Printing an edited image 1 Press PRINT. The dialog box to specify the print quantity is displayed. 2 Set the print quantity. • To increase the print quantity one by one, press ENTER repeatedly. • To reduce the print quantity one by one, press CANCEL repeatedly. • To reset the print quantity to one, press CANCEL for more than two seconds. 3 Press the arrow (B/b/V/v) button to select "OK" to start printing. The image previewed is printed. To stop printing Press CANCEL. When you are printing multiple copies, the next printing after the one currently printing will be cancelled. Displaying other menu while editing an image Press MENU. The menu bar is displayed. Even while editing an image, you can change some printer settings or option menu items such as "Finish," "Date Print" or "Beep." Exiting the Creative Print menu • Press MENU in the middle of the operations and select "Creative Print Complete." • Display the preview image and then press the arrow (B/b/V/v) button to select "Exit" and press ENTER. The dialog box for saving an image may be displayed. To save an edited image, follow the steps in "Saving a Creative print." 59 GB
-
 1
1 -
2
-
3
-
4
-
5
-
6
-
7
-
8
-
9
-
10
-
11
-
12
-
13
-
14
-
15
-
16
-
17
-
18
-
19
-
20
-
21
-
22
-
23
-
24
-
25
-
26
-
27
-
28
-
29
-
30
-
31
-
32
-
33
-
34
-
35
-
36
-
37
-
38
-
39
-
40
-
41
-
42
-
43
-
44
-
45
-
46
-
47
-
48
-
49
-
50
-
51
-
52
-
53
-
 54
54 -
 55
55 -
 56
56 -
 57
57 -
 58
58 -
 59
59 -
 60
60 -
 61
61 -
 62
62 -
 63
63 -
 64
64 -
65
-
66
-
67
-
68
-
69
-
70
-
71
-
72
-
73
-
74
-
75
-
76
-
77
-
78
-
79
-
80
-
81
-
82
-
83
-
84
-
85
-
86
-
87
-
88
-
89
-
90
-
91
-
92
-
93
-
94
-
95
-
96
-
97
-
98
-
99
-
100
-
101
-
102
-
103
-
104
-
105
-
106
-
107
-
108
-
109
-
110
-
111
-
112
-
113
-
114
-
115
-
116
-
117
-
118
-
119
-
120
-
121
-
122
-
123
-
124
-
125
-
126
-
127
-
128
-
129
-
130
-
131
-
132
-
133
-
134
-
135
-
136
-
137
-
138
-
139
-
140
-
141
-
142
-
143
-
144
 |
 |