Sony DPP-EX50 Operating Instructions - Page 72
Printing using the printer‘s LCD display (LCD mode), Connections, Connecting the AC power cord
 |
UPC - 027242639546
View all Sony DPP-EX50 manuals
Add to My Manuals
Save this manual to your list of manuals |
Page 72 highlights
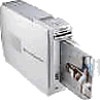
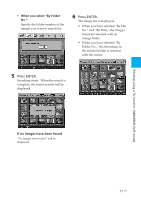
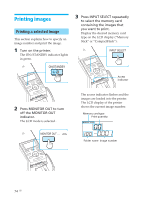
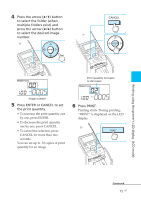
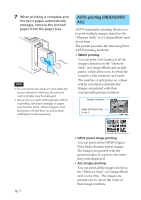
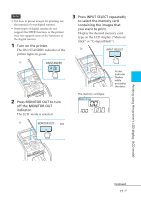
Printing using the printer's LCD display (LCD mode) You can use the printer's LCD display to carry out the following printing operations: • Printing a selected image (page 74) Specify the image number and print an image. • AUTO printing (INDEX/DPOF/ALL) (page 76) • Changing the print settings (page 79) (You need to connect the printer to a TV monitor to make settings.) Connections Connecting the AC power cord After you have made connections (when necessary), connect the AC power cord to the AC outlet. The ON/STANDBY indicator lights in red. To the wall outlet Image numbers To print using the printer's LCD display, you need to specify the image number for each image. To find the image numbers, make an index print. Or display the image list on a TV monitor or check the image numbers with your digital camera. The display of characters on the LCD The following can be displayed on the printer`s LCD. (, ), +, -, number 0 to 9 numbers, capital letters A to Z, _, ˜ Other characters are displayed as " ." AC power cord Note The AC power cord in the above illustration is for 120 V AC only. The plug shape of the AC power cord for 100 to 240 V is different. 72 GB
-
 1
1 -
2
-
3
-
4
-
5
-
6
-
7
-
8
-
9
-
10
-
11
-
12
-
13
-
14
-
15
-
16
-
17
-
18
-
19
-
20
-
21
-
22
-
23
-
24
-
25
-
26
-
27
-
28
-
29
-
30
-
31
-
32
-
33
-
34
-
35
-
36
-
37
-
38
-
39
-
40
-
41
-
42
-
43
-
44
-
45
-
46
-
47
-
48
-
49
-
50
-
51
-
52
-
53
-
54
-
55
-
56
-
57
-
58
-
59
-
60
-
61
-
62
-
63
-
64
-
65
-
66
-
 67
67 -
 68
68 -
 69
69 -
 70
70 -
 71
71 -
 72
72 -
 73
73 -
 74
74 -
 75
75 -
 76
76 -
 77
77 -
78
-
79
-
80
-
81
-
82
-
83
-
84
-
85
-
86
-
87
-
88
-
89
-
90
-
91
-
92
-
93
-
94
-
95
-
96
-
97
-
98
-
99
-
100
-
101
-
102
-
103
-
104
-
105
-
106
-
107
-
108
-
109
-
110
-
111
-
112
-
113
-
114
-
115
-
116
-
117
-
118
-
119
-
120
-
121
-
122
-
123
-
124
-
125
-
126
-
127
-
128
-
129
-
130
-
131
-
132
-
133
-
134
-
135
-
136
-
137
-
138
-
139
-
140
-
141
-
142
-
143
-
144
 |
 |
