Sony DSC R1 Users Guide - Page 12
Exposure Adjusting the light intensity, Exposure - camera manual
 |
UPC - 027242679627
View all Sony DSC R1 manuals
Add to My Manuals
Save this manual to your list of manuals |
Page 12 highlights
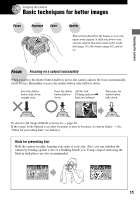
Exposure Adjusting the light intensity You can create various images by adjusting the exposure and the ISO sensitivity. Exposure is the amount of light that the camera will receive when you release the shutter. Shutter speed = Length of time the camera Exposure: receives light Aperture = Size of the opening allowing light to pass through ISO = Recording sensitivity Overexposure = too much light Whitish image Correct exposure Underexposure = too little light Darker image The exposure is automatically set to the proper value in the auto adjustment mode. However, you can adjust it manually using the functions below. Manual exposure: Allows you to adjust the shutter speed and aperture value manually. t page 39 EV: Allows you to adjust the exposure that has been determined by the camera. t page 41 Metering Mode: Allows you to change the part of the subject to be measured to determine the exposure. t page 40 Adjusting the ISO sensitivity ISO is unit of measurement (sensitivity), estimating how much light an image pickup device (equivalent to photo films) receives. Even when the exposure is the same, images differ depending on the ISO sensitivity. To adjust the ISO sensitivity t page 45 High ISO sensitivity Records a bright image even when shooting in a dark location. However, the image tends to become noisy. Low ISO sensitivity Records a smoother image. However, when the exposure is insufficient, the image may become darker. 12
-
 1
1 -
2
-
3
-
4
-
5
-
6
-
 7
7 -
 8
8 -
 9
9 -
 10
10 -
 11
11 -
 12
12 -
 13
13 -
 14
14 -
 15
15 -
 16
16 -
 17
17 -
18
-
19
-
20
-
21
-
22
-
23
-
24
-
25
-
26
-
27
-
28
-
29
-
30
-
31
-
32
-
33
-
34
-
35
-
36
-
37
-
38
-
39
-
40
-
41
-
42
-
43
-
44
-
45
-
46
-
47
-
48
-
49
-
50
-
51
-
52
-
53
-
54
-
55
-
56
-
57
-
58
-
59
-
60
-
61
-
62
-
63
-
64
-
65
-
66
-
67
-
68
-
69
-
70
-
71
-
72
-
73
-
74
-
75
-
76
-
77
-
78
-
79
-
80
-
81
-
82
-
83
-
84
-
85
-
86
-
87
-
88
-
89
-
90
-
91
-
92
-
93
-
94
-
95
-
96
-
97
-
98
-
99
-
100
-
101
-
102
-
103
-
104
-
105
-
106
-
107
-
108
-
109
-
110
-
111
-
112
-
113
-
114
-
115
-
116
-
117
-
118
-
119
-
120
-
121
-
122
-
123
-
124
-
125
-
126
-
127
-
128
-
129
-
130
-
131
-
132
-
133
-
134
-
135
 |
 |
