Sony DSR PD170 Operating Instructions - Page 10
Step 1 Installing the microphone - used
 |
UPC - 027242639850
View all Sony DSR PD170 manuals
Add to My Manuals
Save this manual to your list of manuals |
Page 10 highlights
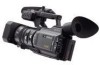
Step 1 Installing the microphone Install the supplied microphone. Be sure to connect the microphone plug to the INPUT1 connector. (1) Attach the wind screen to the microphone. (2) Loosen the microphone holder screw and open the cover. (3) Place the microphone into the holder with the model name (ECM-NV1) facing upward, close the cover, and tighten the screw. (4) Connect the plug of the microphone to the INPUT 1 connector. (5) Set the INPUT LEVEL selector to MIC or MIC ATT. When set to MIC ATT, you can reduce the volume by about 20 dB. And set the +48 V switch to ON. (6) Select the channel to be used, using the REC CH SELECT switch. When you record a sound (signal), which comes from the microphone connected to the INPUT 1 connector, only on the channel 1, set it to CH1. When you record both on the channels 1 and 2, set it to CH1•CH2. 1 2 3 4 5 6 REC CH INPUT SELECT LEVEL +48V INPUT LEVEL +48V CH1•CH2 CH1 LINE ON MIC MIC ATT OFF INPUT1 LINE ON MIC MIC ATT OFF INPUT2 REC CH INPUT SELECT LEVEL +48V INPUT LEVEL +48V CH1•CH2 CH1 LINE ON MIC MIC ATT OFF INPUT1 LINE ON MIC MIC ATT OFF INPUT2 When the wind is blowing hard Set CH1 or CH2 of WIND to ON in the menu settings according to the input (p. 105). When you unplug the microphone plug Unplug it while holding the PUSH button down. 10
-
 1
1 -
2
-
3
-
4
-
 5
5 -
 6
6 -
 7
7 -
 8
8 -
 9
9 -
 10
10 -
 11
11 -
 12
12 -
 13
13 -
 14
14 -
 15
15 -
16
-
17
-
18
-
19
-
20
-
21
-
22
-
23
-
24
-
25
-
26
-
27
-
28
-
29
-
30
-
31
-
32
-
33
-
34
-
35
-
36
-
37
-
38
-
39
-
40
-
41
-
42
-
43
-
44
-
45
-
46
-
47
-
48
-
49
-
50
-
51
-
52
-
53
-
54
-
55
-
56
-
57
-
58
-
59
-
60
-
61
-
62
-
63
-
64
-
65
-
66
-
67
-
68
-
69
-
70
-
71
-
72
-
73
-
74
-
75
-
76
-
77
-
78
-
79
-
80
-
81
-
82
-
83
-
84
-
85
-
86
-
87
-
88
-
89
-
90
-
91
-
92
-
93
-
94
-
95
-
96
-
97
-
98
-
99
-
100
-
101
-
102
-
103
-
104
-
105
-
106
-
107
-
108
-
109
-
110
-
111
-
112
-
113
-
114
-
115
-
116
-
117
-
118
-
119
-
120
-
121
-
122
-
123
-
124
-
125
-
126
-
127
-
128
-
129
-
130
-
131
-
132
-
133
-
134
-
135
-
136
-
137
-
138
-
139
-
140
-
141
-
142
-
143
-
144
-
145
-
146
-
147
-
148
-
149
-
150
-
151
-
152
-
153
-
154
-
155
-
156
-
157
-
158
-
159
-
160
-
161
-
162
-
163
-
164
-
165
-
166
-
167
-
168
-
169
-
170
-
171
-
172
-
173
-
174
-
175
-
176
 |
 |
