Sony DSR PD170 Operating Instructions - Page 86
Audio dubbing
 |
UPC - 027242639850
View all Sony DSR PD170 manuals
Add to My Manuals
Save this manual to your list of manuals |
Page 86 highlights
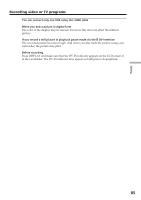
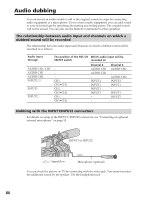
Audio dubbing You can record an audio sound to add to the original sound on a tape by connecting audio equipment or a microphone. If you connect audio equipment, you can add sound to your recorded tape by specifying the starting and ending points. The original sound will not be erased. You can also use the Remote Commander for this operation. The relationship between audio input and channels on which a dubbed sound will be recorded The relationship between audio input and channels on which a dubbed sound will be recorded is as follows: Audio input through AUDIO CH1/CH2 AUDIO CH1 AUDIO CH2 INPUT1/2 INPUT1 INPUT2 The position of the REC CH Which audio input will be SELECT switch recorded on - - - CH1 CH1•CH2 CH1 CH1•CH2 CH1 CH1•CH2 Channel 3 AUDIO CH1 AUDIO CH1 - INPUT1 INPUT1 INPUT1 INPUT1 - - Channel 4 AUDIO CH2 - AUDIO CH2 INPUT2 INPUT1 - INPUT1 INPUT2 - Dubbing with the INPUT1/INPUT2 connectors For details on setup of the INPUT1/INPUT2 connectors, see "Connecting an optional external microphone" on page 55. INPUT1 or INPUT2 : Signal flow Microphone (optional) You can check the picture on TV by connecting with the video jack. You cannot monitor the additional sound by the speaker. Use the headphones jack. 86
-
 1
1 -
2
-
3
-
4
-
5
-
6
-
7
-
8
-
9
-
10
-
11
-
12
-
13
-
14
-
15
-
16
-
17
-
18
-
19
-
20
-
21
-
22
-
23
-
24
-
25
-
26
-
27
-
28
-
29
-
30
-
31
-
32
-
33
-
34
-
35
-
36
-
37
-
38
-
39
-
40
-
41
-
42
-
43
-
44
-
45
-
46
-
47
-
48
-
49
-
50
-
51
-
52
-
53
-
54
-
55
-
56
-
57
-
58
-
59
-
60
-
61
-
62
-
63
-
64
-
65
-
66
-
67
-
68
-
69
-
70
-
71
-
72
-
73
-
74
-
75
-
76
-
77
-
78
-
79
-
80
-
 81
81 -
 82
82 -
 83
83 -
 84
84 -
 85
85 -
 86
86 -
 87
87 -
 88
88 -
 89
89 -
 90
90 -
 91
91 -
92
-
93
-
94
-
95
-
96
-
97
-
98
-
99
-
100
-
101
-
102
-
103
-
104
-
105
-
106
-
107
-
108
-
109
-
110
-
111
-
112
-
113
-
114
-
115
-
116
-
117
-
118
-
119
-
120
-
121
-
122
-
123
-
124
-
125
-
126
-
127
-
128
-
129
-
130
-
131
-
132
-
133
-
134
-
135
-
136
-
137
-
138
-
139
-
140
-
141
-
142
-
143
-
144
-
145
-
146
-
147
-
148
-
149
-
150
-
151
-
152
-
153
-
154
-
155
-
156
-
157
-
158
-
159
-
160
-
161
-
162
-
163
-
164
-
165
-
166
-
167
-
168
-
169
-
170
-
171
-
172
-
173
-
174
-
175
-
176
 |
 |
