Sony DSR PD170 Operating Instructions - Page 165
INPUT1 REC CH SELECT switch, INPUT2 INPUT LEVEL selector
 |
UPC - 027242639850
View all Sony DSR PD170 manuals
Add to My Manuals
Save this manual to your list of manuals |
Page 165 highlights
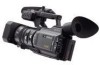
Identifying the parts and controls rs rd rf rg REC CH INPUT SELECT LEVEL +48V INPUT LEVEL +48V CH1•CH2 CH1 LINE ON MIC OFF MIC ATT INPUT1 LINE ON MIC OFF MIC ATT INPUT2 rh rj rk rs Remote sensor rd Camera recording lamp (p. 18) rf INPUT1 REC CH SELECT switch (p. 10) rg INPUT1 INPUT LEVEL selector (p. 10) rh INPUT1 +48 V switch (p. 10) rj INPUT2 +48 V switch (p. 10) rk INPUT2 INPUT LEVEL selector (p. 55) Attaching/removing the hood with a lens cap To attach the hood with a lens cap, fit the line on the hood to the corresponding line on the lens frame, then screw the hood clockwise and tighten the lower hood fixing screw. To remove the hood with a lens cap, loosen the lower hood fixing screw, and unscrew the hood with a lens cap counterclockwise. OPEN CLOSE To open/close the shutter of the hood with a lens cap, slide the knob to your desired direction according to the arrow. Quick Reference 165
-
 1
1 -
2
-
3
-
4
-
5
-
6
-
7
-
8
-
9
-
10
-
11
-
12
-
13
-
14
-
15
-
16
-
17
-
18
-
19
-
20
-
21
-
22
-
23
-
24
-
25
-
26
-
27
-
28
-
29
-
30
-
31
-
32
-
33
-
34
-
35
-
36
-
37
-
38
-
39
-
40
-
41
-
42
-
43
-
44
-
45
-
46
-
47
-
48
-
49
-
50
-
51
-
52
-
53
-
54
-
55
-
56
-
57
-
58
-
59
-
60
-
61
-
62
-
63
-
64
-
65
-
66
-
67
-
68
-
69
-
70
-
71
-
72
-
73
-
74
-
75
-
76
-
77
-
78
-
79
-
80
-
81
-
82
-
83
-
84
-
85
-
86
-
87
-
88
-
89
-
90
-
91
-
92
-
93
-
94
-
95
-
96
-
97
-
98
-
99
-
100
-
101
-
102
-
103
-
104
-
105
-
106
-
107
-
108
-
109
-
110
-
111
-
112
-
113
-
114
-
115
-
116
-
117
-
118
-
119
-
120
-
121
-
122
-
123
-
124
-
125
-
126
-
127
-
128
-
129
-
130
-
131
-
132
-
133
-
134
-
135
-
136
-
137
-
138
-
139
-
140
-
141
-
142
-
143
-
144
-
145
-
146
-
147
-
148
-
149
-
150
-
151
-
152
-
153
-
154
-
155
-
156
-
157
-
158
-
159
-
 160
160 -
 161
161 -
 162
162 -
 163
163 -
 164
164 -
 165
165 -
 166
166 -
 167
167 -
 168
168 -
 169
169 -
 170
170 -
171
-
172
-
173
-
174
-
175
-
176
 |
 |
