Sony DSR-PDX10 Operating Instructions - Page 246
Maintenance information and precautions, Adjusting the LCD screen CALIBRATION
 |
View all Sony DSR-PDX10 manuals
Add to My Manuals
Save this manual to your list of manuals |
Page 246 highlights
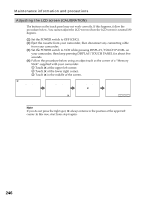
Maintenance information and precautions Adjusting the LCD screen (CALIBRATION) The buttons on the touch panel may not work correctly. If this happens, follow the procedure below. You cannot adjust the LCD screen when the LCD screen is rotated 180 degrees. (1) Set the POWER switch to OFF (CHG). (2) Eject the cassette from your camcorder, then disconnect any connecting cable from your camcorder. (3) Set the POWER switch to VCR while pressing DISPLAY/TOUCH PANEL on your camcorder, then keep pressing DISPLAY/TOUCH PANEL for about five seconds. (4) Follow the procedure below using an object such as the corner of a "Memory Stick" supplied with your camcorder. 1 Touch at the upper left corner. 2 Touch at the lower right corner. 3 Touch in the middle of the screen. CALIBRATE CALIBRATE CALIBRATE PB INDEX FN Note If you do not press the right spot, always returns to the position at the upper left corner. In this case, start from step 4 again. 246
-
 1
1 -
2
-
3
-
4
-
5
-
6
-
7
-
8
-
9
-
10
-
11
-
12
-
13
-
14
-
15
-
16
-
17
-
18
-
19
-
20
-
21
-
22
-
23
-
24
-
25
-
26
-
27
-
28
-
29
-
30
-
31
-
32
-
33
-
34
-
35
-
36
-
37
-
38
-
39
-
40
-
41
-
42
-
43
-
44
-
45
-
46
-
47
-
48
-
49
-
50
-
51
-
52
-
53
-
54
-
55
-
56
-
57
-
58
-
59
-
60
-
61
-
62
-
63
-
64
-
65
-
66
-
67
-
68
-
69
-
70
-
71
-
72
-
73
-
74
-
75
-
76
-
77
-
78
-
79
-
80
-
81
-
82
-
83
-
84
-
85
-
86
-
87
-
88
-
89
-
90
-
91
-
92
-
93
-
94
-
95
-
96
-
97
-
98
-
99
-
100
-
101
-
102
-
103
-
104
-
105
-
106
-
107
-
108
-
109
-
110
-
111
-
112
-
113
-
114
-
115
-
116
-
117
-
118
-
119
-
120
-
121
-
122
-
123
-
124
-
125
-
126
-
127
-
128
-
129
-
130
-
131
-
132
-
133
-
134
-
135
-
136
-
137
-
138
-
139
-
140
-
141
-
142
-
143
-
144
-
145
-
146
-
147
-
148
-
149
-
150
-
151
-
152
-
153
-
154
-
155
-
156
-
157
-
158
-
159
-
160
-
161
-
162
-
163
-
164
-
165
-
166
-
167
-
168
-
169
-
170
-
171
-
172
-
173
-
174
-
175
-
176
-
177
-
178
-
179
-
180
-
181
-
182
-
183
-
184
-
185
-
186
-
187
-
188
-
189
-
190
-
191
-
192
-
193
-
194
-
195
-
196
-
197
-
198
-
199
-
200
-
201
-
202
-
203
-
204
-
205
-
206
-
207
-
208
-
209
-
210
-
211
-
212
-
213
-
214
-
215
-
216
-
217
-
218
-
219
-
220
-
221
-
222
-
223
-
224
-
225
-
226
-
227
-
228
-
229
-
230
-
231
-
232
-
233
-
234
-
235
-
236
-
237
-
238
-
239
-
240
-
 241
241 -
 242
242 -
 243
243 -
 244
244 -
 245
245 -
 246
246 -
 247
247 -
 248
248 -
 249
249 -
 250
250 -
 251
251 -
252
-
253
-
254
-
255
-
256
-
257
-
258
-
259
-
260
-
261
-
262
-
263
-
264
 |
 |
