Sony FDR-X3000R Help Guide - Page 41
Still image mode switching
 |
View all Sony FDR-X3000R manuals
Add to My Manuals
Save this manual to your list of manuals |
Page 41 highlights
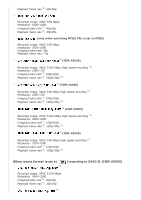
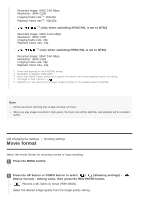
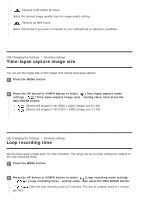
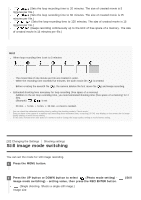
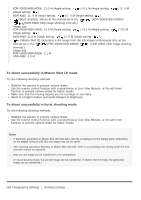
(Sets the loop recording time to 20 minutes. The size of created movie is 5 minutes per file.) (Sets the loop recording time to 60 minutes. The size of created movie is 15 minutes per file.) (Sets the loop recording time to 120 minutes. The size of created movie is 15 minutes per file.) (Keeps recording continuously up to the limit of free space of a memory. The size of created movie is 15 minutes per file.) Hint When loop recording time is set to 5 minutes The movie files of one minute per file are created in order. When the recording time exceeds five minutes, the sixth movie file ( ) is created. Before creating the seventh file ( ), the camera deletes the first movie file ( ) and keeps recording. Estimated shooting time necessary for loop recording (free space of a memory) Addition to the set loop recording time, you need estimated shooting time (free space of a memory) for 2 files. (Example) is set 20 min. + 5 min. + 5 min. = 30 min. or more is needed. * You can check the estimated shooting time by setting the shooting mode to "Movie mode." * Even you have a free space of a memory card according above estimated time, a warning [05-04] may display on the screen due to image quality setting or movie format setting. In this case, increase more free space of a memory card or change the image quality setting or movie format setting. [32] Changing the Settings Shooting settings Still image mode switching You can set the mode for still image recording. 1 Press the MENU button. 2 Press the UP button or DOWN button to select (Photo mode setting) - image mode switching) - setting value, then press the REC/ENTER button. (Single shooting. Shoots a single still image.) Image size (Still
-
 1
1 -
2
-
3
-
4
-
5
-
6
-
7
-
8
-
9
-
10
-
11
-
12
-
13
-
14
-
15
-
16
-
17
-
18
-
19
-
20
-
21
-
22
-
23
-
24
-
25
-
26
-
27
-
28
-
29
-
30
-
31
-
32
-
33
-
34
-
35
-
 36
36 -
 37
37 -
 38
38 -
 39
39 -
 40
40 -
 41
41 -
 42
42 -
 43
43 -
 44
44 -
 45
45 -
 46
46 -
47
-
48
-
49
-
50
-
51
-
52
-
53
-
54
-
55
-
56
-
57
-
58
-
59
-
60
-
61
-
62
-
63
-
64
-
65
-
66
-
67
-
68
-
69
-
70
-
71
-
72
-
73
-
74
-
75
-
76
-
77
-
78
-
79
-
80
-
81
-
82
-
83
-
84
-
85
-
86
-
87
-
88
-
89
-
90
-
91
-
92
-
93
-
94
-
95
-
96
-
97
-
98
-
99
-
100
-
101
-
102
-
103
-
104
-
105
-
106
-
107
-
108
-
109
-
110
-
111
-
112
-
113
-
114
-
115
-
116
-
117
-
118
-
119
-
120
-
121
-
122
-
123
-
124
-
125
-
126
-
127
-
128
-
129
-
130
-
131
 |
 |
