Sony FX41 Operating Instructions - Page 43
Cleaning the Air Filter - vpl filter
 |
UPC - 027242754775
View all Sony FX41 manuals
Add to My Manuals
Save this manual to your list of manuals |
Page 43 highlights
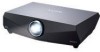
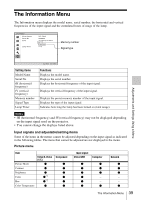
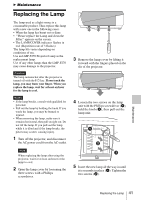
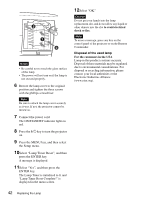
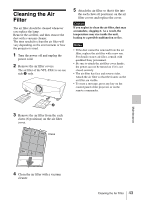
Cleaning the Air Filter The air filter should be cleaned whenever you replace the lamp. Remove the air filter, and then remove the dust with a vacuum cleaner. The time needed to clean the air filter will vary depending on the environment or how the projector is used. 1 Turn the power off and unplug the power cord. 2 Remove the air filter covers. The air filter of the VPL-FX41 is on one side only. 5 Attach the air filter so that it fits into the each claws (6 positions) on the air filter covers and replace the cover. Caution If you neglect to clean the air filter, dust may accumulate, clogging it. As a result, the temperature may rise inside the unit, leading to a possible malfunction or fire. Notes • If the dust cannot be removed from the air filter, replace the air filter with a new one. For details on new air filter, consult with qualified Sony personnnel. • Be sure to attach the air filter cover firmly; the power can not be turned on if it is not closed securely. • The air filter has face and reverse sides. Attach the air filter so that the frames on the air filter are visible. • To erase a message, press any key on the control panel of the projector or on the remote commander. 3 Remove the air filter from the each claws (6 positions) on the air filter cover. Claws Maintenance 4 Clean the air filter with a vacuum cleaner. Cleaning the Air Filter 43
-
 1
1 -
2
-
3
-
4
-
5
-
6
-
7
-
8
-
9
-
10
-
11
-
12
-
13
-
14
-
15
-
16
-
17
-
18
-
19
-
20
-
21
-
22
-
23
-
24
-
25
-
26
-
27
-
28
-
29
-
30
-
31
-
32
-
33
-
34
-
35
-
36
-
37
-
 38
38 -
 39
39 -
 40
40 -
 41
41 -
 42
42 -
 43
43 -
 44
44 -
 45
45 -
 46
46 -
 47
47 -
 48
48 -
49
-
50
-
51
-
52
-
53
-
54
-
55
-
56
-
57
-
58
-
59
 |
 |