Sony HCD-EC68P Service Manual - Page 20
Service, Error
 |
View all Sony HCD-EC68P manuals
Add to My Manuals
Save this manual to your list of manuals |
Page 20 highlights
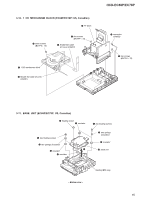
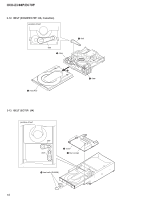
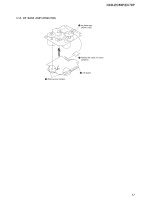
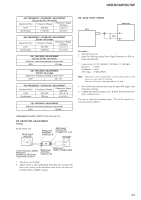
HCD-EC68P/EC78P CD SERVICE MODE This mode can move the SLED of the optical pick-up, and also can turn the optical pick-up laser power on and off. Procedure: 1. Press the [I/1] button to turn the power on. 2. Press three buttons of [CD N], [TUNING + M L], and DISPLAY simultaneously. 3. Press the [FUNCTION] button to select CD function. 4. It enters the CD service mode and displays "SERVICE". 5. To exit from this mode, press three buttons of [CD N], [TUN- ING + M L] and DISPLAY simultaneously. Key Operation: [TUNING + M L], [l m - TUNING]: Use these keys to move the SLED. When [TUNING + M L] is pressed in this mode, the SLED moves to outer circumference and the message "SLED OUT" is displayed. When [l m - TUNING] is pressed in this mode, the SLED moves to inner circumference and the message "SLED IN" is displayed. [DISPLAY]: Use this key to turn the optical pick-up laser power on and off. When the laser power is turned on, the message "LD ON" is displayed. When the laser power is turned off, the message "LD OFF" is displayed. CD ERROR CODE The past errors of the CD mechanism (CDM) are displayed as the CDM Errors, and those of the optical pick-up system (= optical unit + CD board) are displayed as the BD Errors as shown below. Procedure: 1. Press the [I/1] button to turn the power on. 2. Press the [FUNCTION] button to select CD function. 3. Press three buttons of [TUNING + M L], [x] and [DIS- PLAY] simultaneously. 4. Then, the CDM error code is displayed as "M0xxxxxx" (x means hexadecimal number) on the liquid crystal display as shown below. 5. Every pressing of the [TUNING + M L] button in this mode increments the number after "M" starting from "M0" up to "M9", and then returns to "M0". Every pressing of the [l m - TUNING] button in this mode decrements the number after "M". The smaller the error code number is, the newer the error content is. 6. When the [PLAY MODE/TUNING MODE] button is pressed then, the BD error code is displayed as "D0xxxxxx" (x means hexadecimal number) on the liquid crystal display as shown below. In the same way as the CDM error code, use of the [TUNING + M L] and the [l m - TUNING] buttons in this mode enables tracing of the error history. 7. To release from this mode, press the [I/1] button to turn the power off. Contents of "CDM Errors" Error display example M 0 FF 11 42 1 2 3 4 1 It indicates the error history number 0 to 9: The error code number 0 indicates the newest error. 2 It indicates whether the CDM error occurs in the normal opera- tions or during the initialization operation. FF : The error has occurred in the normal opera- tions. Other than FF: The error has occurred during the initialization operation. 3 It indicates the processing during which the trouble has occurred. 01: The disc EJECT processing is in progress. 02: The disc INSERTION-WAITING processing is in progress. 03: Processing of the disc INSERTION-REQUEST for the upper CD tray is in progress. 04: Processing of the disc EJECTION-REQUEST for the upper CD tray is in progress. 05: The disc pulling-in operation is in progress. 06: The disc chucking processing is in progress. 07: The disc re-chucking processing is in progress. 08: The disc chucking-release completion operation is in progress. 4 It indicates the operation during which the trouble has occurred. 00 : Waiting for the operation. 10 to 13 : The disc EJECT operation is in progress. 20 : The disc pulling-in operation is in progress. 30 : The disc chucking-release operation is in progress. 40 to 43 : The disc EJECT operation due to error is in progress. Contents of "BD Errors" Error display example D 0 02 09 01 1 2 3 4 1 It indicates the error history number 0 to 9: The error code number 0 indicates the newest error. 2 It indicates the error content 01: The focus servo cannot lock-in. 02: GFS is no good (NG). 03: The startup time exceeds the specified period of time (time over) 04: The focus servo is unlocked continuously. 05: Q code cannot be obtained within the specified period of time. 06: The tracking servo cannot lock-in. 07: Blank disc 20
-
 1
1 -
2
-
3
-
4
-
5
-
6
-
7
-
8
-
9
-
10
-
11
-
12
-
13
-
14
-
 15
15 -
 16
16 -
 17
17 -
 18
18 -
 19
19 -
 20
20 -
 21
21 -
 22
22 -
 23
23 -
 24
24 -
 25
25 -
26
-
27
-
28
-
29
-
30
-
31
-
32
-
33
-
34
-
35
-
36
-
37
-
38
-
39
-
40
-
41
-
42
-
43
-
44
-
45
-
46
-
47
-
48
-
49
-
50
-
51
-
52
-
53
-
54
-
55
-
56
-
57
-
58
-
59
-
60
-
61
-
62
-
63
-
64
-
65
-
66
 |
 |
