Sony HCD-EC68P Service Manual - Page 6
Hcd-ec68p/ec78p, General
 |
View all Sony HCD-EC68P manuals
Add to My Manuals
Save this manual to your list of manuals |
Page 6 highlights
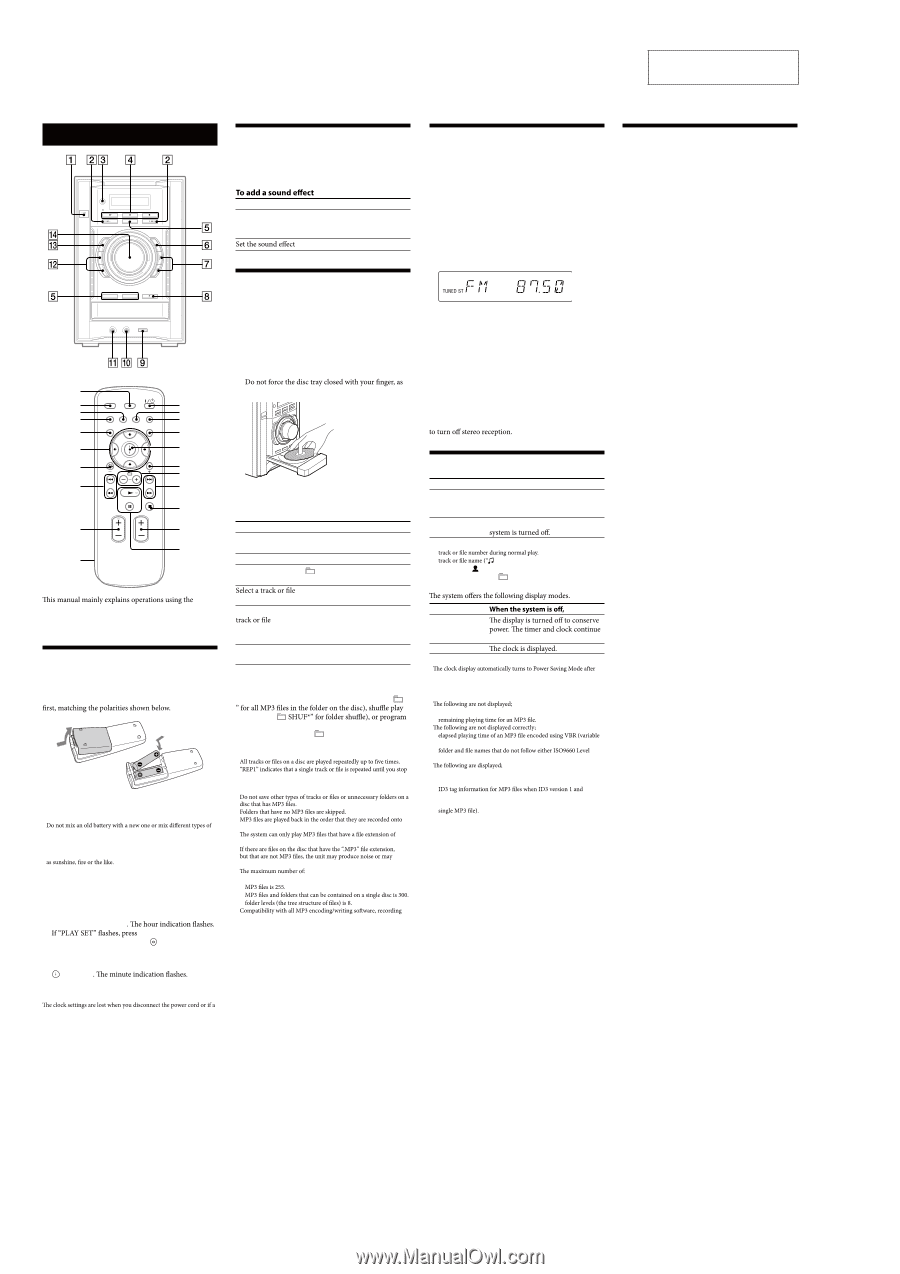
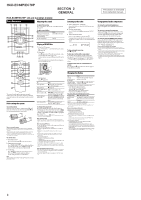
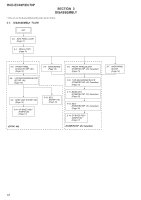
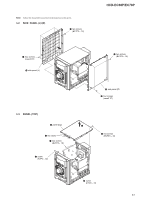
HCD-EC68P/EC78P SECTION 2 GENERAL This section is extracted from instruction manual. HCD-EC68P/EC78P: US and Canadian models: Basic Operations Adjusting the sound To adjust the volume Press VOLUME +/− (or turn the VOLUME control on the unit) . To Generate a more dynamic sound (Dynamic Sound Generator X-tra) Press DSGX on the unit. EQ . remote, but the same operations can also be performed using the buttons on the unit having the same or similar names. Before using the system To use the remote Slide and remove the battery compartment lid , and insert the two R6 (size AA) batteries (supplied), side Notes on using the remote • With normal use, the batteries should last for about six months. • batteries. • If you do not use the remote for a long period of time, remove the batteries to avoid damage from battery leakage and corrosion. • Batteries installed devices shall not be exposed to excessive heat such To set the clock 1 Turn on the system. Press (on/standby) to turn on the system. 2 Select the clock set mode. Press TIMER MENU repeatedly to select "CLOCK," and then press (enter) . 3 Set the time. Press repeatedly to set the hour, then press (enter) Use the same procedure to set the minutes. Note power failure occurs. Playing a CD/MP3 disc 1 Select the CD function. Press FUNCTION +/− (or FUNCTION on the unit) repeatedly. 2 Place a disc. Press (open/close) on the unit, and place a disc with the label side up on the disc tray. To close the disc tray, press (open/close) on the unit. this may damage the unit. 3 Start playback. Press (play) . To Pause playback Stop playback Select a folder on an MP3 disc Find a point in a Select Repeat Play Press (pause) . To resume play, press the button again. (stop) . +/− (select folder) . / (go back/go forward) (or / on the unit) . Hold down / (rewind/fast forward) during playback, and release the button at the desired point. REPEAT repeatedly until "REP" or "REP1" appears. To change the play mode Press PLAY MODE repeatedly while the player is stopped. You can select normal play (no display or " ("SHUF" or " play ("PGM"). * When playing a CD-DA disc, (SHUF) Play performs the same operation as normal (SHUF) Play. Notes on Repeat Play • • it. Notes on playing MP3 discs • • • the disc. • ".MP3". • malfunction. • − folders is 150 (including the root folder device, and recording media cannot be guaranteed. Incompatible MP3 discs may produce noise or interrupted audio or may not play at all. Notes on playing multisession discs • If the disc begins with a CD-DA (or MP3) session, it is recognized as a CD-DA (or MP3) disc, and playback continues until another session is encountered. • A disc with a mixed CD format is recognized as a CD-DA (audio) disc. Listening to the radio 1 Select "TUNER FM" or "TUNER AM." Press FUNCTION +/− (or FUNCTION on the unit) repeatedly. 2 Select the tuning mode. Press TUNING MODE repeatedly until "AUTO" appears. 3 Tune in the desired station. Press +/− (or TUNING +/− on the unit) . Scanning stops automatically when a station is tuned in, and then "TUNED" and "ST" (for stereo programs) appear. To stop automatic scanning Press (stop) . To tune in a station with a weak signal If "TUNED" does not appear and the scanning does not stop, press TUNING MODE repeatedly until "MANUAL" appears, and then press +/− (or TUNING +/− on the unit) repeatedly to tune in the desired station. To reduce static noise on a weak FM stereo station Press FM MODE repeatedly until "MONO" appears Using optional audio components To connect an optional headphones Connect headphones to the PHONES jack on the unit. To connect an optional component Connect additional audio source components to the AUDIO IN jack on the unit using an analog audio cord (not supplied). Turn down the volume on the system, and then select the AUDIO IN function. To connect a DIGITAL MEDIA PORT adaptor Connect the DIGITAL MEDIA PORT adaptor to the DMPORT on the unit. You need to connect the DIGITAL MEDIA PORT adaptor to an optional audio device (portable audio player, etc.). Notes on DIGITAL MEDIA PORT adaptor • Available DIGITAL MEDIA PORT adaptors vary in each area. • Do not connect an adaptor other than the DIGITAL MEDIA PORT adaptor. • Do not connect or disconnect the DIGITAL MEDIA PORT adaptor to/from the DMPORT while the system is on. • When using a DIGITAL MEDIA PORT adaptor that has video output function, connect the adaptor directly to the TV. • For details about the DIGITAL MEDIA PORT adaptor, refer to the operating instructions supplied with your DIGITAL MEDIA PORT adaptor. Changing the display To Press Change DISPLAY repeatedly when the information on system is turned on. the display* Change Display DISPLAY repeatedly when the mode (See below.) * For example, you can view CD/MP3 disc information, such as; − − ") during normal play. − artist name (" ") during normal play. − album or folder name (" ") during normal play. − total playing time while the player is stopped. Display mode Power Saving Mode1) Clock2) to operate. 1) You cannot set the clock in Power Saving Mode. 2) eight seconds. Notes on the display information • Characters that cannot be displayed appear as "_". • − total playing time for an MP3 disc. − • − bit rate). − 1, Level 2 or Joliet in the expansion format. • − total playing time for a CD-DA disc during normal play. − remaining playing time for a track. − version 2 tags are used (ID3 version 2 tag information display has priority when both ID3 version 1 and version 2 tags are used for a − up to 15 characters of ID3 tag information using uppercase letters (A to Z), numbers (0 to 9), and symbols 6
-
 1
1 -
 2
2 -
 3
3 -
 4
4 -
 5
5 -
 6
6 -
 7
7 -
 8
8 -
 9
9 -
 10
10 -
 11
11 -
 12
12 -
13
-
14
-
15
-
16
-
17
-
18
-
19
-
20
-
21
-
22
-
23
-
24
-
25
-
26
-
27
-
28
-
29
-
30
-
31
-
32
-
33
-
34
-
35
-
36
-
37
-
38
-
39
-
40
-
41
-
42
-
43
-
44
-
45
-
46
-
47
-
48
-
49
-
50
-
51
-
52
-
53
-
54
-
55
-
56
-
57
-
58
-
59
-
60
-
61
-
62
-
63
-
64
-
65
-
66
 |
 |