Sony HDR SR12 Operating Guide - Page 17
Name and functions of each part, Recording/Playback - lens
 |
UPC - 027242727755
View all Sony HDR SR12 manuals
Add to My Manuals
Save this manual to your list of manuals |
Page 17 highlights
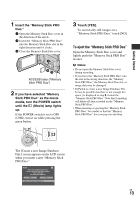
Name and functions of each part Recording/Playback Buttons, jacks, etc., which are not explained in other chapters, are explained here. 1 8 2 3 4 9 5 0 6 qa qs 7 qd qf qg qj qk qh ql w; wa ws wd wf wg wj wh wk wl qj Handycam Station wg qs qa Recording/Playback 1 Power zoom lever Move the power zoom lever slightly for a slower zoom. Move it further for a faster zoom. You can magnify still images from about 1.1 to 5 times the original size (Playback zoom). • When you touch the screen during playback zoom, the point you touched will be displayed in the center of the LCD screen. 2 Eyecup 3 Viewfinder You can view images on the viewfinder with the LCD panel closed. The viewfinder is useful when you want to avoid wearing down the battery, or when the image seen on the LCD panel is poor. 4 Viewfinder lens adjustment lever Move up the viewfinder and move the viewfinder lens adjustment lever until the image is clear. 5 QUICK ON button When you press QUICK ON, the camcorder goes to sleep mode (power saving mode) instead of turning off. The QUICK ON lamp keeps flashing during sleep mode. Press QUICK ON again to start recording next time. Your camcorder returns to recording standby in approximately 1 second. The power turns off automatically if you do not operate your camcorder for a certain period during sleep mode. 6 ACCESS lamp (Hard disk) When the ACCESS lamp is lit or flashing, your camcorder is writing/reading data. 7 Hook for a shoulder belt Attach the shoulder belt (optional). qd Speaker qf NIGHTSHOT switch Set the NIGHTSHOT switch to ON ( appears) to record in dark places. US 17
-
 1
1 -
2
-
3
-
4
-
5
-
6
-
7
-
8
-
9
-
10
-
11
-
 12
12 -
 13
13 -
 14
14 -
 15
15 -
 16
16 -
 17
17 -
 18
18 -
 19
19 -
 20
20 -
 21
21 -
 22
22 -
23
-
24
-
25
-
26
-
27
-
28
-
29
-
30
-
31
-
32
-
33
-
34
-
35
-
36
-
37
-
38
-
39
-
40
-
41
-
42
-
43
-
44
-
45
-
46
-
47
-
48
-
49
-
50
-
51
-
52
-
53
-
54
-
55
-
56
-
57
-
58
-
59
-
60
-
61
-
62
-
63
-
64
-
65
-
66
-
67
-
68
-
69
-
70
-
71
-
72
 |
 |
