Sony HDWM2000/20 Operation Manual - Page 20
REC INHI recording inhibit indicator, Tape transport control PREROLL button
 |
View all Sony HDWM2000/20 manuals
Add to My Manuals
Save this manual to your list of manuals |
Page 20 highlights
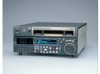
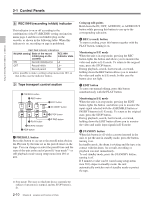
2-1 Control Panels Chapter 2 Location and Function of Parts 8 REC INHI (recording inhibit) indicator This indicator is on or off according to the combination of the F5 (RECINH) setting on function menu page 4 and the record inhibit plug on the cassette, as shown in the following table. When this indicator is on, recording on tape is prohibited. REC INHI indicator indications RECINH setting State of the record inhibit plug on the cassette REC INHI indicator state ON Record inhibit/permit Lit OFF Record inhibit Lit a) Record permit Off a) It is possible to make a setting (setup menu item 107) so that in this case the indicator flashes. 9 Tape transport control section 1 PREROLL button 2 REC button REC PREROLL EDIT 3 EDIT button STANDBY 4 STANDBY button REW PLAY F FWD STOP 5 STOP button 7 PLAY button 8 SERVO indicator 9 REW button 6 F FWD button 1 PREROLL button Press this button to cue up to the preroll point (before the IN point by the time set as the preroll time) on the tape. You can change or select the preroll time and the state of the unit at the end of preroll ("stop mode" 1) or still playback mode) using setup menu item 001 or 401. Cuing up edit points Hold down the IN, OUT, AUDIO IN, or AUDIO OUT button while pressing this button to cue up to the corresponding edit point. 2 REC (record) button To start recording, press this button together with the PLAY button, turning it on. Monitoring in E-E mode When the unit is in stop mode, pressing the REC button lights the button and allows you to monitor the video and audio in E-E mode. To return to the original state, press the STOP button. During playback, search, fast forward, or rewind, holding down the REC button allows you to monitor the video and audio in E-E mode. In this case the button does not light. 3 EDIT button To carry out manual editing, press this button simultaneously with the PLAY button. Monitoring in E-E mode When the unit is in stop mode, pressing the EDIT button lights the button and allows you to monitor the input signal selected with the ASSEMBLE button or INSERT buttons in E-E mode. To return to the original state, press the STOP button. During playback, search, fast forward, or rewind, holding down the EDIT button allows you to monitor the video and audio input signals in E-E mode. 4 STANDBY button When this button is off with a cassette inserted in the unit, to put the unit in standby mode, press the button, turning it on. In standby mode, the drum is rotating and the tape is in contact with the drum. As a result, recording or playback can start immediately. To end standby mode, press the STANDBY button, turning it off. If 8 minutes (value can be varied using setup menu item 501) elapse in standby mode, the unit automatically switches out of standby mode to protect the tape. ...1) Stop mode: The state in which the device currently the subject of operation is stopped, and the STOP button is lit. 2-10 Chapter 2 Location and Function of Parts
-
 1
1 -
2
-
3
-
4
-
5
-
6
-
7
-
8
-
9
-
10
-
11
-
12
-
13
-
14
-
 15
15 -
 16
16 -
 17
17 -
 18
18 -
 19
19 -
 20
20 -
 21
21 -
 22
22 -
 23
23 -
 24
24 -
 25
25 -
26
-
27
-
28
-
29
-
30
-
31
-
32
-
33
-
34
-
35
-
36
-
37
-
38
-
39
-
40
-
41
-
42
-
43
-
44
-
45
-
46
-
47
-
48
-
49
-
50
-
51
-
52
-
53
-
54
-
55
-
56
-
57
-
58
-
59
-
60
-
61
-
62
-
63
-
64
-
65
-
66
-
67
-
68
-
69
-
70
-
71
-
72
-
73
-
74
-
75
-
76
-
77
-
78
-
79
-
80
-
81
-
82
-
83
-
84
-
85
-
86
-
87
-
88
-
89
-
90
-
91
-
92
-
93
-
94
-
95
-
96
-
97
-
98
-
99
-
100
-
101
-
102
-
103
-
104
-
105
-
106
-
107
-
108
-
109
-
110
-
111
-
112
-
113
-
114
-
115
-
116
-
117
-
118
-
119
-
120
-
121
-
122
-
123
-
124
-
125
-
126
-
127
-
128
-
129
-
130
-
131
-
132
-
133
-
134
-
135
-
136
-
137
-
138
-
139
-
140
-
141
-
142
-
143
-
144
-
145
-
146
-
147
-
148
-
149
-
150
-
151
-
152
-
153
-
154
-
155
-
156
 |
 |
