Sony ILCE-9M2 Operating Instructions - Page 240
Cleaning the image sensor, Cleaning Mode]
 |
View all Sony ILCE-9M2 manuals
Add to My Manuals
Save this manual to your list of manuals |
Page 240 highlights
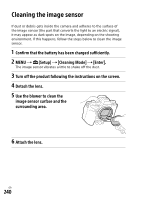
Cleaning the image sensor If dust or debris gets inside the camera and adheres to the surface of the image sensor (the part that converts the light to an electric signal), it may appear as dark spots on the image, depending on the shooting environment. If this happens, follow the steps below to clean the image sensor. 1 Confirm that the battery has been charged sufficiently. 2 MENU (Setup) [Cleaning Mode] [Enter]. The image sensor vibrates a little to shake off the dust. 3 Turn off the product following the instructions on the screen. 4 Detach the lens. 5 Use the blower to clean the image sensor surface and the surrounding area. 6 Attach the lens. GB 240
-
 1
1 -
2
-
3
-
4
-
5
-
6
-
7
-
8
-
9
-
10
-
11
-
12
-
13
-
14
-
15
-
16
-
17
-
18
-
19
-
20
-
21
-
22
-
23
-
24
-
25
-
26
-
27
-
28
-
29
-
30
-
31
-
32
-
33
-
34
-
35
-
36
-
37
-
38
-
39
-
40
-
41
-
42
-
43
-
44
-
45
-
46
-
47
-
48
-
49
-
50
-
51
-
52
-
53
-
54
-
55
-
56
-
57
-
58
-
59
-
60
-
61
-
62
-
63
-
64
-
65
-
66
-
67
-
68
-
69
-
70
-
71
-
72
-
73
-
74
-
75
-
76
-
77
-
78
-
79
-
80
-
81
-
82
-
83
-
84
-
85
-
86
-
87
-
88
-
89
-
90
-
91
-
92
-
93
-
94
-
95
-
96
-
97
-
98
-
99
-
100
-
101
-
102
-
103
-
104
-
105
-
106
-
107
-
108
-
109
-
110
-
111
-
112
-
113
-
114
-
115
-
116
-
117
-
118
-
119
-
120
-
121
-
122
-
123
-
124
-
125
-
126
-
127
-
128
-
129
-
130
-
131
-
132
-
133
-
134
-
135
-
136
-
137
-
138
-
139
-
140
-
141
-
142
-
143
-
144
-
145
-
146
-
147
-
148
-
149
-
150
-
151
-
152
-
153
-
154
-
155
-
156
-
157
-
158
-
159
-
160
-
161
-
162
-
163
-
164
-
165
-
166
-
167
-
168
-
169
-
170
-
171
-
172
-
173
-
174
-
175
-
176
-
177
-
178
-
179
-
180
-
181
-
182
-
183
-
184
-
185
-
186
-
187
-
188
-
189
-
190
-
191
-
192
-
193
-
194
-
195
-
196
-
197
-
198
-
199
-
200
-
201
-
202
-
203
-
204
-
205
-
206
-
207
-
208
-
209
-
210
-
211
-
212
-
213
-
214
-
215
-
216
-
217
-
218
-
219
-
220
-
221
-
222
-
223
-
224
-
225
-
226
-
227
-
228
-
229
-
230
-
231
-
232
-
233
-
234
-
 235
235 -
 236
236 -
 237
237 -
 238
238 -
 239
239 -
 240
240 -
 241
241 -
 242
242 -
 243
243 -
 244
244 -
 245
245 -
246
-
247
-
248
-
249
-
250
-
251
-
252
-
253
-
254
-
255
-
256
-
257
-
258
-
259
-
260
-
261
-
262
-
263
 |
 |

GB
240
Cleaning the image sensor
If dust or debris gets inside the camera and adheres to the surface of
the image sensor (the part that converts the light to an electric signal),
it may appear as dark spots on the image, depending on the shooting
environment. If this happens, follow the steps below to clean the image
sensor.
1
Confirm that the battery has been charged sufficiently.
2
MENU
(Setup)
[Cleaning Mode]
[Enter].
The image sensor vibrates a little to shake off the dust.
3
Turn off the product following the instructions on the screen.
4
Detach the lens.
5
Use the blower to clean the
image sensor surface and the
surrounding area.
6
Attach the lens.