Sony KD-32FS170 Operating Instructions - Page 18
Connecting a Camcorder for playback, Connecting for Video Tape Editing VCR and Camcorder
 |
View all Sony KD-32FS170 manuals
Add to My Manuals
Save this manual to your list of manuals |
Page 18 highlights
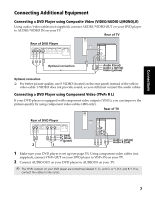
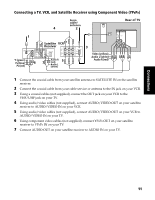
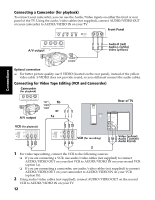
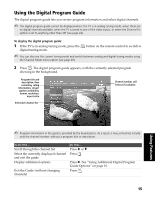
Connecting a Camcorder (for playback) To connect your camcorder, you can use the Audio/Video inputs on either the front or rear panel of the TV. Using the audio/video cables (not supplied), connect AUDIO/VIDEO OUT on your camcorder to AUDIO/VIDEO IN on your TV. Front Panel A/V output Audio R (red) Audio L (white) Video (yellow) Connections Optional connection ❏ For better picture quality, use S VIDEO (located on the rear panel), instead of the yellow video cable. S VIDEO does not provide sound, so you still must connect the audio cables. Connecting for Video Tape Editing (VCR and Camcorder) Camcorder (for playback) A/V output 1b or 1a Rear of TV ATSC VCR (for playback) LINE IN VIDEO AUDIO L AUDIO R LINE OUT LINE IN VIDEO AUDIO L AUDIO R LINE OUT VCR (for recording) Video (yellow) Audio L (white) Audio R (red) 2 1 For video tape editing, connect the VCR to the following sources: ❏ If you are connecting a VCR, use audio/video cables (not supplied) to connect AUDIO/VIDEO OUT on your first VCR to AUDIO/VIDEO IN on your second VCR (option 1a). ❏ If you are connecting a camcorder, use audio/video cables (not supplied) to connect AUDIO/VIDEO OUT on your camcorder to AUDIO/VIDEO IN on your VCR (option 1b). 2 Using audio/video cables (not supplied), connect AUDIO/VIDEO OUT on the second VCR to AUDIO/VIDEO IN on your TV. 12
-
 1
1 -
2
-
3
-
4
-
5
-
6
-
7
-
8
-
9
-
10
-
11
-
12
-
 13
13 -
 14
14 -
 15
15 -
 16
16 -
 17
17 -
 18
18 -
 19
19 -
 20
20 -
 21
21 -
 22
22 -
 23
23 -
24
-
25
-
26
-
27
-
28
-
29
-
30
-
31
-
32
-
33
-
34
-
35
-
36
-
37
-
38
-
39
-
40
-
41
-
42
-
43
-
44
-
45
-
46
-
47
-
48
 |
 |
