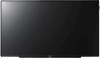
Sony KDL-40R350B Operating Instructions (Setup Guide) - Page 7
Setting Up Your TV, Attaching the Table-Top Stand, KDL-40R350B - picture settings
 |
View all Sony KDL-40R350B manuals
Add to My Manuals
Save this manual to your list of manuals |
Page 7 highlights
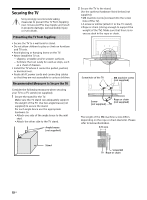
Setting Up Your TV Some TV models are packaged with a detached Table-Top Stand so you can mount your TV to a wall right away. If you are not mounting the TV to a wall, you will need to attach the Table-Top Stand. You will need a Phillips screwdriver (not supplied) and the supplied screws to complete the task. Look for the supplied Table-Top Stand instruction leaflet. Be sure to consider the following while setting up your TV: Disconnect all cables when carrying the TV. Carry the TV with the adequate number of people; larger size TVs require two or more people. Correct hand placement while carrying the TV is very important for safety and to avoid damage. Do not put stress on the LCD panel or the frame around the screen. Attaching the Table-Top Stand Note • If using an electric screwdriver, set the tightening torque at approximately 1.2N·m {12kgf·cm}. • When detaching the Table-Top Stand, reverse the attaching procedure. • Be sure the TV is vertical before turning on. To avoid uneven picture uniformity do not power on the TV with the LCD panel facing down. • When attaching the Table-Top Stand again, be sure to fasten the screws (previously removed) to the original US holes on the rear of the TV. KDL-40R350B Ensure your TV has adequate ventilation, see page 28. For best picture quality, do not expose the screen to direct illumination or sunlight. Avoid installing the TV in a room with reflective wall and floor materials. Avoid moving the TV from a cold area to a warm area. Sudden room temperature changes may cause moisture condensation. This may cause the TV to show poor picture and/or poor color. Should this occur, allow moisture to evaporate completely before powering the TV on. Ensure that there are no objects in front of the TV. IR Sensor 7US
-
 1
1 -
 2
2 -
 3
3 -
 4
4 -
 5
5 -
 6
6 -
 7
7 -
 8
8 -
 9
9 -
 10
10 -
 11
11 -
 12
12 -
13
-
14
-
15
-
16
-
17
-
18
-
19
-
20
-
21
-
22
-
23
-
24
-
25
-
26
-
27
-
28
-
29
-
30
-
31
-
32
-
33
-
34
-
35
-
36
-
37
-
38
-
39
-
40
-
41
-
42
-
43
-
44
-
45
-
46
-
47
-
48
-
49
-
50
-
51
-
52
-
53
-
54
-
55
-
56
-
57
-
58
-
59
-
60
-
61
-
62
-
63
-
64
-
65
-
66
-
67
-
68
 |
 |
