Sony KLV32S400A Revision History - Page 22
SERVICE ADJUSTMENTS, Accessing Diagnostic Menu, Aging, Accessing Service Menu, 2. Aging - remote
 |
UPC - 011110668585
View all Sony KLV32S400A manuals
Add to My Manuals
Save this manual to your list of manuals |
Page 22 highlights
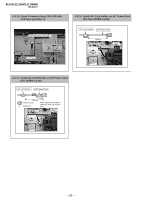
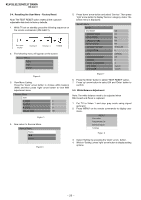
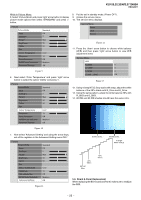
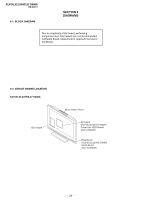
SECTION 5 SERVICE ADJUSTMENTS KLV-26,32,32/H/S,37 S400A RM-GA011 5-1. Accessing Diagnostic Menu 5-3. Accessing Service Menu 1. While TV set on standby, press the following sequence on 1. While TV set on standby, press the following sequence on the remote commander (RM-GA011). the remote commander (RM-GA011). On screen display Channel 5 Volume (-) POWER On screen display Channel 5 Volume (+) POWER 2. The following menu will appear on the screen: ERROR DC_DET 0 DC_ALERT1 0 DC_ALERT2 0 DC_ALERT3 0 BACKLIGHT 0 INTERNAL TEMP ERROR 0 AUDIO ERROR 0 NVM ERROR 0 IIC ERROR 0 BALANCER ERROR 0 HDMI ERROR 0 RESET 0 Figure 1 3. To reset, select 'RESET' using remote commander and press . 4. To quit the diagnostic menu, turn off and on the TV set. 5-2. Aging 1. Aging setting: Set no signal and monitor as aging mode. 2. Aging condition: Aging condition before white balance adjustment is as follows: Supply voltage : Rating Time : 20 minutes or over (AGING TIMER registor setting) Ambient Temp Brightness Input : 22 ~ 28 degree : Brightness is set by aging mode. : Set no signal except digital and analog RF (video/component/PC). 3. LED lightning pattern during aging: In case the AGING TIMER > 0 Green (0.5s) --> Off (0.5s) --> Green (0.5s) --> Off (0.5s) Note: Green (Power LED is ON / OFF) 2. The following menu will appear on the screen: Service Menu Status W/B Service Figure 2 3. View Menu Listing Press the 'down' arrow button to choose white balance (W/B) and then press 'right' arrow button to view W/B adjustment items. Service Menu W/B R_DRIVE 0 G_DRIVE 0 B_DRIVE 0 COLOR _SAVE OK Figure 3 4. Select Menu Item Press the 'up' or 'down' arrow button to select the item you want to adjust. 5. Increase/Decrease Data Value To increase the data value, press the 'right' arrow button whereas to decrease, press the 'left' arrow button. 6. Save/Cancel Data Value To save the data value changes, firstly press the 'down' arrow button to select 'COLOR SAVE' then use 'right' arrow button to select 'OK' and press the button. To cancel the data value changes, use 'down' arrow button to select 'Cancel' and press the button. In case the AGING TIMER = 0 Green (3s) -->Off (3s) --> Green (3s) --> Off (3s) Note: Green (Power LED is ON / OFF) Note: If set has been put on surface down, static electricity causes brightness surface irregularity. If such happens, turn the set over or place it in upright position for more than 30 seconds. Once surface irregularity is cleared, check the set. - 21 -
-
 1
1 -
2
-
3
-
4
-
5
-
6
-
7
-
8
-
9
-
10
-
11
-
12
-
13
-
14
-
15
-
16
-
 17
17 -
 18
18 -
 19
19 -
 20
20 -
 21
21 -
 22
22 -
 23
23 -
 24
24 -
 25
25 -
 26
26 -
 27
27 -
28
-
29
-
30
-
31
-
32
-
33
-
34
-
35
-
36
-
37
-
38
-
39
-
40
-
41
-
42
-
43
-
44
-
45
-
46
-
47
-
48
-
49
-
50
-
51
-
52
-
53
-
54
-
55
-
56
-
57
-
58
-
59
-
60
-
61
-
62
-
63
-
64
-
65
-
66
-
67
-
68
-
69
-
70
-
71
-
72
-
73
-
74
-
75
-
76
-
77
-
78
-
79
-
80
-
81
 |
 |
