Sony KLV32S400A Revision History - Page 77
Installing the TV
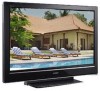 |
UPC - 011110668585
View all Sony KLV32S400A manuals
Add to My Manuals
Save this manual to your list of manuals |
Page 77 highlights
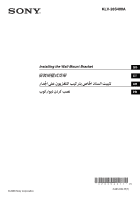
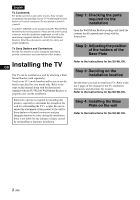
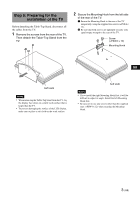
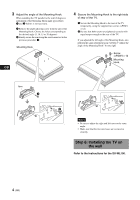
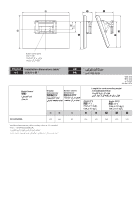
English To Customers: For product protection and safety reasons, Sony strongly recommends that installing of your TV be performed by Sony dealers or licensed contractors. Do not attempt to install it yourself. Your KLV-26S400A can be installed using SUWL100 WallMount Bracket (sold separately). Please provide your licensed contractor with this installation supplement as well as the Instructions (supplied with the SUWL100 Wall-Mount Bracket). Read these documents carefully for safety and proper installation. To Sony Dealers and Contractors: Provide full attention to safety during the installation, periodic maintenance and examination of this product. GB Installing the TV The TV can be installed on a wall by attaching a WallMount Bracket (sold separately). Verify your TV's model number and be sure to use the bracket specified for your model only. Refer to the steps on this manual along with the Instructions supplied with the SUWL100 Wall-Mount Bracket, to properly carry out the installation. Sufficient expertise is required for installing this product, especially to determine the strength of the wall for withstanding the TV's weight. Be sure to entrust the attachment of this product to the wall to Sony dealers or licensed contractors and pay adequate attention to safety during the installation. Sony is not liable for any damage or injury caused by mishandling or improper installation. Step 1: Checking the parts required for the installation Open the Wall-Mount Bracket package and check the contents for all required parts along with the Instructions. Step 2: Adjusting the position of the holders of the Base Plate Refer to the Instructions for the SU-WL100. Step 3: Deciding on the installation location Decide where you want to install your TV. Refer to the last 2 pages of this manual for the TV installation dimensions and determine the location. Refer to the Instructions for the SU-WL100. Step 4: Installing the Base Plate on the wall Refer to the Instructions for the SU-WL100. 2 (GB)
-
 1
1 -
2
-
3
-
4
-
5
-
6
-
7
-
8
-
9
-
10
-
11
-
12
-
13
-
14
-
15
-
16
-
17
-
18
-
19
-
20
-
21
-
22
-
23
-
24
-
25
-
26
-
27
-
28
-
29
-
30
-
31
-
32
-
33
-
34
-
35
-
36
-
37
-
38
-
39
-
40
-
41
-
42
-
43
-
44
-
45
-
46
-
47
-
48
-
49
-
50
-
51
-
52
-
53
-
54
-
55
-
56
-
57
-
58
-
59
-
60
-
61
-
62
-
63
-
64
-
65
-
66
-
67
-
68
-
69
-
70
-
71
-
 72
72 -
 73
73 -
 74
74 -
 75
75 -
 76
76 -
 77
77 -
 78
78 -
 79
79 -
 80
80 -
 81
81
 |
 |
