Sony KP-65WV700 Primary User Manual - Page 77
Using the Screen Menu, Selecting Screen Mode Options, To select the Screen Menu
 |
View all Sony KP-65WV700 manuals
Add to My Manuals
Save this manual to your list of manuals |
Page 77 highlights
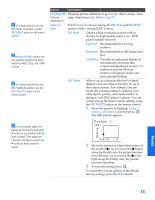
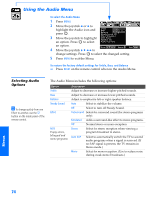
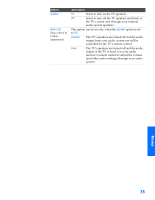
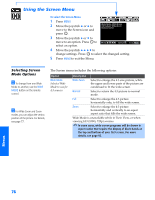
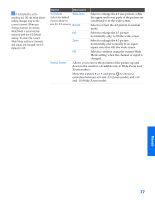
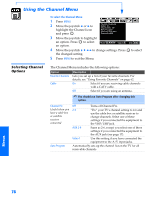
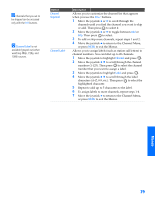
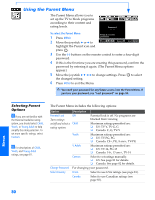
SETUP SETUP Using the Screen Menu To select the Screen Menu 1 Press MENU. 2 Move the joystick B or b to move to the Screen icon and Wide Mode: Wide Zoom 4:3 Default: Wide Zoom Vertical Center press . 3 Move the joystick V or v to move to an option. Press to select an option. Move: V v B b Select: + End: MENU 4 Move the joystick B b V v to change settings. Press to select the changed setting. 5 Press MENU to exit the Menu. Selecting Screen Mode Options z To change from one Wide Mode to another, use the WIDE MODE button on the remote control. z For Wide Zoom and Zoom modes, you can adjust the vertical position of the picture. For details, see page 77. The Screen menu includes the following options: Option Wide Mode Select a Wide Mode to use for 4:3 sources. Description Wide Zoom Select to enlarge the 4:3 size picture, while the upper and lower parts of the picture are condensed to fit the wide screen. Normal Select to return the 4:3 picture to normal mode. Full Select to enlarge the 4:3 picture horizontally only, to fill the wide screen. Zoom Select to enlarge the 4:3 picture horizontally and vertically to an equal aspect ratio that fills the wide screen. Wide Mode is unavailable while in Twin View, or when viewing HD (1080i, 720p) sources. ✍ In some cases, wide-screen programs will be shown in aspect ratios that require the display of black bands at the top and bottom of your 16:9 screen. For more details, see page 92. SETU P SETUP Menus SETUP 76
-
 1
1 -
2
-
3
-
4
-
5
-
6
-
7
-
8
-
9
-
10
-
11
-
12
-
13
-
14
-
15
-
16
-
17
-
18
-
19
-
20
-
21
-
22
-
23
-
24
-
25
-
26
-
27
-
28
-
29
-
30
-
31
-
32
-
33
-
34
-
35
-
36
-
37
-
38
-
39
-
40
-
41
-
42
-
43
-
44
-
45
-
46
-
47
-
48
-
49
-
50
-
51
-
52
-
53
-
54
-
55
-
56
-
57
-
58
-
59
-
60
-
61
-
62
-
63
-
64
-
65
-
66
-
67
-
68
-
69
-
70
-
71
-
 72
72 -
 73
73 -
 74
74 -
 75
75 -
 76
76 -
 77
77 -
 78
78 -
 79
79 -
 80
80 -
 81
81 -
 82
82 -
83
-
84
-
85
-
86
-
87
-
88
-
89
-
90
-
91
-
92
-
93
-
94
-
95
-
96
-
97
-
98
-
99
-
100
-
101
 |
 |
