Sony MEX-DV2000 Operating Instructions - Page 36
Precisely calibrating the listening position - Intelligent Time Alignment Tune
 |
UPC - 027242706477
View all Sony MEX-DV2000 manuals
Add to My Manuals
Save this manual to your list of manuals |
Page 36 highlights
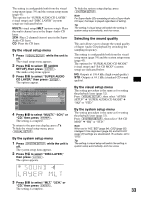
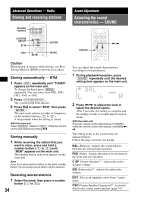
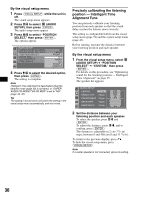
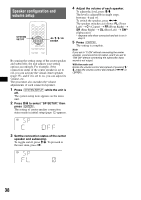
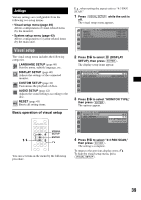
By the visual setup menu 1 Press (VISUAL SETUP) while the unit is off. The visual setup menu appears. 2 Press M/m to select (AUDIO SETUP), then press (ENTER). The audio setup items appear. 3 Press M/m to select "POSITION SELECT," then press (ENTER). The options appear. AUDIO SETUP SUPER AUDIO CD MODE: SUPER AUDIO CD LAYER : POSITION SELECT : AUDIO DRC : 5.1CH OUTPUT : PRO LOGIC II : HQ MULTI FRONT L OFF FRONT ALL FRONT L FRONT R 4 Press M/m to select the desired option, then press (ENTER). The setting is complete. Note Intelligent Time Alignment is deactivated while the karaoke mode (page 30) is activated, or "SUPER AUDIO CD MODE"/"SA-CD MOD" is set to "HQ" (page 42, 46). Tip The setting in sound menu will switch the setting in the visual setup menu automatically, and vice versa. Precisely calibrating the listening position - Intelligent Time Alignment Tune You can precisely calibrate your listening position from each speaker so that the sound delay reaches the listener more correctly. The setting is configurable both from the visual setup menu (page 39) and the system setup menu (page 43). Before starting, measure the distance between your listening position and each speaker. By the visual setup menu 1 From the visual setup menu, select (AUDIO SETUP) c "POSITION SELECT" c "CUSTOM," then press (ENTER). For details on this procedure, see "Optimizing sound for the listening position - Intelligent Time Alignment" on page 35. The speaker list appears. AUDIO SETUP CENTER 100cm FRONT LEFT 100cm FRONT RIGHT 100cm REAR LEFT 100cm REAR RIGHT 100cm 2 Set the distance between your listening position and each speaker. To select the speaker, press M/m and (ENTER). To adjust the distance, press M/m, and to confirm, press (ENTER). The distance is adjustable in 2 cm (13/16 in) steps, between 0 and 400 cm (0 and 13 1/10 ft). To return to the previous display, press O. To hide the visual setup menu, press (VISUAL SETUP). Note If a center speaker is not connected, ignore its setting. 36
-
 1
1 -
2
-
3
-
4
-
5
-
6
-
7
-
8
-
9
-
10
-
11
-
12
-
13
-
14
-
15
-
16
-
17
-
18
-
19
-
20
-
21
-
22
-
23
-
24
-
25
-
26
-
27
-
28
-
29
-
30
-
 31
31 -
 32
32 -
 33
33 -
 34
34 -
 35
35 -
 36
36 -
 37
37 -
 38
38 -
 39
39 -
 40
40 -
 41
41 -
42
-
43
-
44
-
45
-
46
-
47
-
48
-
49
-
50
-
51
-
52
-
53
-
54
-
55
-
56
-
57
-
58
-
59
-
60
-
61
-
62
-
63
-
64
-
65
-
66
-
67
-
68
-
69
-
70
-
71
-
72
-
73
-
74
-
75
-
76
-
77
-
78
-
79
-
80
-
81
-
82
-
83
-
84
-
85
-
86
-
87
-
88
-
89
-
90
-
91
-
92
-
93
-
94
-
95
-
96
-
97
-
98
-
99
-
100
-
101
-
102
-
103
-
104
-
105
-
106
-
107
-
108
-
109
-
110
-
111
-
112
-
113
-
114
-
115
-
116
-
117
-
118
-
119
-
120
-
121
-
122
-
123
-
124
-
125
-
126
-
127
-
128
-
129
-
130
-
131
-
132
-
133
-
134
-
135
-
136
-
137
-
138
-
139
-
140
-
141
-
142
-
143
-
144
-
145
-
146
-
147
-
148
-
149
-
150
-
151
-
152
-
153
-
154
-
155
-
156
-
157
-
158
-
159
-
160
-
161
-
162
-
163
-
164
-
165
-
166
-
167
-
168
-
169
-
170
-
171
-
172
-
173
-
174
-
175
-
176
-
177
-
178
-
179
-
180
-
181
-
182
-
183
-
184
-
185
-
186
-
187
-
188
-
189
-
190
-
191
-
192
 |
 |
