Sony PCV-J100 Reference Manual - Page 54
Installing a 3º” Internal Hard Disk Drive, the power of the computer and all attached peripherals
 |
View all Sony PCV-J100 manuals
Add to My Manuals
Save this manual to your list of manuals |
Page 54 highlights
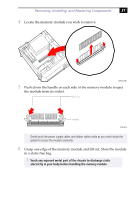
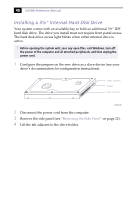
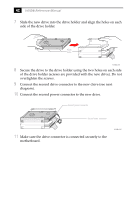
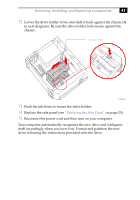
40 VAIO® Reference Manual Installing a 3½" Internal Hard Disk Drive Your system comes with an available bay to hold an additional 3½" IDE hard disk drive. The drive you install must not require front panel access. The hard disk drive access light blinks when either internal drive is active. ! Before opening the system unit, save any open files, exit Windows, turn off the power of the computer and all attached peripherals, and then unplug the power cord. 1 Configure the jumpers on the new drive as a slave device (see your drive's documentation for configuration instructions). Power connector Jumpers Drive connector KY0084.VSD 2 Disconnect the power cord from the computer. 3 Remove the side panel (see "Removing the Side Panel" on page 22). 4 Lift the tab adjacent to the drive holder.
-
 1
1 -
2
-
3
-
4
-
5
-
6
-
7
-
8
-
9
-
10
-
11
-
12
-
13
-
14
-
15
-
16
-
17
-
18
-
19
-
20
-
21
-
22
-
23
-
24
-
25
-
26
-
27
-
28
-
29
-
30
-
31
-
32
-
33
-
34
-
35
-
36
-
37
-
38
-
39
-
40
-
41
-
42
-
43
-
44
-
45
-
46
-
47
-
48
-
 49
49 -
 50
50 -
 51
51 -
 52
52 -
 53
53 -
 54
54 -
 55
55 -
 56
56 -
 57
57 -
 58
58 -
 59
59 -
60
-
61
-
62
-
63
-
64
-
65
-
66
-
67
-
68
-
69
-
70
-
71
-
72
-
73
-
74
-
75
-
76
-
77
-
78
-
79
-
80
-
81
-
82
-
83
-
84
-
85
-
86
-
87
-
88
-
89
-
90
-
91
-
92
-
93
-
94
-
95
-
96
-
97
-
98
-
99
-
100
-
101
-
102
-
103
-
104
-
105
-
106
-
107
-
108
-
109
-
110
-
111
-
112
-
113
-
114
 |
 |