Sony PCV-R532DS Online Help Center (VAIO User Guide) (Large File - 20.02 MB) - Page 471

Con the jumpers on the new drive as a slave see your drive's documentation for, If necessary

Page 471 highlights

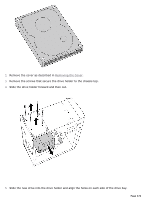
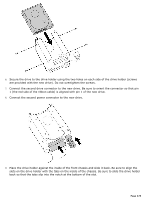
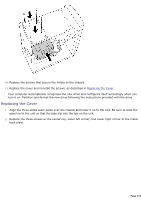
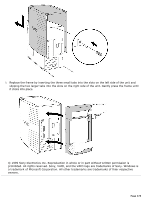
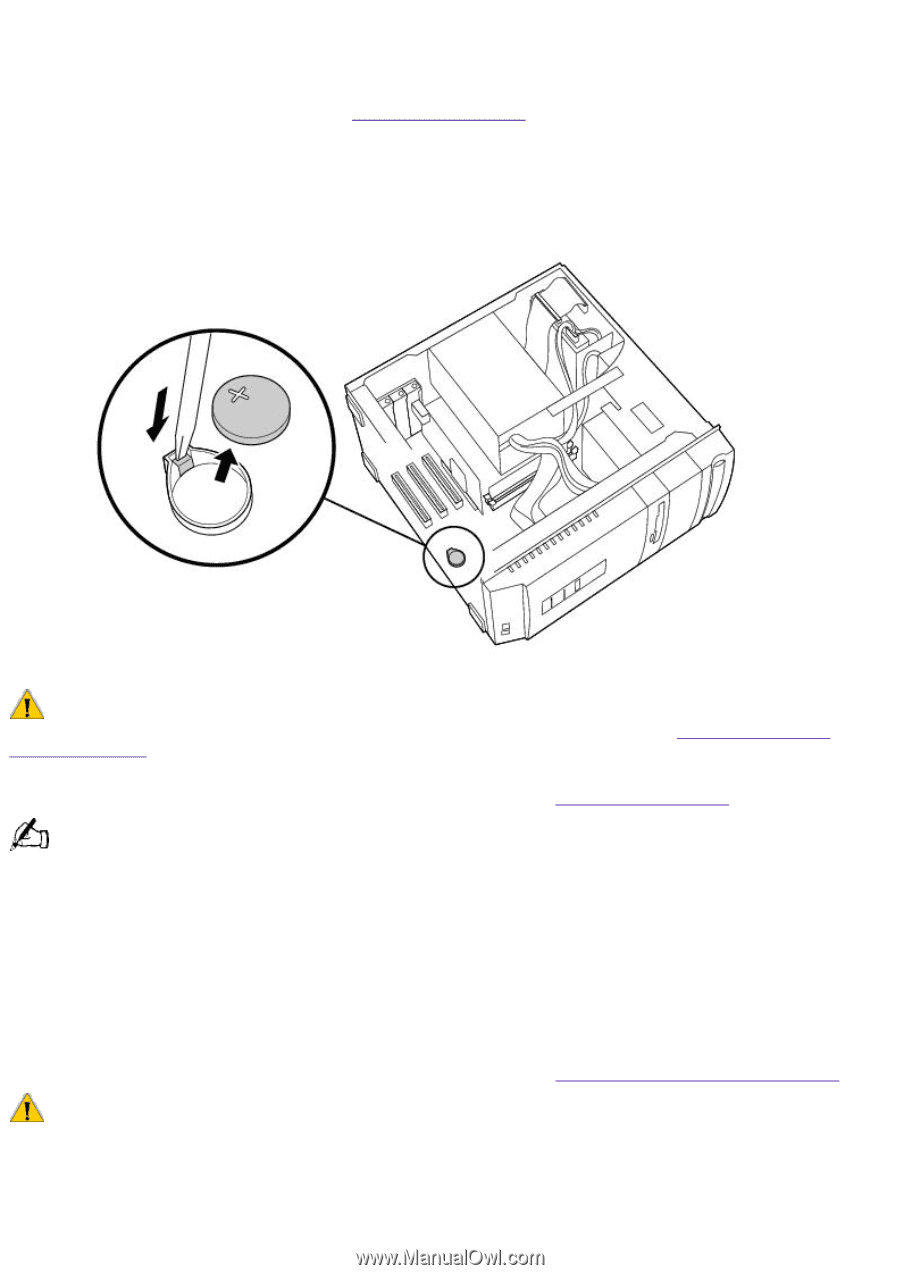
made any changes to the BIOS settings, proceed to step 2. 2. Shut down your computer and turn off all peripheral devices, such as your printer. Unplug your computer. 3. Remove the cover as described in Removing the Cover. 4. If necessary, remove any cables, add-in cards, or other components to access the lithium battery. 5. Remove the old battery, and install the new battery with the plus (+) side up. There is danger of the battery exploding if it is replaced incorrectly. You must replace the battery only with a CR2032 type lithium battery. Discard used batteries according to the instructions in the Sony Vaio Consumer Information Guide . 6. Replace the cover and reinstall the screws, as described in Replacing the Cover . The values stored in the CMOS memory are now reset to the factory default values. You must run the Setup utility to reset the date, time, passwords, and other changes you may have made to the BIOS settings. If you do not wish to customize your BIOS settings, you do not need to run the Setup utility. If you simply wish to reset the date and time, see Windows Help for instructions. Installing an Additional Hard Disk Drive Your computer comes with an available internal bay to hold a second standard 3½ inch hard disk drive. You may also use the additional 5¼ inch external bay on the PCV-R532DS and PCV-R536DS. The hard disk drive access light blinks when either internal drive is active. For information on how to install additional drives into the external drive, see the computer Reference Manual. You can download the Reference Manual from the Sony web site at http://www.sony.com/pcsupport. Before opening the system unit, save any open files, exit Windows, turn off the power of the computer and all attached peripherals, and then unplug the power cord. 1. Configure the jumpers on the new drive as a slave (see your drive's documentation for configuration instructions). Page 471
  • 1
  • 2
  • 3
  • 4
  • 5
  • 6
  • 7
  • 8
  • 9
  • 10
  • 11
  • 12
  • 13
  • 14
  • 15
  • 16
  • 17
  • 18
  • 19
  • 20
  • 21
  • 22
  • 23
  • 24
  • 25
  • 26
  • 27
  • 28
  • 29
  • 30
  • 31
  • 32
  • 33
  • 34
  • 35
  • 36
  • 37
  • 38
  • 39
  • 40
  • 41
  • 42
  • 43
  • 44
  • 45
  • 46
  • 47
  • 48
  • 49
  • 50
  • 51
  • 52
  • 53
  • 54
  • 55
  • 56
  • 57
  • 58
  • 59
  • 60
  • 61
  • 62
  • 63
  • 64
  • 65
  • 66
  • 67
  • 68
  • 69
  • 70
  • 71
  • 72
  • 73
  • 74
  • 75
  • 76
  • 77
  • 78
  • 79
  • 80
  • 81
  • 82
  • 83
  • 84
  • 85
  • 86
  • 87
  • 88
  • 89
  • 90
  • 91
  • 92
  • 93
  • 94
  • 95
  • 96
  • 97
  • 98
  • 99
  • 100
  • 101
  • 102
  • 103
  • 104
  • 105
  • 106
  • 107
  • 108
  • 109
  • 110
  • 111
  • 112
  • 113
  • 114
  • 115
  • 116
  • 117
  • 118
  • 119
  • 120
  • 121
  • 122
  • 123
  • 124
  • 125
  • 126
  • 127
  • 128
  • 129
  • 130
  • 131
  • 132
  • 133
  • 134
  • 135
  • 136
  • 137
  • 138
  • 139
  • 140
  • 141
  • 142
  • 143
  • 144
  • 145
  • 146
  • 147
  • 148
  • 149
  • 150
  • 151
  • 152
  • 153
  • 154
  • 155
  • 156
  • 157
  • 158
  • 159
  • 160
  • 161
  • 162
  • 163
  • 164
  • 165
  • 166
  • 167
  • 168
  • 169
  • 170
  • 171
  • 172
  • 173
  • 174
  • 175
  • 176
  • 177
  • 178
  • 179
  • 180
  • 181
  • 182
  • 183
  • 184
  • 185
  • 186
  • 187
  • 188
  • 189
  • 190
  • 191
  • 192
  • 193
  • 194
  • 195
  • 196
  • 197
  • 198
  • 199
  • 200
  • 201
  • 202
  • 203
  • 204
  • 205
  • 206
  • 207
  • 208
  • 209
  • 210
  • 211
  • 212
  • 213
  • 214
  • 215
  • 216
  • 217
  • 218
  • 219
  • 220
  • 221
  • 222
  • 223
  • 224
  • 225
  • 226
  • 227
  • 228
  • 229
  • 230
  • 231
  • 232
  • 233
  • 234
  • 235
  • 236
  • 237
  • 238
  • 239
  • 240
  • 241
  • 242
  • 243
  • 244
  • 245
  • 246
  • 247
  • 248
  • 249
  • 250
  • 251
  • 252
  • 253
  • 254
  • 255
  • 256
  • 257
  • 258
  • 259
  • 260
  • 261
  • 262
  • 263
  • 264
  • 265
  • 266
  • 267
  • 268
  • 269
  • 270
  • 271
  • 272
  • 273
  • 274
  • 275
  • 276
  • 277
  • 278
  • 279
  • 280
  • 281
  • 282
  • 283
  • 284
  • 285
  • 286
  • 287
  • 288
  • 289
  • 290
  • 291
  • 292
  • 293
  • 294
  • 295
  • 296
  • 297
  • 298
  • 299
  • 300
  • 301
  • 302
  • 303
  • 304
  • 305
  • 306
  • 307
  • 308
  • 309
  • 310
  • 311
  • 312
  • 313
  • 314
  • 315
  • 316
  • 317
  • 318
  • 319
  • 320
  • 321
  • 322
  • 323
  • 324
  • 325
  • 326
  • 327
  • 328
  • 329
  • 330
  • 331
  • 332
  • 333
  • 334
  • 335
  • 336
  • 337
  • 338
  • 339
  • 340
  • 341
  • 342
  • 343
  • 344
  • 345
  • 346
  • 347
  • 348
  • 349
  • 350
  • 351
  • 352
  • 353
  • 354
  • 355
  • 356
  • 357
  • 358
  • 359
  • 360
  • 361
  • 362
  • 363
  • 364
  • 365
  • 366
  • 367
  • 368
  • 369
  • 370
  • 371
  • 372
  • 373
  • 374
  • 375
  • 376
  • 377
  • 378
  • 379
  • 380
  • 381
  • 382
  • 383
  • 384
  • 385
  • 386
  • 387
  • 388
  • 389
  • 390
  • 391
  • 392
  • 393
  • 394
  • 395
  • 396
  • 397
  • 398
  • 399
  • 400
  • 401
  • 402
  • 403
  • 404
  • 405
  • 406
  • 407
  • 408
  • 409
  • 410
  • 411
  • 412
  • 413
  • 414
  • 415
  • 416
  • 417
  • 418
  • 419
  • 420
  • 421
  • 422
  • 423
  • 424
  • 425
  • 426
  • 427
  • 428
  • 429
  • 430
  • 431
  • 432
  • 433
  • 434
  • 435
  • 436
  • 437
  • 438
  • 439
  • 440
  • 441
  • 442
  • 443
  • 444
  • 445
  • 446
  • 447
  • 448
  • 449
  • 450
  • 451
  • 452
  • 453
  • 454
  • 455
  • 456
  • 457
  • 458
  • 459
  • 460
  • 461
  • 462
  • 463
  • 464
  • 465
  • 466
  • 467
  • 468
  • 469
  • 470
  • 471
  • 472
  • 473
  • 474
  • 475
  • 476
  • 477
  • 478
  • 479
  • 480
  • 481
  • 482
  • 483
  • 484
  • 485
  • 486
  • 487
  • 488
  • 489
  • 490
  • 491
  • 492
  • 493
  • 494
  • 495
  • 496
  • 497
  • 498
  • 499
  • 500
  • 501
  • 502
  • 503
  • 504
  • 505
  • 506
  • 507
  • 508
  • 509
  • 510
  • 511
  • 512
  • 513
  • 514
  • 515
  • 516
  • 517
  • 518
  • 519
  • 520
  • 521
  • 522
  • 523
  • 524
  • 525
  • 526
  • 527
  • 528
  • 529
  • 530
  • 531
  • 532
  • 533
  • 534
  • 535
  • 536
  • 537
  • 538
  • 539
  • 540
  • 541
  • 542
  • 543
  • 544
  • 545
  • 546
  • 547
  • 548
  • 549
  • 550
  • 551
  • 552
  • 553
  • 554
  • 555
  • 556
  • 557
  • 558
  • 559
  • 560
  • 561
  • 562
  • 563
  • 564
  • 565
  • 566
  • 567
  • 568
  • 569
  • 570
  • 571
  • 572
  • 573
  • 574
  • 575
  • 576
  • 577
  • 578
  • 579
  • 580
  • 581
  • 582
  • 583
  • 584
  • 585
  • 586

made any changes to the BIOS settings, proceed to step 2.
2.
Shut down your computer and turn off all peripheral devices, such as your printer. Unplug your
computer.
3.
Remove the cover as described in
Removing the Cover
.
4.
If necessary, remove any cables, add-in cards, or other components to access the lithium
battery.
5.
Remove the old battery, and install the new battery with the plus (+) side up.
There is danger of the battery exploding if it is replaced incorrectly. You must replace the battery only with a
CR2032 type lithium battery. Discard used batteries according to the instructions in the
Sony Vaio Consumer
Information Guide
.
6.
Replace the cover and reinstall the screws, as described in
Replacing the Cover
.
The values stored in the CMOS memory are now reset to the factory default values. You must run the Setup
utility to reset the date, time, passwords, and other changes you may have made to the BIOS settings. If you do
not wish to customize your BIOS settings, you do not need to run the Setup utility. If you simply wish to reset the
date and time, see Windows Help for instructions.
Installing an Additional Hard Disk Drive
Your computer comes with an available internal bay to hold a second standard 3½ inch hard disk
drive. You may also use the additional 5¼ inch external bay on the PCV-R532DS and PCV-R536DS.
The hard disk drive access light blinks when either internal drive is active. For information on how to
install additional drives into the external drive, see the computer
Reference Manual
. You can
download the
Reference Manual
from the Sony web site at
.
Before opening the system unit, save any open files, exit Windows, turn off the power of the computer and all
attached peripherals, and then unplug the
power cord.
1.
Configure the jumpers on the new drive as a slave (see your drive's documentation for
configuration instructions).
Page 471