Sony PCV-RZ22G System Reference Manual - Page 61
Replace the side panel see, Reconnect the power cord to the system and then turn on your - hard drive upgrade
 |
View all Sony PCV-RZ22G manuals
Add to My Manuals
Save this manual to your list of manuals |
Page 61 highlights
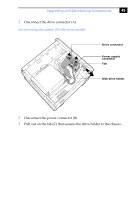
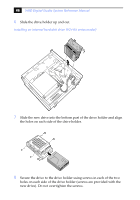
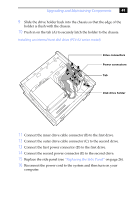
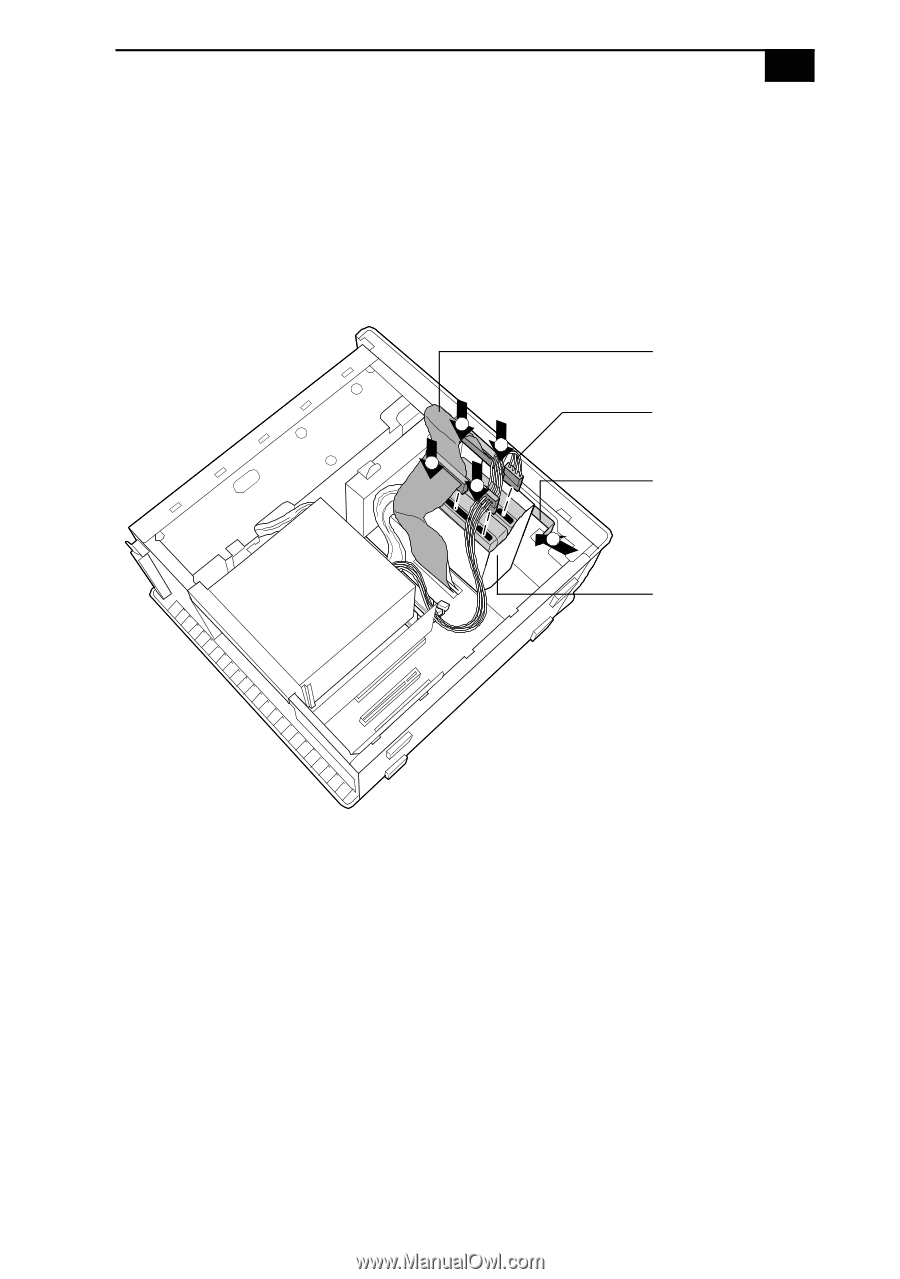
Upgrading and Maintaining Components 47 9 Slide the drive holder back into the chassis so that the edge of the holder is flush with the chassis. 10 Push in on the tab (A) to securely latch the holder to the chassis. Installing an internal hard disk drive (PCV-RX series model) C E B D A Drive connectors Power connectors Tab Disk drive holder 11 Connect the inner drive cable connector (B) to the first drive. 12 Connect the outer drive cable connector (C) to the second drive. 13 Connect the first power connector (D) to the first drive. 14 Connect the second power connector (E) to the second drive. 15 Replace the side panel (see "Replacing the Side Panel" on page 26). 16 Reconnect the power cord to the system and then turn on your computer.
-
 1
1 -
2
-
3
-
4
-
5
-
6
-
7
-
8
-
9
-
10
-
11
-
12
-
13
-
14
-
15
-
16
-
17
-
18
-
19
-
20
-
21
-
22
-
23
-
24
-
25
-
26
-
27
-
28
-
29
-
30
-
31
-
32
-
33
-
34
-
35
-
36
-
37
-
38
-
39
-
40
-
41
-
42
-
43
-
44
-
45
-
46
-
47
-
48
-
49
-
50
-
51
-
52
-
53
-
54
-
55
-
 56
56 -
 57
57 -
 58
58 -
 59
59 -
 60
60 -
 61
61 -
 62
62 -
 63
63 -
 64
64 -
 65
65 -
 66
66 -
67
-
68
-
69
-
70
-
71
-
72
-
73
-
74
-
75
-
76
-
77
-
78
-
79
-
80
-
81
-
82
-
83
-
84
-
85
-
86
-
87
-
88
-
89
-
90
-
91
-
92
-
93
-
94
-
95
-
96
-
97
-
98
-
99
-
100
 |
 |
Upgrading and Maintaining Components
47
9
Slide the drive holder back into the chassis so that the edge of the
holder is flush with the chassis.
10
Push in on the tab (A) to securely latch the holder to the chassis.
Installing an internal hard disk drive (PCV-RX series model)
11
Connect the inner drive cable connector (B) to the first drive.
12
Connect the outer drive cable connector (C) to the second drive.
13
Connect the first power connector (D) to the first drive.
14
Connect the second power connector (E) to the second drive.
15
Replace the side panel (see
“Replacing the Side Panel”
on page 26).
16
Reconnect the power cord to the system and then turn on your
computer.
C
E
A
B
D
Drive connectors
Power connectors
Tab
Disk drive holder