Sony PCV-RZ31G VAIO User Guide - Page 133
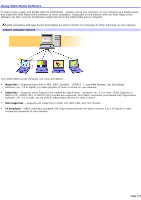
Transferring a finished movie to your digital video camera, Start, All Programs., DVgate, EXPORT
 |
View all Sony PCV-RZ31G manuals
Add to My Manuals
Save this manual to your list of manuals |
Page 133 highlights
Transferring a finished movie to your digital video camera After you have created a movie, you can export it back to your compatible DV device. 1. Confirm your DV device is set to recording mode. On certain models this is called VCR or VTR mode. 2. Turn on your DV device, and insert a tape. 3. From your VAIO® computer, click Start and then click All Programs. 4. Point to DVgate and then click DVgate. 5. Select EXPORT - Auto from the MODE list in the DVgate window. 6. In the DVgate - AVI file list window, click ADD. If the DVgate - AVI file list window is not open, click List on the Window menu. 7. In the ADD dialog box, select the movie file you want to export, and click Open. The ADD dialog box closes, and your selected movie appears in the Record list in the DVgate - AVI file list window. 8. Click RECORD ALL. 9. Click OK. The Output dialog box closes, and recording to your DV device begins. For more detailed information, see the DVgate Plus software Help. Page 133
-
 1
1 -
2
-
3
-
4
-
5
-
6
-
7
-
8
-
9
-
10
-
11
-
12
-
13
-
14
-
15
-
16
-
17
-
18
-
19
-
20
-
21
-
22
-
23
-
24
-
25
-
26
-
27
-
28
-
29
-
30
-
31
-
32
-
33
-
34
-
35
-
36
-
37
-
38
-
39
-
40
-
41
-
42
-
43
-
44
-
45
-
46
-
47
-
48
-
49
-
50
-
51
-
52
-
53
-
54
-
55
-
56
-
57
-
58
-
59
-
60
-
61
-
62
-
63
-
64
-
65
-
66
-
67
-
68
-
69
-
70
-
71
-
72
-
73
-
74
-
75
-
76
-
77
-
78
-
79
-
80
-
81
-
82
-
83
-
84
-
85
-
86
-
87
-
88
-
89
-
90
-
91
-
92
-
93
-
94
-
95
-
96
-
97
-
98
-
99
-
100
-
101
-
102
-
103
-
104
-
105
-
106
-
107
-
108
-
109
-
110
-
111
-
112
-
113
-
114
-
115
-
116
-
117
-
118
-
119
-
120
-
121
-
122
-
123
-
124
-
125
-
126
-
127
-
 128
128 -
 129
129 -
 130
130 -
 131
131 -
 132
132 -
 133
133 -
 134
134 -
 135
135 -
 136
136 -
 137
137 -
 138
138 -
139
-
140
-
141
-
142
-
143
-
144
-
145
-
146
-
147
-
148
-
149
-
150
-
151
-
152
-
153
-
154
-
155
-
156
-
157
-
158
-
159
-
160
-
161
-
162
-
163
-
164
-
165
-
166
-
167
-
168
-
169
-
170
-
171
-
172
-
173
-
174
-
175
-
176
-
177
-
178
-
179
-
180
-
181
-
182
-
183
-
184
-
185
-
186
-
187
-
188
-
189
-
190
-
191
-
192
-
193
-
194
-
195
-
196
-
197
-
198
-
199
-
200
-
201
-
202
-
203
-
204
-
205
-
206
-
207
-
208
-
209
-
210
-
211
-
212
-
213
-
214
-
215
-
216
-
217
-
218
-
219
-
220
-
221
-
222
-
223
 |
 |
