Sony PCV-RZ31G VAIO User Guide - Page 86
Divide, Recycle Bin, Combine, To set up your DVD, Create DVD, Title Menu, Video Menu, Previous
 |
View all Sony PCV-RZ31G manuals
Add to My Manuals
Save this manual to your list of manuals |
Page 86 highlights
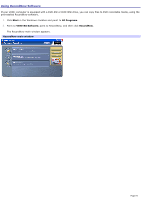
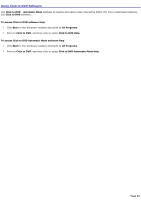
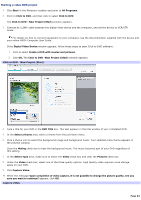
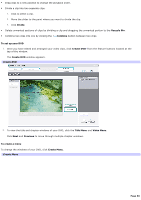
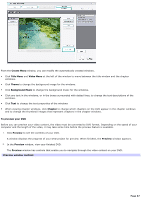
Drag clips to a new position to change the playback order. Divide a clip into two separate clips. 1. Click to select a clip. 2. Move the slider to the point where you want to divide the clip. 3. Click Divide. Delete unwanted sections of clips by dividing a clip and dragging the unwanted portion to the Recycle Bin. Combine two clips into one by clicking the Combine button between two clips To set up your DVD 1. Once you have edited and arranged your video clips, click Create DVD1 from the feature buttons located at the top of the window. The Create DVD window appears. Create DVD 2. To view the title and chapter windows of your DVD, click the Title Menu and Video Menu. Click Next and Previous to move through multiple chapter windows. To create a menu To change the windows of your DVD, click Create Menu. Create Menu Page 86
-
 1
1 -
2
-
3
-
4
-
5
-
6
-
7
-
8
-
9
-
10
-
11
-
12
-
13
-
14
-
15
-
16
-
17
-
18
-
19
-
20
-
21
-
22
-
23
-
24
-
25
-
26
-
27
-
28
-
29
-
30
-
31
-
32
-
33
-
34
-
35
-
36
-
37
-
38
-
39
-
40
-
41
-
42
-
43
-
44
-
45
-
46
-
47
-
48
-
49
-
50
-
51
-
52
-
53
-
54
-
55
-
56
-
57
-
58
-
59
-
60
-
61
-
62
-
63
-
64
-
65
-
66
-
67
-
68
-
69
-
70
-
71
-
72
-
73
-
74
-
75
-
76
-
77
-
78
-
79
-
80
-
 81
81 -
 82
82 -
 83
83 -
 84
84 -
 85
85 -
 86
86 -
 87
87 -
 88
88 -
 89
89 -
 90
90 -
 91
91 -
92
-
93
-
94
-
95
-
96
-
97
-
98
-
99
-
100
-
101
-
102
-
103
-
104
-
105
-
106
-
107
-
108
-
109
-
110
-
111
-
112
-
113
-
114
-
115
-
116
-
117
-
118
-
119
-
120
-
121
-
122
-
123
-
124
-
125
-
126
-
127
-
128
-
129
-
130
-
131
-
132
-
133
-
134
-
135
-
136
-
137
-
138
-
139
-
140
-
141
-
142
-
143
-
144
-
145
-
146
-
147
-
148
-
149
-
150
-
151
-
152
-
153
-
154
-
155
-
156
-
157
-
158
-
159
-
160
-
161
-
162
-
163
-
164
-
165
-
166
-
167
-
168
-
169
-
170
-
171
-
172
-
173
-
174
-
175
-
176
-
177
-
178
-
179
-
180
-
181
-
182
-
183
-
184
-
185
-
186
-
187
-
188
-
189
-
190
-
191
-
192
-
193
-
194
-
195
-
196
-
197
-
198
-
199
-
200
-
201
-
202
-
203
-
204
-
205
-
206
-
207
-
208
-
209
-
210
-
211
-
212
-
213
-
214
-
215
-
216
-
217
-
218
-
219
-
220
-
221
-
222
-
223
 |
 |
