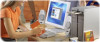
Sony PCV-RZ31G VAIO User Guide - Page 144
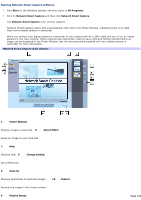
Starting Network Smart Capture software, Start, All Programs., Network Smart Capture, Finder Window
 |
View all Sony PCV-RZ31G manuals
Add to My Manuals
Save this manual to your list of manuals |
Page 144 highlights
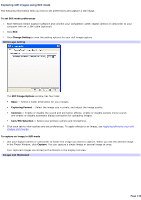
Starting Network Smart Capture software 1. Click Start on the Windows taskbar and then point to All Programs. 2. Point to Network Smart Capture and then click Network Smart Capture. The Network Smart Capture main window appears. Network Smart Capture opens with a preinstalled video clip in the Finder Window, indicating there is no data input from a digital camera or camcorder. When you connect your digital camera or camcorder to your system with an i.LINK® cable and turn it on, an image appears in the main window. Some cameras and camcorders need to have recording media inserted before an image can be displayed in the Finder Window. See the documentation supplied with your digital camera or camcorder for more information. Network Sm art Capture m ain window 1 Finder Window Displays images in real-time 8 Select Effect Saves an image to your hard disk 2 Help Displays Help 9 Change Setting Set preferences 3 Data list Displays thumbnails of captured images 10 Capture Records the image in the Finder window 4 Display Image Page 144
-
 1
1 -
2
-
3
-
4
-
5
-
6
-
7
-
8
-
9
-
10
-
11
-
12
-
13
-
14
-
15
-
16
-
17
-
18
-
19
-
20
-
21
-
22
-
23
-
24
-
25
-
26
-
27
-
28
-
29
-
30
-
31
-
32
-
33
-
34
-
35
-
36
-
37
-
38
-
39
-
40
-
41
-
42
-
43
-
44
-
45
-
46
-
47
-
48
-
49
-
50
-
51
-
52
-
53
-
54
-
55
-
56
-
57
-
58
-
59
-
60
-
61
-
62
-
63
-
64
-
65
-
66
-
67
-
68
-
69
-
70
-
71
-
72
-
73
-
74
-
75
-
76
-
77
-
78
-
79
-
80
-
81
-
82
-
83
-
84
-
85
-
86
-
87
-
88
-
89
-
90
-
91
-
92
-
93
-
94
-
95
-
96
-
97
-
98
-
99
-
100
-
101
-
102
-
103
-
104
-
105
-
106
-
107
-
108
-
109
-
110
-
111
-
112
-
113
-
114
-
115
-
116
-
117
-
118
-
119
-
120
-
121
-
122
-
123
-
124
-
125
-
126
-
127
-
128
-
129
-
130
-
131
-
132
-
133
-
134
-
135
-
136
-
137
-
138
-
 139
139 -
 140
140 -
 141
141 -
 142
142 -
 143
143 -
 144
144 -
 145
145 -
 146
146 -
 147
147 -
 148
148 -
 149
149 -
150
-
151
-
152
-
153
-
154
-
155
-
156
-
157
-
158
-
159
-
160
-
161
-
162
-
163
-
164
-
165
-
166
-
167
-
168
-
169
-
170
-
171
-
172
-
173
-
174
-
175
-
176
-
177
-
178
-
179
-
180
-
181
-
182
-
183
-
184
-
185
-
186
-
187
-
188
-
189
-
190
-
191
-
192
-
193
-
194
-
195
-
196
-
197
-
198
-
199
-
200
-
201
-
202
-
203
-
204
-
205
-
206
-
207
-
208
-
209
-
210
-
211
-
212
-
213
-
214
-
215
-
216
-
217
-
218
-
219
-
220
-
221
-
222
-
223
 |
 |
