Sony PCV-RZ31G VAIO User Guide - Page 84
Starting a video DVD project, Click to DVD - New Project Start
 |
View all Sony PCV-RZ31G manuals
Add to My Manuals
Save this manual to your list of manuals |
Page 84 highlights
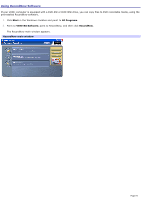
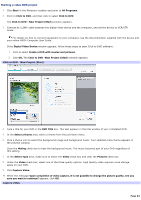
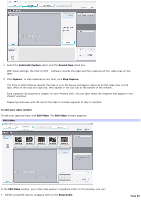
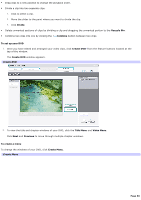
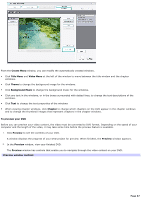
Starting a video DVD project 1. Click Start in the Windows® taskbar and point to All Programs. 2. Point to Click to DVD, and then click to select Click to DVD. The Click to DVD - New Project (Start) window appears. 3. Connect an i.LINK® cable between the digital video device and the computer, and set the device to VCR/VTR mode. For details on how to connect equipment to your computer, see the documentation supplied with the device and your online VAIO® Computer User Guide. If the Digital Video Device window appears, follow these steps to start Click to DVD software: 1. Click to select Create a DVD with movies and pictures. 2. Click OK. The Click to DVD -New Project (Start) window appears. Click to DVD - New Project (Start) 4. Type a title for your DVD in the DVD Title box. This text appears in the title window of your completed DVD. 5. In the Select a theme area, select a theme from the pull-down menu. 6. Click a theme icon to select the background image and background music. Your selected menu theme appears in the preview window. Clear the Muting check box to hear the background music. The music becomes part of your DVD regardless of this setting. 7. In the Select Type area, make sure to select the Video check box and clear the Pictures check box. 8. Under the Video check box, select one of the three quality options. High Quality video requires more storage space on your DVD. 9. Click Capture Video. 10. When the message Upon completion of video capture, it is not possible to change the picture quality. Are you sure you want to continue? appears, click OK. Capture Video Page 84
-
 1
1 -
2
-
3
-
4
-
5
-
6
-
7
-
8
-
9
-
10
-
11
-
12
-
13
-
14
-
15
-
16
-
17
-
18
-
19
-
20
-
21
-
22
-
23
-
24
-
25
-
26
-
27
-
28
-
29
-
30
-
31
-
32
-
33
-
34
-
35
-
36
-
37
-
38
-
39
-
40
-
41
-
42
-
43
-
44
-
45
-
46
-
47
-
48
-
49
-
50
-
51
-
52
-
53
-
54
-
55
-
56
-
57
-
58
-
59
-
60
-
61
-
62
-
63
-
64
-
65
-
66
-
67
-
68
-
69
-
70
-
71
-
72
-
73
-
74
-
75
-
76
-
77
-
78
-
 79
79 -
 80
80 -
 81
81 -
 82
82 -
 83
83 -
 84
84 -
 85
85 -
 86
86 -
 87
87 -
 88
88 -
 89
89 -
90
-
91
-
92
-
93
-
94
-
95
-
96
-
97
-
98
-
99
-
100
-
101
-
102
-
103
-
104
-
105
-
106
-
107
-
108
-
109
-
110
-
111
-
112
-
113
-
114
-
115
-
116
-
117
-
118
-
119
-
120
-
121
-
122
-
123
-
124
-
125
-
126
-
127
-
128
-
129
-
130
-
131
-
132
-
133
-
134
-
135
-
136
-
137
-
138
-
139
-
140
-
141
-
142
-
143
-
144
-
145
-
146
-
147
-
148
-
149
-
150
-
151
-
152
-
153
-
154
-
155
-
156
-
157
-
158
-
159
-
160
-
161
-
162
-
163
-
164
-
165
-
166
-
167
-
168
-
169
-
170
-
171
-
172
-
173
-
174
-
175
-
176
-
177
-
178
-
179
-
180
-
181
-
182
-
183
-
184
-
185
-
186
-
187
-
188
-
189
-
190
-
191
-
192
-
193
-
194
-
195
-
196
-
197
-
198
-
199
-
200
-
201
-
202
-
203
-
204
-
205
-
206
-
207
-
208
-
209
-
210
-
211
-
212
-
213
-
214
-
215
-
216
-
217
-
218
-
219
-
220
-
221
-
222
-
223
 |
 |
