Sony PDWF800 User Manual (PDW-700 / PDW-F800 Operation Manual for Firmware Ver - Page 224
Setting power saving functions, Setting up a wireless LAN, Turn the MENU knob to select
 |
View all Sony PDWF800 manuals
Add to My Manuals
Save this manual to your list of manuals |
Page 224 highlights
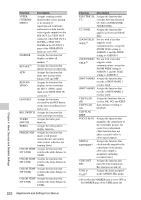
Setting power saving functions You can limit the function of some output connectors to save power consumption. (How to select an item in the menu screen: Turn the MENU knob to move b to the desired item.) 1 Display the POWER SAVE page of the OPERATION menu, and press the MENU knob. For details on menu operations, see "Basic menu operations" on page 205. 2 Select the desired item, and press the MENU knob. You can set the following items on the POWER SAVE page. Item Description ETHERNET/ Enables or disables the USB network connector and USB connector. i.LINK(FAM) a) Enables or disables the i.LINK connector (FAM function). REC AUDIO Puts the AUDIO OUT OUT connectors in EE or SAVE mode. TEST OUT Switches the TEST OUT SAVE connector power saving function on and off. ON: No signals are output if a cable is not connected. OFF: Signals are always output, regardless of whether a cable is connected. Wi-Fi Enables or disables the wireless LAN function. a) The unit must be powered off and on again to enable changes to this setting. 3 Turn the MENU knob to select the desired setting, and press the MENU knob. 4 Repeat steps 2 and 3 until you have set all of the desired items. Setting up a wireless LAN You can install the optional CBK-WA01 Wi-Fi adapter in this unit, and set up a wireless LAN as explained in this section. When you connect this unit to a computer over a network, you can make the settings explained here from a Web menu. For details, refer to the operation manual supplied with the optional CBK-WA01 Wi-Fi adapter. Notes • The CBKZ-UPG01 Software Upgrade Key must be installed to make these settings. • For information about connecting to a wireless LAN, refer to the operation manual supplied with the optional CBK-WA01 Wi-Fi adapter. • Even when the optional CBK-WA01 Wi-Fi adapter is installed in this unit, the message "NO Wi-Fi ADAPTER!" may appear if you attempt to set up a wireless LAN immediately after powering the unit on. If this occurs, wait for a while and try again. • If the message "IEEE802.1X IS ENABLED!" appears when you change the settings, execute NET CFG RESET on the NETWORK 2 page of the MAINTENANCE menu and then try again. • The proxy data recording function is disabled automatically whenever you enable the wireless LAN connection function. Before starting, set ETHERNET/USB and Wi-Fi on the POWER SAVE page of the OPERATION menu to "ENABL". (How to select an item in the menu screen: Turn the MENU knob to move b to the desired item.) 1 Display the Wi-Fi page of the MAINTENANCE menu, and then press the MENU knob. See "Basic menu operations" (page 205) for more information about menu operations. M26 Wi-Fi TOP Wi-Fi SETUP : EXEC Wi-Fi STATUS : [-----] WIRELESS MODE: 802.11b SSID: (unknown) NETWORK TYPE : CH : AUTH : ENCRYPTION : INFRA 1 OPEN DISABLE 2 Select "Wi-Fi SETUP" and then press the MENU knob. Chapter 6 Menu Displays and Detailed Settings 224 Adjustments and Settings from Menus
-
 1
1 -
2
-
3
-
4
-
5
-
6
-
7
-
8
-
9
-
10
-
11
-
12
-
13
-
14
-
15
-
16
-
17
-
18
-
19
-
20
-
21
-
22
-
23
-
24
-
25
-
26
-
27
-
28
-
29
-
30
-
31
-
32
-
33
-
34
-
35
-
36
-
37
-
38
-
39
-
40
-
41
-
42
-
43
-
44
-
45
-
46
-
47
-
48
-
49
-
50
-
51
-
52
-
53
-
54
-
55
-
56
-
57
-
58
-
59
-
60
-
61
-
62
-
63
-
64
-
65
-
66
-
67
-
68
-
69
-
70
-
71
-
72
-
73
-
74
-
75
-
76
-
77
-
78
-
79
-
80
-
81
-
82
-
83
-
84
-
85
-
86
-
87
-
88
-
89
-
90
-
91
-
92
-
93
-
94
-
95
-
96
-
97
-
98
-
99
-
100
-
101
-
102
-
103
-
104
-
105
-
106
-
107
-
108
-
109
-
110
-
111
-
112
-
113
-
114
-
115
-
116
-
117
-
118
-
119
-
120
-
121
-
122
-
123
-
124
-
125
-
126
-
127
-
128
-
129
-
130
-
131
-
132
-
133
-
134
-
135
-
136
-
137
-
138
-
139
-
140
-
141
-
142
-
143
-
144
-
145
-
146
-
147
-
148
-
149
-
150
-
151
-
152
-
153
-
154
-
155
-
156
-
157
-
158
-
159
-
160
-
161
-
162
-
163
-
164
-
165
-
166
-
167
-
168
-
169
-
170
-
171
-
172
-
173
-
174
-
175
-
176
-
177
-
178
-
179
-
180
-
181
-
182
-
183
-
184
-
185
-
186
-
187
-
188
-
189
-
190
-
191
-
192
-
193
-
194
-
195
-
196
-
197
-
198
-
199
-
200
-
201
-
202
-
203
-
204
-
205
-
206
-
207
-
208
-
209
-
210
-
211
-
212
-
213
-
214
-
215
-
216
-
217
-
218
-
 219
219 -
 220
220 -
 221
221 -
 222
222 -
 223
223 -
 224
224 -
 225
225 -
 226
226 -
 227
227 -
 228
228 -
 229
229 -
230
-
231
-
232
-
233
-
234
-
235
-
236
-
237
-
238
-
239
-
240
-
241
-
242
-
243
-
244
-
245
-
246
-
247
-
248
-
249
-
250
-
251
-
252
-
253
-
254
-
255
-
256
-
257
-
258
-
259
-
260
-
261
-
262
-
263
-
264
-
265
-
266
-
267
-
268
-
269
-
270
-
271
-
272
-
273
-
274
-
275
-
276
-
277
-
278
-
279
-
280
-
281
-
282
-
283
-
284
-
285
-
286
-
287
-
288
-
289
-
290
-
291
-
292
-
293
-
294
-
295
 |
 |
