Sony PDWF800 User Manual (PDW-700 / PDW-F800 Operation Manual for Firmware Ver - Page 225
To specify a connection destination by, automatic detection, manually, SCAN NETWORKS and then press
 |
View all Sony PDWF800 manuals
Add to My Manuals
Save this manual to your list of manuals |
Page 225 highlights
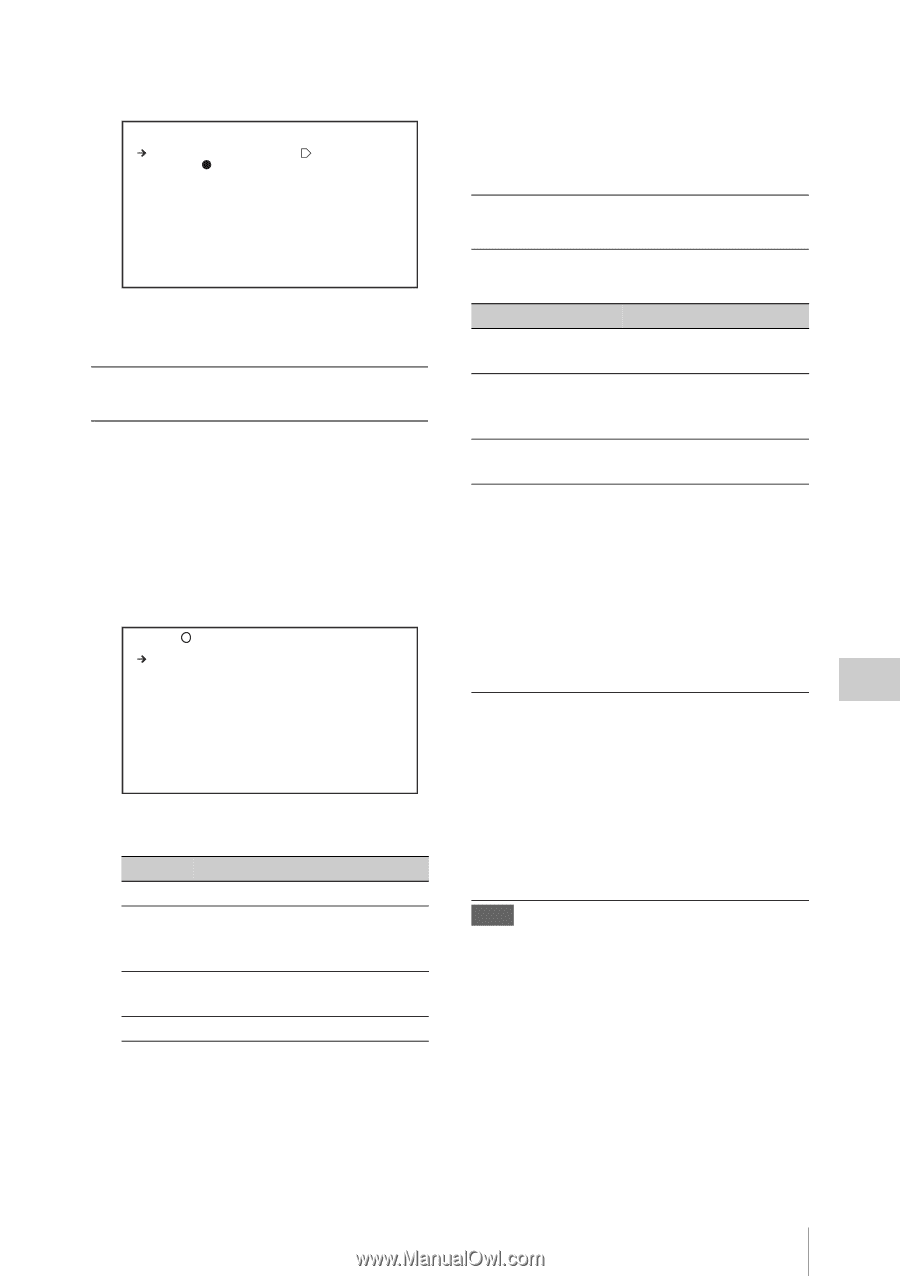
The screen changes to the Wi-Fi SETTING page. Wi-Fi SETTING ESC SCAN NETWORKS: EXEC SSID: 00:11:22:33:44:55 NETWORK TYPE : ADHOC CH : 1 AUTH : OPEN ENCRYPTION : DISABLE SET 3 Specify the connection destination (see the next section for how to specify it). To specify a connection destination by automatic detection 1 On the Wi-Fi SETTING page, select "SCAN NETWORKS" and then press the MENU knob. The screen changes to the NETWORKS page, and automatic detection of the connection destination starts. Several minutes may be required for network detection. P00 NETWORKS SCAN ESC 01.SSID: TYPE: ADHOC LVL : 4 MODE: 802.11b/g/n 02.SSID: TYPE: INFRA LVL : 3 MODE: 802.11b/g/n This page displays the following network items. Item SSID TYPE LVL MODE Description Network name Network connection mode INFRA: Infrastructure mode ADHOC: Ad hoc mode Signal strength 0 (minimum) to 4 (maximum) IEEE 802.11 standard 2 Select the desired access point or computer from the detected items, and then press the MENU knob. You return to the Wi-Fi SETTING page. Check the various setting items. To return to the Wi-Fi SETTING page If you do not want to specify a connection destination on this page, or if no connection destination was detected, select "ESC" and then press the MENU knob to return to the Wi-Fi SETTING page. To specify a connection destination manually Specify the following items on the Wi-Fi SETTING page. Item name Setting SSID (network name) Up to 32 alphanumeric characters or symbols NETWORK TYPE (connection mode) INFRA: Infrastructure mode ADHOC: Ad hoc mode CH (wireless channel) 1 to 11 (can be specified only in ad hoc mode) AUTH (network authentication) OPEN: Open system authentication SHARED: Shared key authentication WPA: WPA (Wi-Fi Protected Access) authentication WPA2: WPA2 (Wi-Fi Protected Access 2) authentication ENCRYPTION (data encryption) DISABLE: Disable WEP: WEP (Wired Equivalent Privacy) method TKIP: TKIP (Temporal Key Integrity Protocol) method AES: AES (Advanced Encryption Standard) method Note Some limitations apply to combinations of the "NETWORK TYPE", "AUTH", and "ENCRYPTION" settings. To enter an SSID Select SSID, press the MENU knob to display the Wi-Fi>SSID page, and then press the MENU knob again. When you press the MENU knob once more, an x appears over the first character in the input string, and the unit enters character input mode. Chapter 6 Menu Displays and Detailed Settings Adjustments and Settings from Menus 225
-
 1
1 -
2
-
3
-
4
-
5
-
6
-
7
-
8
-
9
-
10
-
11
-
12
-
13
-
14
-
15
-
16
-
17
-
18
-
19
-
20
-
21
-
22
-
23
-
24
-
25
-
26
-
27
-
28
-
29
-
30
-
31
-
32
-
33
-
34
-
35
-
36
-
37
-
38
-
39
-
40
-
41
-
42
-
43
-
44
-
45
-
46
-
47
-
48
-
49
-
50
-
51
-
52
-
53
-
54
-
55
-
56
-
57
-
58
-
59
-
60
-
61
-
62
-
63
-
64
-
65
-
66
-
67
-
68
-
69
-
70
-
71
-
72
-
73
-
74
-
75
-
76
-
77
-
78
-
79
-
80
-
81
-
82
-
83
-
84
-
85
-
86
-
87
-
88
-
89
-
90
-
91
-
92
-
93
-
94
-
95
-
96
-
97
-
98
-
99
-
100
-
101
-
102
-
103
-
104
-
105
-
106
-
107
-
108
-
109
-
110
-
111
-
112
-
113
-
114
-
115
-
116
-
117
-
118
-
119
-
120
-
121
-
122
-
123
-
124
-
125
-
126
-
127
-
128
-
129
-
130
-
131
-
132
-
133
-
134
-
135
-
136
-
137
-
138
-
139
-
140
-
141
-
142
-
143
-
144
-
145
-
146
-
147
-
148
-
149
-
150
-
151
-
152
-
153
-
154
-
155
-
156
-
157
-
158
-
159
-
160
-
161
-
162
-
163
-
164
-
165
-
166
-
167
-
168
-
169
-
170
-
171
-
172
-
173
-
174
-
175
-
176
-
177
-
178
-
179
-
180
-
181
-
182
-
183
-
184
-
185
-
186
-
187
-
188
-
189
-
190
-
191
-
192
-
193
-
194
-
195
-
196
-
197
-
198
-
199
-
200
-
201
-
202
-
203
-
204
-
205
-
206
-
207
-
208
-
209
-
210
-
211
-
212
-
213
-
214
-
215
-
216
-
217
-
218
-
219
-
 220
220 -
 221
221 -
 222
222 -
 223
223 -
 224
224 -
 225
225 -
 226
226 -
 227
227 -
 228
228 -
 229
229 -
 230
230 -
231
-
232
-
233
-
234
-
235
-
236
-
237
-
238
-
239
-
240
-
241
-
242
-
243
-
244
-
245
-
246
-
247
-
248
-
249
-
250
-
251
-
252
-
253
-
254
-
255
-
256
-
257
-
258
-
259
-
260
-
261
-
262
-
263
-
264
-
265
-
266
-
267
-
268
-
269
-
270
-
271
-
272
-
273
-
274
-
275
-
276
-
277
-
278
-
279
-
280
-
281
-
282
-
283
-
284
-
285
-
286
-
287
-
288
-
289
-
290
-
291
-
292
-
293
-
294
-
295
 |
 |