Sony PDWU1 User Manual (PDW-U1 Professional Disc Drive Unit Operation Manual F - Page 44
To Eject Discs With, the Unit Powered Off, Media Protection, Function
 |
View all Sony PDWU1 manuals
Add to My Manuals
Save this manual to your list of manuals |
Page 44 highlights
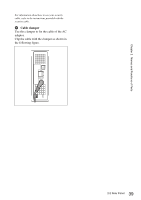
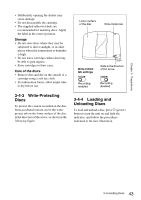
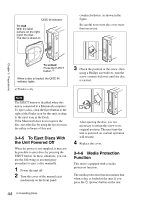
DISC IN indicator To load With the label surface on the right, insert the disc. The disc is drawn in. counterclockwise, as shown in the figure. Be careful not to turn the cover more than necessary. Chapter 3 Preparations To unload Press the EJECT button. a) When a disc is loaded, the DISC IN indicator lights. a) Windows only Note The EJECT button is disabled when this unit is connected to a Macintosh computer. To eject a disc, click the Eject button to the right of the Finder icon for this unit, or drag to the eject icon in the Dock. If the Macintosh does not recognize the disc, eject the disc by using the eject icon in the utility software of this unit. 3-4-5 To Eject Discs With the Unit Powered Off When the power is not supplied, it may not be possible to eject discs by pressing the EJECT button. In these situations, you can use the following as an emergency procedure to eject a disc manually. 1 Power the unit off. 2 Turn the cover of the manual eject mechanism on the front panel 3 Check the position of the screw, then using a Phillips screwdriver, turn the screw counterclockwise until the disc is ejected. After ejecting the disc, it is not necessary to return the screw to its original position. The next time the unit is powered on, normal operation will resume. 4 Replace the cover. 3-4-6 Media Protection Function This unit is equipped with a media protection function. The media protection function means that when a disc is loaded in the unit, if you press the 1 (power) button on the rear 44 3-4 Handling Discs
-
 1
1 -
2
-
3
-
4
-
5
-
6
-
7
-
8
-
9
-
10
-
11
-
12
-
13
-
14
-
15
-
16
-
17
-
18
-
19
-
20
-
21
-
22
-
23
-
24
-
25
-
26
-
27
-
28
-
29
-
30
-
31
-
32
-
33
-
34
-
35
-
36
-
37
-
38
-
 39
39 -
 40
40 -
 41
41 -
 42
42 -
 43
43 -
 44
44 -
 45
45 -
 46
46 -
 47
47 -
 48
48 -
 49
49 -
50
-
51
-
52
 |
 |
