Sony RDR-HX730 Operating Instructions - Page 78
Program Edit, Select DV / D8 EDIT, and press
 |
View all Sony RDR-HX730 manuals
Add to My Manuals
Save this manual to your list of manuals |
Page 78 highlights
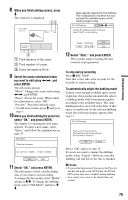
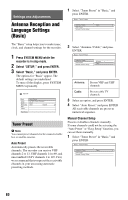
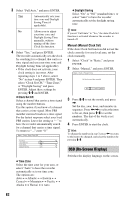
Program Edit HDD +RW -RWVR -RWVideo +R -RVR -RVideo You can select scenes from a DV/Digital8 format tape, and then automatically record selected scenes to the HDD or a DVD. To use this function, do the following: Connect your digital video camera and prepare for recording m Select and edit the scenes you want to dub Using the recorder's remote control, fast forward or rewind the tape to select the scenes. At this point, the selected scenes are not copied to the disc. The recorder only remembers the IN and OUT points of the scenes that you selected for dubbing. You can also erase or change the order of the scenes. m Dub the selected scenes After you have selected the scenes, the recorder will fast forward and rewind the tape automatically and record the scenes to the HDD or a DVD. How chapters are created The contents dubbed to the HDD or DVD become a single title. When "Auto Chapter" is set to "On" in the "Recording" setup, this title is divided into chapters. When dubbing to the HDD or a DVD-RW/DVD-R (VR mode), each shooting session on the tape and each selected scene becomes a chapter on the disc. For other discs, the recorder divides the title into chapters at approximately 6 minute intervals. 1 Follow steps 1 to 6 of "Preparing for DV/Digital8 dubbing" on page 75, and press SYSTEM MENU. 78 2 Select "DV / D8 EDIT," and press ENTER. The display asks if you want to start selecting scenes. • If you have previously saved a program, the display asks if you want to edit an existing program or to create a new program. To resume editing the existing program, select "Saved Data," and go to step 9. 3 Select "Start," and press ENTER. The display for setting the IN point (start of the scene) appears. The scene starts to play. 4 Select the IN point using m/M, and press ENTER. Playback pauses. 5 Press ENTER if the IN point is correct. If the IN point is incorrect, select the IN point using c/C, and press ENTER. The display for setting the OUT point (end of the scene) appears. 6 Select the OUT point using m/M, and press ENTER. Playback pauses. 7 Press ENTER if the OUT point is correct. If the OUT point is incorrect, select the OUT point using c/C, and press ENTER. The selected scene is added to the scene information block. • To add more scenes, go to step 4.
-
 1
1 -
2
-
3
-
4
-
5
-
6
-
7
-
8
-
9
-
10
-
11
-
12
-
13
-
14
-
15
-
16
-
17
-
18
-
19
-
20
-
21
-
22
-
23
-
24
-
25
-
26
-
27
-
28
-
29
-
30
-
31
-
32
-
33
-
34
-
35
-
36
-
37
-
38
-
39
-
40
-
41
-
42
-
43
-
44
-
45
-
46
-
47
-
48
-
49
-
50
-
51
-
52
-
53
-
54
-
55
-
56
-
57
-
58
-
59
-
60
-
61
-
62
-
63
-
64
-
65
-
66
-
67
-
68
-
69
-
70
-
71
-
72
-
 73
73 -
 74
74 -
 75
75 -
 76
76 -
 77
77 -
 78
78 -
 79
79 -
 80
80 -
 81
81 -
 82
82 -
 83
83 -
84
-
85
-
86
-
87
-
88
-
89
-
90
-
91
-
92
-
93
-
94
-
95
-
96
-
97
-
98
-
99
-
100
-
101
-
102
-
103
-
104
-
105
-
106
-
107
-
108
 |
 |
