Sony RDR-HX730 Operating Instructions - Page 87
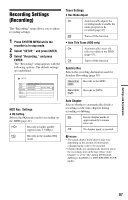
Recording Settings (Recording), Select SETUP, and press ENTER.
 |
View all Sony RDR-HX730 manuals
Add to My Manuals
Save this manual to your list of manuals |
Page 87 highlights
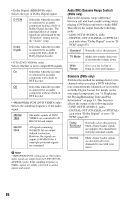
Recording Settings (Recording) The "Recording" setup allows you to adjust recording settings. 1 Press SYSTEM MENU while the recorder is in stop mode. 2 Select "SETUP," and press ENTER. 3 Select "Recording," and press ENTER. The "Recording" setup appears with the following options. The default settings are underlined. Timer Settings Rec Mode Adjust On Automatically adjusts the recording mode to enable the entire program to be recorded (page 43). Off Turns off the function. Auto Title Erase (HDD only) On Automatically erases old titles recorded on the HDD (page 43). Off Turns off the function. Synchro Rec Selects the recording destination used for Synchro-Recording (page 50). Record to Records to the HDD. HDD Record to Records to DVDs. DVD HDD Rec. Settings HQ Setting Selects the HQ mode used for recording on the HDD (page 41). HQ+ Records in higher quality (approximate 15 Mbps). HQ Records in the standard HQ mode. Auto Chapter Selects whether to automatically divide a recording (a title) into chapters during recording or dubbing. On Inserts chapter marks at approximately 6 minute intervals. Off No chapter mark is inserted. b Notes • The actual chapter mark interval may vary depending on the amount of information contained in the video to be recorded. • Chapter marks are automatically inserted where the recordings start on the tape when "Auto Chapter" is set to "On" during DV/Digital8 dubbing to the HDD or a DVD-RW/DVD-R (VR mode). Settings and Adjustments 87
-
 1
1 -
2
-
3
-
4
-
5
-
6
-
7
-
8
-
9
-
10
-
11
-
12
-
13
-
14
-
15
-
16
-
17
-
18
-
19
-
20
-
21
-
22
-
23
-
24
-
25
-
26
-
27
-
28
-
29
-
30
-
31
-
32
-
33
-
34
-
35
-
36
-
37
-
38
-
39
-
40
-
41
-
42
-
43
-
44
-
45
-
46
-
47
-
48
-
49
-
50
-
51
-
52
-
53
-
54
-
55
-
56
-
57
-
58
-
59
-
60
-
61
-
62
-
63
-
64
-
65
-
66
-
67
-
68
-
69
-
70
-
71
-
72
-
73
-
74
-
75
-
76
-
77
-
78
-
79
-
80
-
81
-
 82
82 -
 83
83 -
 84
84 -
 85
85 -
 86
86 -
 87
87 -
 88
88 -
 89
89 -
 90
90 -
 91
91 -
 92
92 -
93
-
94
-
95
-
96
-
97
-
98
-
99
-
100
-
101
-
102
-
103
-
104
-
105
-
106
-
107
-
108
 |
 |
