Sony RDR-HX730 Operating Instructions - Page 82
OSD (On-Screen Display), Manual Manual Clock Set
 |
View all Sony RDR-HX730 manuals
Add to My Manuals
Save this manual to your list of manuals |
Page 82 highlights
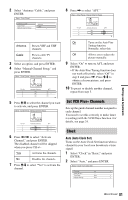
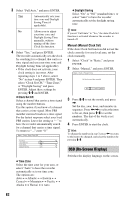
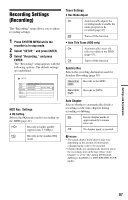
3 Select "Full Auto," and press ENTER. Yes Automatically sets your time zone and Daylight Saving Time (if applicable). No Allows you to adjust your time zone and Daylight Saving Time manually, without turning off the Auto Clock Set function. 4 Select "Yes," and press ENTER. The recorder automatically sets the clock by searching for a channel that carries a time signal and sets your time zone and Daylight Saving Time (if applicable). • If the clock does not activate, your clock setting is incorrect. After repeating steps 1 to 3 above, select "No" in step 4 and press ENTER. Then select "Clock Set CH," "Time Zone," or "Daylight Saving" and press ENTER. Adjust these settings by pressing M/m and ENTER. Clock Set CH Select a channel that carries a time signal using the number buttons. Use this option if you know of a channel that carries a time signal. Most PBS member stations broadcast a time signal. For the fastest response select your local PBS station. Leave the setting at "--" to have the recorder automatically search for a channel that carries a time signal. To return to "--," enter "0." Daylight Saving Select "On" or "Off" (standard time), or select "Auto" to have the recorder automatically set the daylight saving time. z Hint If you set "Full Auto" to "Yes," the Auto Clock Set function is activated whenever the recorder is turned off. Manual (Manual Clock Set) If the Auto Clock Set function did not set the clock correctly for your local area, set the clock manually. 1 Select "Clock" in "Basic," and press ENTER. 2 Select "Manual," and press ENTER. 3 Press M/m to set the month, and press ,. Set the day, year, hour, and minutes in sequence. Press
-
 1
1 -
2
-
3
-
4
-
5
-
6
-
7
-
8
-
9
-
10
-
11
-
12
-
13
-
14
-
15
-
16
-
17
-
18
-
19
-
20
-
21
-
22
-
23
-
24
-
25
-
26
-
27
-
28
-
29
-
30
-
31
-
32
-
33
-
34
-
35
-
36
-
37
-
38
-
39
-
40
-
41
-
42
-
43
-
44
-
45
-
46
-
47
-
48
-
49
-
50
-
51
-
52
-
53
-
54
-
55
-
56
-
57
-
58
-
59
-
60
-
61
-
62
-
63
-
64
-
65
-
66
-
67
-
68
-
69
-
70
-
71
-
72
-
73
-
74
-
75
-
76
-
 77
77 -
 78
78 -
 79
79 -
 80
80 -
 81
81 -
 82
82 -
 83
83 -
 84
84 -
 85
85 -
 86
86 -
 87
87 -
88
-
89
-
90
-
91
-
92
-
93
-
94
-
95
-
96
-
97
-
98
-
99
-
100
-
101
-
102
-
103
-
104
-
105
-
106
-
107
-
108
 |
 |
