Sony RM-AX4000A Instruction Manual - Page 9
OK and Cursor Control buttons, SYSTEM CONTROL buttons - remote commander
 |
UPC - 027242701205
View all Sony RM-AX4000A manuals
Add to My Manuals
Save this manual to your list of manuals |
Page 9 highlights
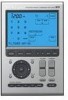
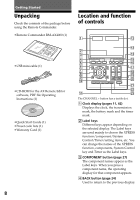
Getting Started 5 XPRESS button (pages 22-24) The XPRESS names appear as the Label keys. When you press an XPRESS name, the operating display for that XPRESS function appears, and its macro is performed. 6 MENU button (pages 76-87) Calls up the menu screen for components that have menu function. 7 EPG button (pages 76, 78, 81, 84, 86) 8 OK and Cursor Control buttons (pages 40, 46, 62, 67, 76, 78-81, 83-88) 9 EXIT button (pages 39, 76, 78-81, 83-87) q; TOOLS button (pages 76, 78, 81, 84, 86) qa SYSTEM CONTROL buttons (pages 31, 51, 54) You can automatically carry out the entire program by pressing one button. qs Display title Shows the title of the LCD Display. If a page number such as "/1" appears, multiple pages are available. If you press the number, next page displays. qh COMMANDER OFF button (page 33) Turns the power of the Remote Commander off. qj LIGHT button (pages 32, 49) Used to brighten the backlight in the dark. Press the button once to turn on/off the light. qk CHANNEL +/- buttons (pages 76-78, 80-81, 83-87) Selects the channel. ql VOLUME +/- buttons* (pages 29, 50, 76-90) Adjusts the volume. w; RECALL button (pages 76-78, 81, 84-86, 91) wa ALL OFF button (page 33) ws MUTING button* (pages 29, 50, 76-90) Silences the sound. Press the button to silence, and again to return to the previous volume level. wd MORE button (pages 31, 51, 55) The System Control keys (SYSTEM58) are displayed as the Label keys. When you press a System Control key, its macro is performed. Note No default System Control key macros are set at the factory. qd Touch-keys The keys are used for setting the Remote Commander and operating each component appear on the LCD display. Note Do not press the touch-keys using sharp objects such as pins or ball-point pens. qf SYNC-UP button (pages 25, 49, 55) Used to synchronize with the status of a component . * Note on the VOLUME +/- and MUTING buttons The Remote Commander can control or silence the TV and amplifier's volume when you select a visual or audio component. Note on the LCD display's power on/off To turn on the LCD display, press any button except the COMMANDER OFF button. To turn off the LCD display, press the COMMANDER OFF button. If you do not use the Remote Commander within 5 minutes, the LCD display automatically turns off. This interval can also be changed (page 37). qg TIMER button (pages 29, 30) Used to set the timer program on/off. 9
-
 1
1 -
2
-
3
-
 4
4 -
 5
5 -
 6
6 -
 7
7 -
 8
8 -
 9
9 -
 10
10 -
 11
11 -
 12
12 -
 13
13 -
 14
14 -
15
-
16
-
17
-
18
-
19
-
20
-
21
-
22
-
23
-
24
-
25
-
26
-
27
-
28
-
29
-
30
-
31
-
32
-
33
-
34
-
35
-
36
-
37
-
38
-
39
-
40
-
41
-
42
-
43
-
44
-
45
-
46
-
47
-
48
-
49
-
50
-
51
-
52
-
53
-
54
-
55
-
56
-
57
-
58
-
59
-
60
-
61
-
62
-
63
-
64
-
65
-
66
-
67
-
68
-
69
-
70
-
71
-
72
-
73
-
74
-
75
-
76
-
77
-
78
-
79
-
80
-
81
-
82
-
83
-
84
-
85
-
86
-
87
-
88
-
89
-
90
-
91
-
92
-
93
-
94
-
95
-
96
 |
 |
