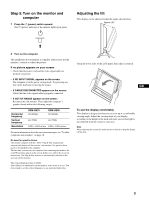
Sony SDM-HS75 Operating Instructions - Page 10
Customizing Your Monitor, Adjusting to the desired brightness, Navigating the menu - information
 |
View all Sony SDM-HS75 manuals
Add to My Manuals
Save this manual to your list of manuals |
Page 10 highlights
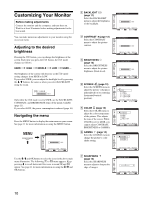
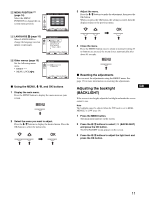
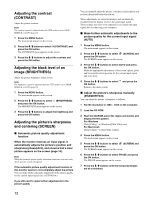
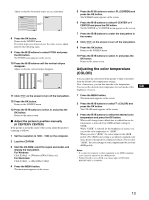
Customizing Your Monitor Before making adjustments Connect the monitor and the computer, and turn them on. Wait for at least 30 minutes before making adjustments for the best result. You can make numerous adjustments to your monitor using the on-screen menu. Adjusting to the desired brightness Pressing the button, you can change the brightness of the screen. Each time you press the button, the mode changes as follows. USER t HIGH t MIDDLE t LOW t USER ... The brightness of the screen will decrease as the mode setting changes from HIGH to LOW. If you select USER, you can adjust the backlight level by pressing the m/M buttons, the same as when you select BACKLIGHT using the menu. : USER 100 Only while the mode is set to USER, are the BACKLIGHT, CONTRAST, and BRIGHTNESS items of the menu available (page 11). If you select LOW, the power consumption is reduced (page 16). Navigating the menu Press the MENU button to display the main menu on your screen. See page 11 for more information on using the MENU button. MENU , BACKL I GHT 100 1280 x1024 / 60Hz EX I T Use the m/M and OK buttons to select the icons in the above main menu illustration. The following 1 to 0 menu appears. Keep pressing m to scroll down until the icons in menu 9 and 0 appear. See page 11 for more information on using the m/M and OK buttons. 1 BACKLIGHT (page 11) Select the BACKLIGHT menu to adjust the brightness of the backlight. 2 CONTRAST 6 (page 12) Select the CONTRAST menu to adjust the picture contrast. 3 BRIGHTNESS 8 (page 12) Select the BRIGHTNESS menu to adjust the picture brightness (black level). 4 SCREEN (page 12) Select the SCREEN menu to adjust the picture's sharpness (phase/pitch) or its centering (horizontal/vertical position). 5 COLOR (page 13) Select the COLOR menu to adjust the color temperature of the picture. This adjusts the tone of the screen. While COLOR is set to sRGB, you cannot adjust CONTRAST, BRIGHTNESS or GAMMA. 6 GAMMA (page 14) Select the GAMMA menu to change the picture's color shade setting. 7 SHARPNESS (page 14) Select the SHARPNESS menu to adjust to sharpen the edge of images. BACKL I GHT 100 1280 x1024 / 60Hz EX I T CONTRAST 100 1280 x1024 / 60Hz EX I T BR I GHTNESS 100 1280 x1024 / 60Hz EX I T SCREEN AUTO PHASE P I TCH H CENTER V CENTER 1280 x1024 / 60Hz EX I T COLOR 9300K 6500K s RGB USER ADJUST 1280 x1024 / 60Hz EX I T GAMMA GAMMA 1 GAMMA 2 GAMMA 3 1280 x1024 / 60Hz EX I T SHARPNE S S 5 1280 x1024 / 60Hz EX I T 10
-
 1
1 -
2
-
3
-
4
-
 5
5 -
 6
6 -
 7
7 -
 8
8 -
 9
9 -
 10
10 -
 11
11 -
 12
12 -
 13
13 -
 14
14 -
 15
15 -
16
-
17
-
18
-
19
-
20
 |
 |
