Sony SDM-M81 Operating Instructions - Page 11
Customizing Your Monitor, Navigating the menu - resolution
 |
View all Sony SDM-M81 manuals
Add to My Manuals
Save this manual to your list of manuals |
Page 11 highlights
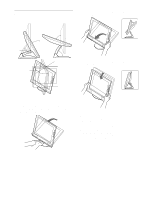
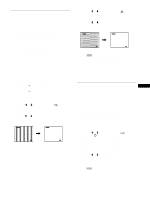
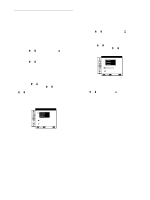
Customizing Your Monitor Before making adjustments Connect the monitor and the computer, and turn them on. Wait for at least 30 minutes before making adjustments for the best results. You can make numerous adjustments to your monitor using the on-screen menu. Navigating the menu Press the MENU button to display the main menu on your screen. For more information on using the MENU button, see "Using the MENU, M(+)/m(-), and OK buttons" on page 12 . PHASE MENU , Use the M(+)/m(-) and OK buttons to select one of the following menus. For more information on using the M(+)/m(-) and OK buttons, see "Using the MENU, M(+)/m(-), and OK buttons" on page 12. 1 PHASE (Analog RGB signal only) (page 13) Select the PHASE menu to adjust the phase when the characters or pictures appear fuzzy throughout the entire screen. Adjust the phase after adjusting the pitch. 2 PITCH (Analog RGB signal only) (page 13) Select the PITCH menu to adjust the pitch when the characters or pictures are unclear in some areas of the screen. 3 H CENTER (Analog RGB signal only) (page 13) Select the H CENTER menu to adjust the picture's horizontal centering. PHAS E 30 EX I T P I TCH 1688 EX I T H CENTER 50 EX I T 4 V CENTER (Analog RGB signal only) (page 13) Select the V CENTER menu to adjust the picture's vertical centering. V CENTER 50 5 COLOR (page 14) Select the COLOR menu to adjust the color temperature of the picture. This adjusts the tone of the screen. EX I T CO L OR 9 300K 6500K 5000K USER AD J U ST 6 ZOOM (page 15) Select the ZOOM menu to adjust the picture's size according to the input signal's aspect ratio or resolution. 7 SMOOTHING (page 15) Select the SMOOTHING menu to adjust the picture's sharpness according to the type of an object displayed on the screen. 8 MENU POSITION (page 15) Select the MENU POSITION menu to change the on-screen menu position. EX I T ZOOM FUL L 2 FUL L 1 REA L EX I T SMOOTH I NG T EX T S T ANDARD GRAPH I CS EX I T MENU POS I T I ON 9 Other menus (page 16) Select the m to adjust other settings listed below. • RESET • AUDIO SELECT • BACKLIGHT • POWER SAVE • LANGUAGE • MENU LOCK EX I T RESET 0 S CREEN RESE T AL L RESET EX I T GB 11
-
 1
1 -
2
-
3
-
4
-
5
-
 6
6 -
 7
7 -
 8
8 -
 9
9 -
 10
10 -
 11
11 -
 12
12 -
 13
13 -
 14
14 -
 15
15 -
 16
16 -
17
-
18
-
19
-
20
-
21
-
22
-
23
-
24
-
25
-
26
-
27
-
28
-
29
-
30
-
31
-
32
-
33
-
34
-
35
-
36
-
37
-
38
-
39
-
40
-
41
-
42
-
43
-
44
-
45
-
46
-
47
-
48
-
49
-
50
-
51
-
52
-
53
-
54
-
55
-
56
-
57
-
58
-
59
-
60
-
61
-
62
-
63
-
64
-
65
-
66
-
67
-
68
-
69
-
70
-
71
-
72
-
73
-
74
-
75
-
76
-
77
-
78
-
79
-
80
-
81
-
82
-
83
-
84
-
85
-
86
-
87
-
88
-
89
-
90
-
91
-
92
-
93
-
94
-
95
-
96
-
97
-
98
-
99
-
100
-
101
-
102
-
103
-
104
 |
 |