Sony SDM-N50PS Operating Instructions (primary manual) - Page 10
Installing the display vertically, Using the headphones
 |
View all Sony SDM-N50PS manuals
Add to My Manuals
Save this manual to your list of manuals |
Page 10 highlights
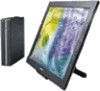
Installing the display vertically This display can be installed either horizontally or vertically using the supplied display stand. To switch to the horizontal or vertical viewing position First install the supplied WinPortrait (for Windws 95/98 and NT4.0) or MacPortrait (for Macintosh). To switch the view, press Shift + Ctrl + R on the keyboard. For more information, see the supplied software's instruction manual. To install the display horizontally or vertically Open the display stand until the click sound is heard. Put the display on the stand, aligning the mark which shows the stand position on the display. Horizontal installation The stand positioning mark Vertical installation To close the display stand While sliding the stopper up, close the display stand. The stopper Using the headphones You can listen to the audio signals from your computer or other audio equipment using headphones. Connect the AUDIO IN jack to the audio output jack of your computer or other audio equipment using the supplied audio cord. Adjusting the volume 1 Press the 2 +/- buttons. The VOLUME menu appears on the screen. VOL UME , 40 The stand positioning mark 2 Press the 2 +/- button to adjust the volume. The menu automatically disappears after about 3 seconds. Notes • You cannot adjust the volume when displaying the main menu on the screen. • When your monitor is in power saving mode, no sound comes from the headphones. 10
-
 1
1 -
2
-
3
-
4
-
 5
5 -
 6
6 -
 7
7 -
 8
8 -
 9
9 -
 10
10 -
 11
11 -
 12
12 -
 13
13 -
 14
14 -
 15
15 -
16
-
17
-
18
-
19
-
20
-
21
-
22
-
23
-
24
-
25
-
26
-
27
-
28
-
29
-
30
-
31
-
32
-
33
-
34
-
35
-
36
-
37
-
38
-
39
-
40
-
41
-
42
-
43
-
44
-
45
-
46
-
47
-
48
-
49
-
50
-
51
-
52
-
53
-
54
-
55
-
56
-
57
-
58
-
59
-
60
-
61
-
62
-
63
-
64
-
65
-
66
-
67
-
68
-
69
-
70
-
71
-
72
-
73
-
74
-
75
-
76
-
77
-
78
-
79
-
80
-
81
-
82
-
83
-
84
-
85
-
86
-
87
-
88
-
89
-
90
-
91
-
92
-
93
-
94
-
95
-
96
-
97
-
98
-
99
-
100
-
101
-
102
-
103
-
104
 |
 |
