Sony SNC-RZ50N User Guide - Page 58
Creating a security group for Active, Directory, Configuring the Internet Authentication, Service
 |
UPC - 027242240377
View all Sony SNC-RZ50N manuals
Add to My Manuals
Save this manual to your list of manuals |
Page 58 highlights
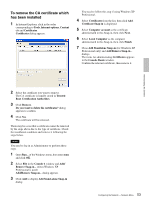
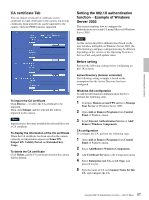
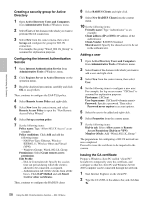
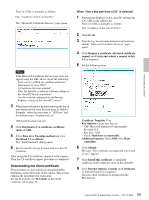
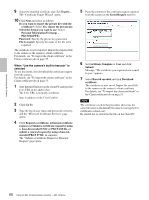
Administrating the Camera Creating a security group for Active Directory 1 Open Active Directory Users and Computers from Administrative Tools of Windows menu. 2 Select Users of the domain with which you want to perform 802.1X connection. 3 Select New from the context menu, then select Group and configure the group for 802.1X connection. For example, the group "Wired_802.1X_Group" is assumed for explanation purposes. Configuring the Internet Authentication Service 1 Open Internet Authentication Service from Administrative Tools of Windows menu. 2 Click Register Server in Active Directory on the operation menu. 3 Read the displayed precautions carefully and click OK to accept them. Then, continue to configure the EAP-TLS policy. 4 Select Remote Access Policy and right-click. 5 Select New from the context menu, and select Remote Access Policy to open the "New Remote Access Policy Wizard." 6 Select Set up a custom policy. 7 Set the following items: Policy name: Type "Allow 802.1X Access" as an example. Policy conditions: Click Add and add the following items: - NAS Port-Type: Ethernet, WirelessIEEE802.11, Wireless-Other and Virtual (VPN) - Windows-Groups: Wired_802.1X_Group Permissions: Select Grant remote access permission. Edit Profile: - Dial-in Constraints tab: Specify the session time out period during which the client is allowed to be connected, as required. - Authentication tab: Delete checks from all the boxes. Click EAP Method and add Smart Card or other certificates. Then, continue to configure the RADIUS client. 8 Select RADIUS Clients and right-click. 9 Select New RADIUS Client from the context menu. 10 Set the following items: Friendly name: Type "authenticator" as an example. Client address (IP or DNS): IP address of the authenticator Client-Vender: RADIUS Standard Shared secret: Specify the shared secret to be set in the authenticator. Adding a user 1 Open Active Directory Users and Computers from Administrative Tools of Windows menu. 2 Select Users of the domain with which you want to add a user and right-click. 3 Select New from the context menu, then select User. 4 Set the following items to configure a new user: For example, the log-on user name "1XClient" is assumed for explanation purposes. First name: 1XClient User logon name: 1XClient@ Password: Specify a password. Then select Password never expires in account options. 5 Select the user to be added and right-click. 6 Select Properties from the context menu. 7 Set the following items: Dial-in tab: Select Allow access in Remote Access Permission (Dial-in or VPN) Member Of tab: Add "Wired_802.1X_Group." The preparations for configuring a 802.1X network are now completed. Proceed to issue the certificate to be imported to the camera. Issuing the CA certificate Prepare a Windows client PC (called "client PC" hereafter) to temporarily store the certificate, and configure so that the client PC and Windows Server 2003 computer can be connected through the network. 1 Start Internet Explorer on the client PC. 2 Type the CA's URL in the address bar, and click Go To. 58 Using the 802.1X Authentication Function - 802.1X Menu
-
 1
1 -
2
-
3
-
4
-
5
-
6
-
7
-
8
-
9
-
10
-
11
-
12
-
13
-
14
-
15
-
16
-
17
-
18
-
19
-
20
-
21
-
22
-
23
-
24
-
25
-
26
-
27
-
28
-
29
-
30
-
31
-
32
-
33
-
34
-
35
-
36
-
37
-
38
-
39
-
40
-
41
-
42
-
43
-
44
-
45
-
46
-
47
-
48
-
49
-
50
-
51
-
52
-
 53
53 -
 54
54 -
 55
55 -
 56
56 -
 57
57 -
 58
58 -
 59
59 -
 60
60 -
 61
61 -
 62
62 -
 63
63 -
64
-
65
-
66
-
67
-
68
-
69
-
70
-
71
-
72
-
73
-
74
-
75
-
76
-
77
-
78
-
79
-
80
-
81
-
82
-
83
-
84
-
85
-
86
-
87
-
88
-
89
-
90
-
91
-
92
-
93
-
94
-
95
-
96
-
97
-
98
-
99
-
100
-
101
-
102
-
103
-
104
-
105
-
106
-
107
-
108
-
109
-
110
-
111
-
112
-
113
-
114
-
115
-
116
-
117
-
118
-
119
-
120
 |
 |
