Sony SPP-A968 Operating Instructions - Page 14
Identifying the parts, ANSWER ON/OFF button - greeting
 |
View all Sony SPP-A968 manuals
Add to My Manuals
Save this manual to your list of manuals |
Page 14 highlights
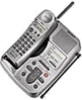
Identifying the parts Refer to the pages indicated in parentheses for details. Base Unit 1 2 3 4 5 6 7 8 1 Display window (p.9, 34) 2 IN USE lamp Lights when the cordless handset is in use. 3 CHARGE lamp (p. 11) Lights while the battery is being charged. 4 GREETING button (p. 29) Plays back the greeting message. Also used when recording a greeting. 5 ERASE button (p. 30, 34) Erases the recorded greeting or messages. 6 REPEAT/SLOW button (p. 28, 34) Press to repeat the current message or go back to the previous message. Keep the button pressed for slow playback of messages. 7 MEMO button (p. 36) Records a memo message. 8 MIC (microphone) (p. 29, 36) 14US Getting Started 9 0 qa qs qd qf qg qh qj qk 9 Antenna (p. 9, 47) 0 Speaker qa VOLUME +/- buttons (p. 34) Adjusts the speaker volume. qs TIME button (p. 28) Press when setting the day andtime, or to check the current time. qd SET/REC button (p. 28, 29, 37) Press to set the time or to record a greeting. Also used when setting the remote ID code (security code). qf Wall bracket/stand for base unit (p. 9, 47) qg ANSWER ON/OFF button (p. 33) Turns the answering function on or off. Lights when the answering function is on, and flashes when a new message is recorded. Also used when setting the remote ID code (security code). qh SKIP/QUICK button (p. 28, 34) Press to skip to the next message. Keep the button pressed for quick playback of messages.
-
 1
1 -
2
-
3
-
4
-
5
-
6
-
7
-
8
-
 9
9 -
 10
10 -
 11
11 -
 12
12 -
 13
13 -
 14
14 -
 15
15 -
 16
16 -
 17
17 -
 18
18 -
 19
19 -
20
-
21
-
22
-
23
-
24
-
25
-
26
-
27
-
28
-
29
-
30
-
31
-
32
-
33
-
34
-
35
-
36
-
37
-
38
-
39
-
40
-
41
-
42
-
43
-
44
-
45
-
46
-
47
-
48
-
49
-
50
-
51
-
52
-
53
-
54
-
55
-
56
-
57
-
58
-
59
-
60
-
61
-
62
-
63
-
64
-
65
-
66
-
67
-
68
-
69
-
70
-
71
-
72
-
73
-
74
-
75
-
76
-
77
-
78
-
79
-
80
-
81
-
82
-
83
-
84
-
85
-
86
-
87
-
88
-
89
-
90
-
91
-
92
-
93
-
94
-
95
-
96
-
97
-
98
-
99
-
100
-
101
-
102
-
103
-
104
-
105
-
106
-
107
-
108
-
109
-
110
-
111
-
112
 |
 |
