Sony STR-DA5600ES Operating Instructions (Large File - 18.8 MB) - Page 135
Operating without connecting to a TV, Turn on the receiver., Press MENU., Press, repeatedly to select
 |
View all Sony STR-DA5600ES manuals
Add to My Manuals
Save this manual to your list of manuals |
Page 135 highlights
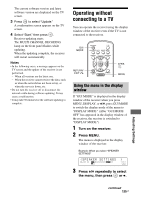
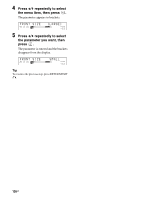
The current software version and latest software version are displayed on the TV screen. 3 Press to select "Update." A confirmation screen appears on the TV screen. 4 Select "Start," then press . Receiver updating starts. The MULTI CHANNEL DECODING lamp on the front panel flashes while updating. When the updating complete, the receiver will restart automatically. Notes • In the following cases, a message appears on the TV screen and the update of the receiver is not performed. - When all versions are the latest one. - When the receiver cannot retrieve the data, such as when the network has not been set up, or when the server is down, etc. • Do not turn the receiver off or disconnect the network cable during software updating. It may cause a malfunction. • It may take 50 minutes for the software updating to complete. Operating without connecting to a TV You can operate the receiver using the display window of the receiver even if the TV is not connected to the receiver. GUI MODE RETURN/ EXIT O V/v/b, MENU Using the menu in the display window If "GUI MODE" is displayed in the display window of the receiver when you press MENU, DISPLAY, or V/v, press GUI MODE to switch the display mode of the menu to "DISPLAY MODE." (After "GUI MODE OFF" has appeared in the display window of the receiver, the receiver is switched to "DISPLAY MODE.") 1 Turn on the receiver. 2 Press MENU. The menu is displayed in the display window of the receiver. Example: When you select "SPEAKER SETTINGS" Adjusting Settings 3 Press V/v repeatedly to select the menu, then press or b. continued 135GB
-
 1
1 -
2
-
3
-
4
-
5
-
6
-
7
-
8
-
9
-
10
-
11
-
12
-
13
-
14
-
15
-
16
-
17
-
18
-
19
-
20
-
21
-
22
-
23
-
24
-
25
-
26
-
27
-
28
-
29
-
30
-
31
-
32
-
33
-
34
-
35
-
36
-
37
-
38
-
39
-
40
-
41
-
42
-
43
-
44
-
45
-
46
-
47
-
48
-
49
-
50
-
51
-
52
-
53
-
54
-
55
-
56
-
57
-
58
-
59
-
60
-
61
-
62
-
63
-
64
-
65
-
66
-
67
-
68
-
69
-
70
-
71
-
72
-
73
-
74
-
75
-
76
-
77
-
78
-
79
-
80
-
81
-
82
-
83
-
84
-
85
-
86
-
87
-
88
-
89
-
90
-
91
-
92
-
93
-
94
-
95
-
96
-
97
-
98
-
99
-
100
-
101
-
102
-
103
-
104
-
105
-
106
-
107
-
108
-
109
-
110
-
111
-
112
-
113
-
114
-
115
-
116
-
117
-
118
-
119
-
120
-
121
-
122
-
123
-
124
-
125
-
126
-
127
-
128
-
129
-
 130
130 -
 131
131 -
 132
132 -
 133
133 -
 134
134 -
 135
135 -
 136
136 -
 137
137 -
 138
138 -
 139
139 -
 140
140 -
141
-
142
-
143
-
144
-
145
-
146
-
147
-
148
-
149
-
150
-
151
-
152
-
153
-
154
-
155
-
156
-
157
-
158
-
159
-
160
-
161
-
162
-
163
-
164
-
165
-
166
-
167
-
168
-
169
-
170
-
171
-
172
-
173
-
174
-
175
-
176
-
177
-
178
 |
 |
