Sony STR-DA5600ES Operating Instructions (Large File - 18.8 MB) - Page 99
Switching the zone setting of the remote
 |
View all Sony STR-DA5600ES manuals
Add to My Manuals
Save this manual to your list of manuals |
Page 99 highlights
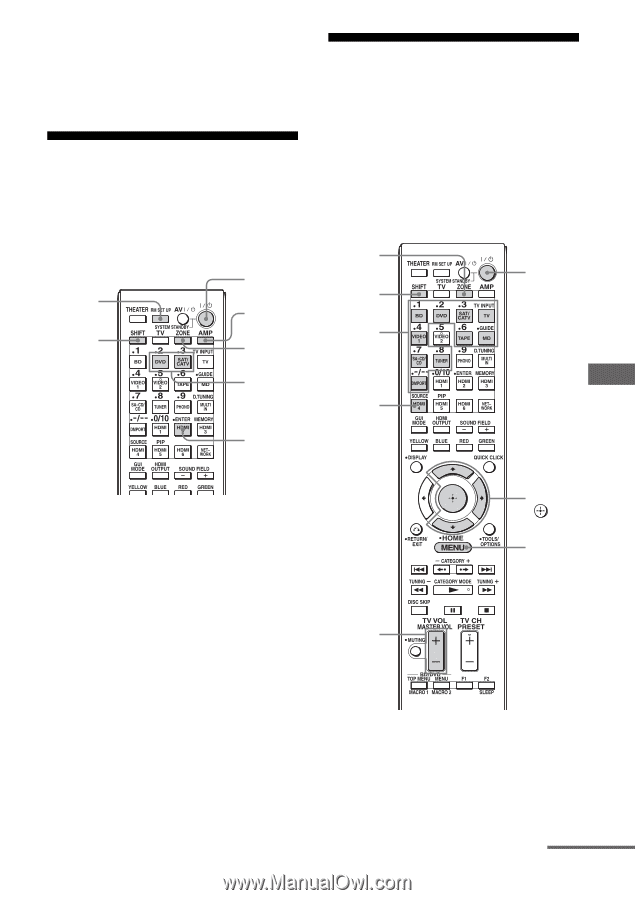
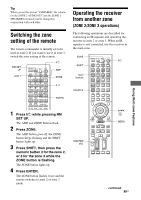
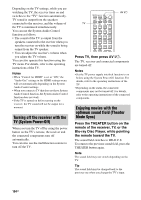
Tip When you set this item to "VARIABLE," the volume for the ZONE 2 AUDIO OUT and the ZONE 2 SPEAKERS terminals can be changed in conjunction with each other. Switching the zone setting of the remote The remote commander is initially set to be used in zone 2. If you want to use it in zone 3, switch the zone setting of the remote. RM SET UP ?/1 AMP SHIFT ZONE 2, 3 ENTER Operating the receiver from another zone (ZONE 2/ZONE 3 operations) The following operations are described for connecting an IR repeater and operating the receiver in zone 2 or zone 3. When an IR repeater is not connected, use this receiver in the main zone. ZONE ?/1 SHIFT Input buttons SOURCE Using Multi-zone Features 1 Press ?/1 while pressing RM SET UP. The AMP and ZONE buttons flash. 2 Press ZONE. The AMP button goes off, the ZONE button keeps flashing and the SHIFT button lights up. 3 Press SHIFT, then press the numeric button 2 for the zone 2, or 3 for the zone 3 while the ZONE button is flashing. The ZONE button lights up. 4 Press ENTER. The ZONE button flashes twice and the remote switches to zone 2 or zone 3 mode. MASTER VOL V/v/b, MENU continued 99GB
-
 1
1 -
2
-
3
-
4
-
5
-
6
-
7
-
8
-
9
-
10
-
11
-
12
-
13
-
14
-
15
-
16
-
17
-
18
-
19
-
20
-
21
-
22
-
23
-
24
-
25
-
26
-
27
-
28
-
29
-
30
-
31
-
32
-
33
-
34
-
35
-
36
-
37
-
38
-
39
-
40
-
41
-
42
-
43
-
44
-
45
-
46
-
47
-
48
-
49
-
50
-
51
-
52
-
53
-
54
-
55
-
56
-
57
-
58
-
59
-
60
-
61
-
62
-
63
-
64
-
65
-
66
-
67
-
68
-
69
-
70
-
71
-
72
-
73
-
74
-
75
-
76
-
77
-
78
-
79
-
80
-
81
-
82
-
83
-
84
-
85
-
86
-
87
-
88
-
89
-
90
-
91
-
92
-
93
-
 94
94 -
 95
95 -
 96
96 -
 97
97 -
 98
98 -
 99
99 -
 100
100 -
 101
101 -
 102
102 -
 103
103 -
 104
104 -
105
-
106
-
107
-
108
-
109
-
110
-
111
-
112
-
113
-
114
-
115
-
116
-
117
-
118
-
119
-
120
-
121
-
122
-
123
-
124
-
125
-
126
-
127
-
128
-
129
-
130
-
131
-
132
-
133
-
134
-
135
-
136
-
137
-
138
-
139
-
140
-
141
-
142
-
143
-
144
-
145
-
146
-
147
-
148
-
149
-
150
-
151
-
152
-
153
-
154
-
155
-
156
-
157
-
158
-
159
-
160
-
161
-
162
-
163
-
164
-
165
-
166
-
167
-
168
-
169
-
170
-
171
-
172
-
173
-
174
-
175
-
176
-
177
-
178
 |
 |