Sony STR-DE815G Operating Instructions - Page 32
Recording, other, components, video
 |
View all Sony STR-DE815G manuals
Add to My Manuals
Save this manual to your list of manuals |
Page 32 highlights
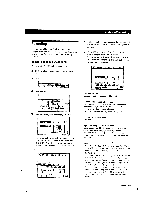
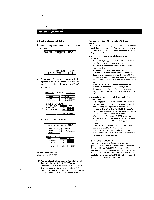
Playback/Recording ■ Recording other components to video tape 1 Click FUNCTION in the main menu. 2 Click the video playback component you want (VCR 1, VCR 2, LD/DVD, etc.). 3 Click REC. (If you selected LD/DVD or TV/DBS* in step 2 click SUB.) SUB USER I 01') 4 Click REC EDIT. (If you selected LD/DVD or TV/DBS* in step 2 click REC EDIT in the sub menu.) CH +I IBUB I I USER REC DIT REC I CANCEL 5 Click a recording component (e.g., VIDEO 2). VIDEO 1 IDEO 1 VIDEO 2 DAT/MD TAPE E. EXIT The control buttons for both components appear. "PLAYER" for the playback component, and "RECORDER" for the recording component. The arrow indicates the operative component. arrow FUNCTION SOUND SETUP 7 Click REC to start recording, then click the play button (110.-) on the PLAYER control. Recording starts. Do not click any RECORDER controls while recording. This will cut off the source being recorded. To stop recording Click the recording component's ■ control. To control the recorder after recording Click RECORDER. RECORDER becomes the operative component and you can use the RECORDER controls to rewind and playback the recording (etc.). Click PLAYER to operate the playback component. To return to the main menu Click EXIT. III Recording TV programs to video tape 1 Click FUNCTION in the main menu and select a VCR 1 or 2. 2 Tune in the TV program on your video deck. 3 Click REC. -I 1.4 SUB USER I all • I U RCS 4 Click REC again to start recording. CH +IISUBI IUSERI 01') REC EDIT R C CANCEL PLAYER ICI3 uuVIDEO 1 II RECORDER Ens REC VIDEO 2i_I L!_ .I II L' E. EXIT 6 Insert a blank tape into the recording component (VCR, etc.) and adjust the recording level, if necessary. 32
-
 1
1 -
2
-
3
-
4
-
5
-
6
-
7
-
8
-
9
-
10
-
11
-
12
-
13
-
14
-
15
-
16
-
17
-
18
-
19
-
20
-
21
-
22
-
23
-
24
-
25
-
26
-
 27
27 -
 28
28 -
 29
29 -
 30
30 -
 31
31 -
 32
32 -
 33
33 -
 34
34 -
 35
35 -
 36
36 -
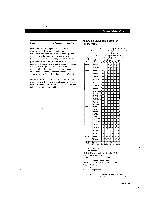 37
37 -
38
-
39
-
40
-
41
-
42
-
43
-
44
-
45
-
46
-
47
-
48
-
49
-
50
-
51
-
52
-
53
-
54
-
55
-
56
-
57
-
58
-
59
-
60
-
61
-
62
-
63
-
64
-
65
 |
 |
