Sony STR-DH770 Operating Instructions - Page 28
Setting up the Receiver using the Easy Setup, Before you perform Auto, Calibration
 |
View all Sony STR-DH770 manuals
Add to My Manuals
Save this manual to your list of manuals |
Page 28 highlights
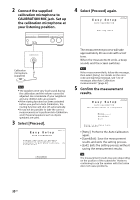
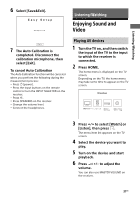
Setting up the Receiver using the Easy Setup To perform initial setup of the receiver, make sure a TV is connected to the receiver (page 22, 23). Then, switch the input of the TV to the input to which the receiver is connected. Note It is not possible to perform the Easy Setup procedure using the indications on the display panel. When you turn on the receiver for the first time or after the receiver is initialized, the Easy Setup screen appears on the TV screen. If the Easy Setup screen does not appear or you want to display the Easy Setup screen manually, you can display it by pressing HOME, then select [Easy Setup]. What you can do with Easy Setup By performing Easy Setup, you can complete: 1: Selecting the language 2: Selecting the Surround Back Speakers Assign Set the assignment for the SPEAKERS SURROUND BACK/BI-AMP/FRONT HIGH/ FRONT B terminals. 3: Performing the Auto Calibration Perform automatic calibration according to the configuration and arrangement of your speaker system. Before you perform Auto Calibration Disconnect the headphones. Remove any obstacles between the calibration microphone and the speakers. For accurate measurement, make sure the environment is quiet and free from noise. Set the speaker output to a setting other than "SPK OFF". For details, see "Selecting the front speakers" (page 29). Confirm the active subwoofer setup When a subwoofer is connected, turn on the subwoofer and turn up the volume prior to activating the subwoofer. Turn the LEVEL to just before the mid-point. If you connect a subwoofer with a crossover frequency function, set the value to maximum. If you connect a subwoofer with an auto standby function, set it to off (deactivated). Note Depending on the characteristics of the subwoofer you are using, the setup distance value may be different from the actual position. 28GB
-
 1
1 -
2
-
3
-
4
-
5
-
6
-
7
-
8
-
9
-
10
-
11
-
12
-
13
-
14
-
15
-
16
-
17
-
18
-
19
-
20
-
21
-
22
-
 23
23 -
 24
24 -
 25
25 -
 26
26 -
 27
27 -
 28
28 -
 29
29 -
 30
30 -
 31
31 -
 32
32 -
 33
33 -
34
-
35
-
36
-
37
-
38
-
39
-
40
-
41
-
42
-
43
-
44
 |
 |
